Screenshot: Google Recognizes Sarasota as its 2014 eCity for Florida
This “big little city” that we call home and affectionately refer to as “Paradise” has been recognized by Google for having the, “strongest online business community,” in the State of Florida.
The award represents Google’s belief that businesses in Sarasota are embracing new technology to find and connect with customers.
Google uses its own data, including Search, ad revenue (both fees paid to Google by advertisers and fees paid by Google to publishers), and Ad Grants (provided by Google to non-profits) to estimate the economic impact of Google on each area. This forms the basis of its determination that local businesses are embracing technology.
ABC 7 reported on the reactions from some local businesses following a ceremony yesterday with the Mayor and City Manager.
The Herald-Tribune apparently also reported on the award, but their absurd paywall prevents us from accessing the article, so we won’t bother to link to it.
Congratulations to all of our local businesses who have endeavored to build out a presence online, use social media and other tools, and effectively generate a return on investment with digital advertising tools.
TL;DR: The RAM wasn’t seated properly. Like… for a long time. And I’m a geek who should know better. Try reseating your RAM.
I’ve had this machine for almost 3 years (in itself a record, but that’s another blog post). It was a nice middle-of-the-road machine that I bought after an uncharacteristically brief research period. Suffice it to say that I wasn’t expecting it to last long, since I am (at times) a bit of a road warrior and it was purchased to be my daily driver.
I realized it was slowing down some about a year after purchasing it. So, I did the obvious and bought new RAM for it. In fact, I doubled the RAM that day… or at least that was the intention. I happily removed the factory-installed 2GB memory sticks and popped in fresh 4GB ones.
Imagine my horror when, on boot, Windows reported 4GB of RAM.
What?! There must be some mistake.
I shut the machine down, re-seated the new RAM (and verified that I had, in fact, put the new sticks in). Rebooted. 4GB.
One of the new sticks must be bad, I thought.
So… I swapped them. Still 4GB. So… it isn’t the sticks. Must be one of the slots.
So… I booted up with a stick in only one of the 2 slots. Machine worked. 4GB.
With a stick in only the 2nd slot, the machine never came up.
Just to be sure, I put the original RAM in. Booted up with what should’ve been 4GB (2 x 2GB sticks). BIOS and Windows both reported only 2GB.
Shoot. The 2nd slot is dead. No wonder it’s been running slow!!
I contacted Gateway, since I was just inside the warranty period. After explaining my predicament, they authorized an RMA. All I had to do was ship the machine in.
That was 2 years ago. I didn’t have time then, nor have I had it since, to be without my daily driver for the time it would take them to fix it up and ship it back.
So… I decided—more through inaction than anything else—to live with it. And it really hasn’t been too bad, frankly.
A few months ago, I decided that an SSD upgrade would be a nice boost, and that did wonders for the machine’s performance. In fact, it was so nice that it made me think I might be able to hang on to this machine for maybe even a whole year more!
But for the last few months… I’ve started to really bump up against the upper limits of this thing’s performance. Maybe its my habit of having too many Chrome tabs open… or maybe everything just uses more resources now… but with 2 screens full of Google Chrome and one of the Adobe products (usually Photoshop) running, I’d find that my physical memory usage was at 99%. Even worse: I started getting warnings about low memory.
Yechhh….
So… today, on a whim, I decided to open the case and just try to fix it.
I could never understand why on earth there was no physical sign of difficulty. The slots both appear to be soldered nicely to the motherboard. There’s no hint of cracking on the motherboard itself, nor on the physical structures that make up the slots. The machine has undergone no trauma of which I’m aware… unlike the machine before this, which I managed to run over with my convertible one day.
So… I went through the gamut of test all over again. All this time, I’ve had a RAM stick sitting in the “dead” slot not doing anything. It never seemed like there was a good reason to remove it, so I left it.
After doing some tests… even flashing the latest BIOS from the manufacturer, I was unsuccessful and not really getting anywhere. So… I ran some Google searches about dead memory slots. I even ran across one post that showed a nifty memory slot fix involving a guitar pick. It just so happened that I had a guitar pick handy, but that didn’t help.
Now… let me just say that for the last 21 years, my daily work has revolved around technology. For large chunks of that time, fixing technology was even a major component of my life. I do my own IT support, and always have. In fact, right or wrong, I handle all of our own internal IT needs.
…which is why I feel really stupid saying what I’m about to say.
I don’t honestly know know which board I was reading (I’ve gone back to look at the pages I visited today while trying to solve this, and I haven’t found it)… but some joker in a thread about dead memory slots actually made a remark that went something like this:
Any chances you seated the RAM incorrectly 3 times in a row? I’ve done it.
I didn’t think too much about it at the time… probably due to my vast IT experience. But as I continued tinkering, it started to haunt me.
Wouldn’t you know it?
I opened everything back up, looked at slot number 2, and realized the memory stick wasn’t seated.
Could it be that simple? Have I done without the full capacity of my hardware for 2 years over a failure to seat a memory stick properly?
Yep.
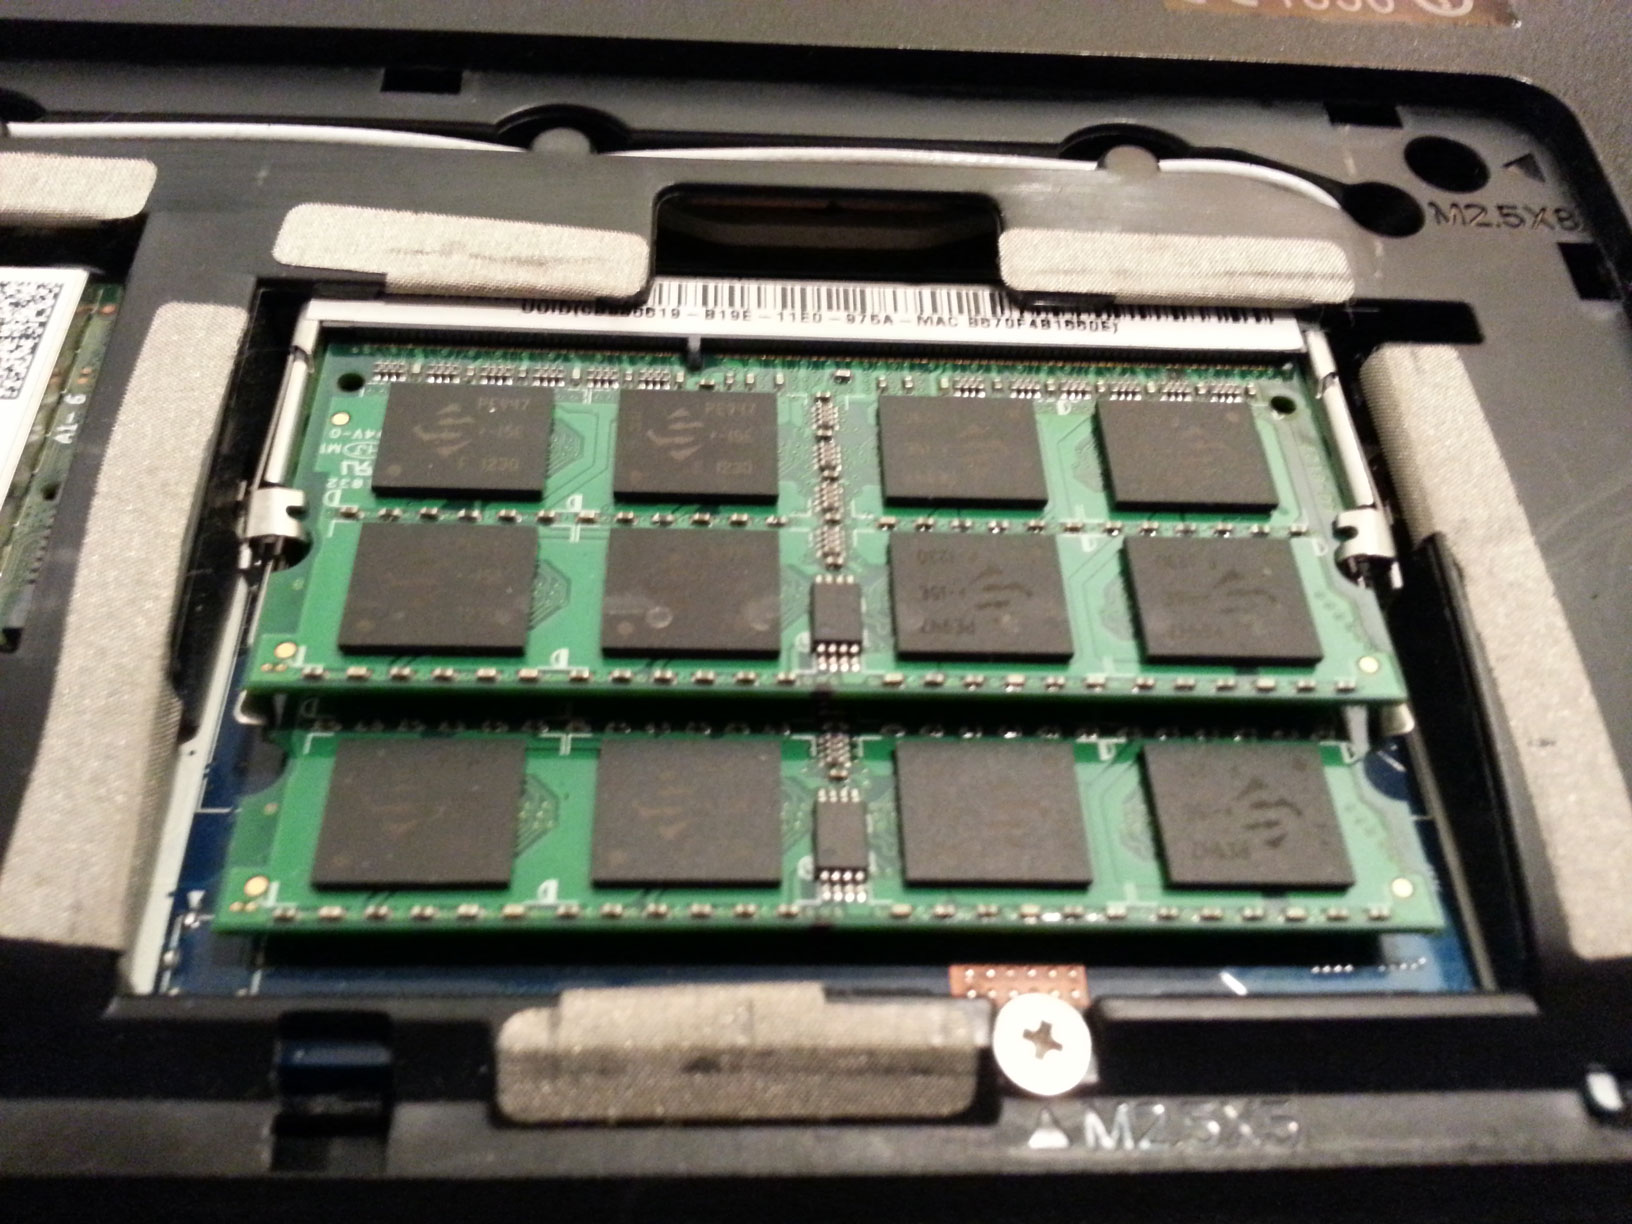
I’m typing this on my newly responsive machine with 8GB of RAM.
Sheesh.
Here’s what my (properly seated) RAM looks like now
Since none of us use cash anymore (except for that one guy in accounting), often your PIN code is the only thing standing between a would-be thief and the piles of treasure you have stashed in your checking account.
Actually, the card plus PIN number is a reasonably good, if simple, implementation of the “something you have” plus “something you know” principle of security. Neither the card nor the PIN number is much good without the other. (We’re ignoring the fact that most debit cards can also be processed as credit cards for the moment.)
Obviously, hanging on to the card itself is a good start, so that covers the “something you have” side of the equation. But sleight of hand, accidental drops, and old-fashioned purse-snatching still happen today.
So that leaves us with the “something you know“Â piece: your PIN.
Why Be Concerned About Infrared PIN Theft?
Being a security-minded person, I’m sure you’re already in the habit of covering your fingers when entering PIN numbers. After all, it takes only a tiny bit of effort, and it prevents cameras and sneaky eyes from catching what you’re entering, right?
But what about heat?
You did know your fingers transferred heat to those keys, right?
And since heat dissipates at a linear rate, the heat signature reveals not just which keys got pressed, but also the order in which they were pressed!
But that’s not really a problem, right? After all, who has equipment that can detect heat?
Until recently, the ability to walk up to a PIN pad and detect which buttons had just been pressed required an expensive (and bulky!) infrared camera that would pick up the heat signature left by your fingers.
But with the advent of relatively inexpensive ($349) iPhone attachments,  infrared smartphone camera technology is easily within reach of a ne’er-do-well… especially since they might recoup that much or more in just one ATM transaction. But even for one who’s looking for something less expensive (or who uses an Android device instead of an iPhone), there’s this Kickstarter project, or even a tutorial on how to build one with an old floppy disk! (…for the Macgyver types, evidently).
In other words: stealing your PIN even up to 1 minute after you enter it is pretty easy these days.
So What’s the Solution?
It’s pretty simple, really. Just touch your fingers to several buttons and hold them there while you’re entering your PIN.
Heat multiple buttons up, obfuscate the ones you pressed.
Not so sure about all of this? Mark Rober made this video to demonstrate:
Oh yeah… and don’t use PINs that are easy to guess!
Dropbox today announced that “Pro” accounts, which pay $9.95/month, will get an automatic bump to 1TB of storage (from 100GB). Nice!
Even better, we’re getting new features like remote wipe for devices, and something I’ve wanted for a long time:Â expirations for shared links.
Once you send out a shared link, you no longer have any control over how many times it’s shared or used by those to whom you have not intentionally granted permissions.
They’ve also added passwords for shared links, which is nice for when you want to have a little additional control over stuff that gets out in the wild.
Granted, it’s still remarkably easy for a malicious person to push your files out to the world, so these are perhaps small blessings, but nevertheless, I feel they’ll be helpful.
One of my great disappointments in life came several years ago when I made the switch to a 64-bit OS for the first time: a 64-bit build of Google Chrome simply did not exist!
OK, I might be exaggerating my disappointment. But only slightly.
But life went on. After a while, my incessant checking for news on this all-important development slowed from daily… to weekly… to… I can’t even remember when I last looked.
And to be honest, I haven’t cared. 32-bit Chrome has been fine… until the last couple of months. I’ve noticed it has begun to consume more and more of my aging laptop’s finite memory. This could, of course, have something to do with the sheer number of tabs and background apps (running in Chrome) that I have open. But that’s beside the point.
Your browser is, after all, likely to be your single most-used piece of software—especially if (like me) you long ago ditched other email clients.
So it came as quite the surprise last night when the Ars Technica announcement zipped by one of my news feeds.
But it was late when I saw it, so I waited till this morning to install it.
The upgrade process to 64-bit Google Chrome was fairly simple, but one step left me questioning whether it had worked, so…
How to Upgrade to the 64-Bit Version of Chrome
There’s currently no upgrade path within Chrome itself to get you over to the 64-bit development channel—making the switch is a manual opt-in process. Here’s how to do it:
Head on over to the official Chrome download page and look for the line that says “You can also download Chrome for Windows 64-bit.” Click the bold words “Windows 64-bit,” which will switch things around so that when you hit the big blue “Download Chrome” button, you’ll get the one you want. Currently, you’re out of luck if you’re a Mac user. (Linux users have had access to 64-bit Chromium for a while now.)
Optional step: At this point, I bookmarked all my open tabs just in case they got lost during the upgrade process. I wasn’t sure how this was gonna go down… so, I’d rather be safe than sorry. I then closed Chrome.
Double-click the Chrome-Setup.exe file that you just downloaded and let it run. This ran and completed, leaving me wondering what the heck had happened. Did it update my Chrome shortcuts in the Start Menu, Taskbar, and Desktop? I don’t know? Will I still be launching the 32-bit version of I click one? I don’t know!
Launch Chrome again. If you’re experience is like mine, all your tabs will reopen and everything will go back to the way it was. Hmmmmm….
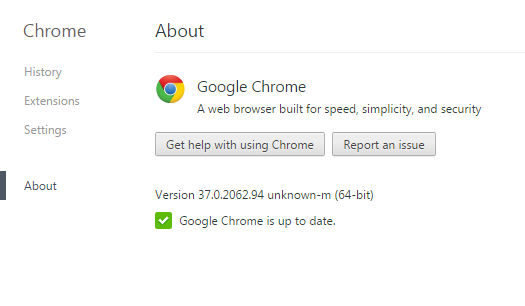
Head over to your hamburger menu and click the “About Google Chrome” item (or just open a tab and type chrome://chrome/ in the address bar). You’ll see a message that reads something pretty close to “Google Chrome is almost finished updating. Relaunch Chrome to complete the update.” (I didn’t screen shot it, but you’ll know it when you see it.) There’s a handy “Relaunch” button.
When Chrome restarts, check chrome://chrome/ again. You should see a shiny new version message like Version 37.0.2062.94 unknown-m (64-bit). The beauty is the “(64-bit)” at the end, of course.
So How Is It?
OK so it’s admittedly a bit early for real serious feedback here. But my preliminary thoughts are pretty solid.
So far, I can’t tell that it’s making any better use of memory (this is one of its promised benefits thanks to they availability of better addressing). But, it’s nice and zippy. The memory usage may not have actually been the real problem I’d been experiencing with the 32-bit version. We’ll see.
Fonts are visibly better. For whatever reason, Chrome has been really bad with font rendering… so much so that I almost made the switch to Firefox over it! This has made me happy.
I’ve had no problems with any of my extensions. I wasn’t expecting any, but the announcement post on the Chromium blog and the Ars story both mentioned lack of support for 32-bit NPAPI plugins. This means you may need to update Silverlight and Java. (I haven’t tried Netflix yet, but I don’t use it on my computer very often anyway. We’ll see what happens.)
All in all… so far, so good. I’ll plan on a more thorough write-up after I’ve had some time behind the wheel. But for now… I’d say go for it!
Today I had an unusual situation with my Amazon account. It started when I tried to log in to Amazon Web Services (AWS) to upload some files to my S3 account.
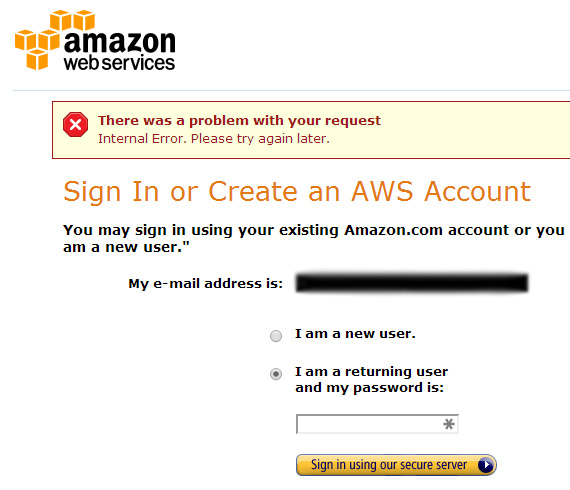
After entering my email address and password, I saw the following error:
“There was a problem with your request Internal Error. Please try again later.”
Being the understanding user that I am, I waited awhile and tried again later as requested. Same problem.
I went on to work on some other projects, but eventually came back to this because I really needed get the files into S3. Same problem.
Here’s a screenshot of the sign-in error:
Amazon Support: Puzzled
Initially, I tweeted my issue because I wondered if perhaps it might be affecting multiple users.
Anyone else having trouble at signin to @awscloud ? "Internal Error. Please try again later."
There was no way to log in to the support site to post my issue… because I couldn’t log in!
So… after I responded via Twitter to that effect, I was pleasantly surprised to receive an email from Amazon support. I’m still not 100% certain how they figured it out, but they managed to locate my account and my email address just from my tweets. (I actually think I got doxxed by Amazon Support, but that’s OK!)
Ultimately, they called me as well, because I wasn’t able to get logged in to reply to the case ID that had been established for me.
As Amazon continued to work on their end, I also engaged in some troubleshooting on my own:
Tried to sign in from another browser. I normally use Chrome for my daily driver, but I tried to login from Firefox
Tried to sign in using Firefox “Private Window” to eliminate the browser cache and any cookies that might be affecting sign-in.
I actually busted out Internet Explorer (cringe!). Since this is a fairly recent install of Windows 7, I knew that I had never logged in to an Amazon account from IE, so that also gave me a fair test without the normal Amazon cookies and browser cache..
Used my wife’s laptop to try to sign in.
In every case, I received the exact same error.
One of the messages I received from AWS Support suggested that I attempt to login to another account. Although my AWS setup is all connected to my primary Amazon account, IÂ did have another account or 2 that I could try. I was successful in logging in right away using the first account I tried.
So…. I was able to conclude that the issue was directly connected to my Amazon account and didn’t have anything to do with my browser, cookies, or cache.
Since Amazon uses an OAuth process to facilitate single-sign-on to multiple Amazon properties via a single account, I thought, “I’ll just sign in and review my Amazon order history.”
No dice. Same error.
Ultimately, after Nolan from Amazon Web Services Support got me on the phone, I walked him through all that I had done. He told me how puzzled they were on their end, since everything in my account looked OK.
He first directed me to try to log in from a couple of specific locations, just to rule out user error (I’m guessing).
After some effort, he asked if I would click the “Forgot Password” link.
“Hmmm…. why didn’t I think of that?”
I guess it hadn’t occurred to me because I was too busy ruling out all sorts of other issues.
So, I used the password reset function and created a new password. That’s when IÂ did see a warning from Amazon’s site about cookies. I wish I had noted the actual error (or taken a screenshot of it). I didn’t. The error message seemed to indicate that my browser wasn’t accepting cookies (I was back in Chrome now, so I knew it was accepting cookies).
At this point, I decided to go ahead and remove all Amazon cookies from Chrome. Once I did, I was able to login.
Thank you, Amazon support! Thank you, Nolan!
Apparently there was some corruption with my Amazon account on Amazon’s servers. I believe this because I saw the same error from every browser I tried to use—even from multiple machines. Apparently, the process for resetting my password cleared the issue!
Bottom line: If you see this error, reset your password. You may also need to remove Amazon cookies from your browser.
P.S. I was very impressed with the security procedures at Amazon. In every communication (I also tried to get support via chat), they took multiple steps to confirm my identity before proceeding. Kudos to them for establishing solid procedures for this!
Since the same type of attack has hit my websites on a second web host, I want to provide some more details about the attack I recently experienced prior to writing about why you need to update WordPress and your plugins.
Yesterday, I logged in via FTP to a separate hosting account on a completely different web host, and found some of the same signs that accompanied the original attack on my 1and1 account.
The first sign is a suspicious file in the root of the website. The filename is “.. ” — as in ‘dot dot space’
This is particularly insidious, because the filename is designed to make the file hard to find. This is because “..” by itself is a unix/linux standard for “parent directory.” (It’s the same way on Windows & DOS systems as well.)
Thus, if you aren’t paying attention and looking specifically for it, it’s hard to notice. Also, since most systems don’t give you any sign of the “space” in the filename, it’s hard to open the file. (Here’s where I have to give credit to a sysadmin at 1and1 for helping me discover the space in the filename. I kept telling him it was called “..” and he said, “that’s impossible.” He was right.)
Either way, I have found that you can simply rename the file and then download it via FTP to open it up and see what’s inside. Here’s the code inside the “.. ” file:
This is obfuscated somehow… perhaps encoded with base64 or some other method.
I’m not certain what it does, but my guess is that it only works when in combination with the code that was inserted into PHP files. Here are the filenames targeted by the attack:
wp-config.php
index.php
header.php
While index.php & header.php are common filenames in a wide variety of php websites, wp-config.php is unique to WordPress. Thus, I’m fairly certain that the creators of this attack were particularly interested in attacking WordPress sites.
The wp-config.php file only shows up in the “root” folder of any given WordPress installation. On the other hand, index.php appears in a number of folders in a typical WordPress installation. Here are a few examples:
the “root” folder of the site
the wp-admin folder
wp-content folder
wp-content/themes
wp-content/plugins
wp-content/uploads
the main folder of any given theme
the main folder of some plugins
The header.php file, on the other hand, is most likely to show up in one or more of your theme folders.
My guess is that whatever script gets uploaded to your server gets busy locating files that match those filenames and injecting the malicious code.
The code is intended to be hard to spot. First of all, the PHP files are edited without modifying their timestamps. Thus, they don’t look like they’ve been edited recently.
Also, the code contains an opening <?php tag, and then is immediately followed by 1183 spaces. This means that even if you open an infected file in a typical code or text editor, the malicious code will be so far off your screen that you won’t notice it. You can scroll down and see all of the untouched PHP code that you’re expecting to see in the file.
From being attacked in the past, I was already aware of both of those techniques, so I opened the files and scrolled all the way to the right, finding the code.
Here’s an exact copy of what’s being inserted into these files.
What Does This Code Do?
Well… the only reference to this particular attack that I’ve been able to find online is found in this thread (in German). That confirmed a suspicion I had held which led me to believe that there was something inserting some ad code into the WordPress admin pages (the “Dashboard” specifically) of my sites. Thus, it is only visible when logged in as an admin user, and is intentionally targeting WordPress site operators.
1and1 insisted that my sites were injecting malware into visitors’ browsers. Perhaps this is the malware. Perhaps the code was doing more than just displaying the ads I saw.
In any case, I had originally attributed these ads to a recently-added Chrome extension which I immediately disabled.
Now that I’ve seen the German thread, I’m more convinced that the sites which were displaying that ad were, in fact, the ones infected with this malicious attack.
So… I have no proof as to what this code actually does. It’s all obfuscated and it’s beyond my pay grade to figure it out anyway. My only hope is that by writing this up, someone (or perhaps more than one someone) will be able to use what I’ve discovered to help make sense out of it and put this sort of crap to an end.
If you have thoughts about this, don’t hesitate to comment below or hit me up on Twitter. Thanks.
We all know we shouldn’t let an old WordPress site sit around without updating it. It’s dangerous, they say.
And… for the most part, I’m really good about staying on top of this—at least when it comes to mission-critical sites. But… I’ll admit, there are a few sites that I built and forgot about.
One in particular came to my attention this week. It was a site I built around a hobby of mine. It needed a WordPress upgrade.
Okay… it had missed a lot of WordPress upgrades.
But worst of all: it had a plugin that was very old and had stopped being updated by its original developer. It was a stats plugin that I really loved back in the days before Jetpack gave us access to WordPress.com stats.
That particular plugin had a vulnerability which was exploited by some nasty malicious hacker.
How I Found Out I’d Been Hacked
This particular site was in one of my longest-standing hosting accounts… one I’ve had since 2006 with 1and1.com. I keep telling myself I’m going to clean that account out and move all the sites, but I just haven’t done it. That’s part of the reason I’ve let some of the sites go unpatched—because why patch ’em if you’re gonna move ’em, right?
<sigh>
Well… somewhere along the line, 1and1 started the practice of sending an email when they encountered something suspicious going on. In the past, they’ve notified my when SPAM emails started going out because of the TimThumb WordPress vulnerability and when their antivirus scanner found malware in a PHP file.
I’ve always been quick to respond when I see one of those, and it happened just a few weeks back. In that case, it just turned out to be an old inaccessible file that I’d renamed after fixing a previous problem.
On Monday of this week, I got another one of these emails:
Anti-virus scan reports: Your 1&1 webspace is currently under attack [Ticket XXXXXX]
Even though I was busy, I jumped right in to see what was happening. They identified a file that had been uploaded to my webspace, and when I saw where it was located, I knew exactly what was going on. That old plugin was still running on the site I mentioned earlier.
So… I logged in via FTP, downloaded a copy of the “malicious file” just so I could see it, and then deleted it and the entire plugin that it got in through.
No big deal.
Or so I thought.
Sites Down
Yesterday, I discovered that all of the sites in that hosting account were down. For most of them, I was getting a simple “Access Denied” error from 1and1 when I tried to load them up in my browser.
A minor panic set in as I went in and tried to discover what was going on.
What I found was very perplexing. The file permissions on the index.php file, the wp-config.php file, and a handful of other files in these sites were changed to 200.
If you aren’t familiar with Linux file permissions, 200 basically means that the file can’t be read by anyone. So… if that file happens to be critical to the running of your site, then… your site doesn’t work.
So… I changed the permissions on a couple of these files in one of the most important sites just to try to get it working. Oddly… within a few minutes of me setting the permissions to 644, they were automatically changing back to 200.
“Hmmmmm…. maybe there’s some malware still running in my account,” I thought to myself.
That’s when I noticed a whole bunch of database “dump” files in the root of my webspace. They looked like this:
dbxxxxxxxx.dump.lzo
Uh oh.
So… I replied to the email I’d gotten a few days earlier, and explained what was going on. This updated the “ticket” in 1and1’s Abuse Department so they could have a chance to respond.
After working on things for a few more minutes, I couldn’t stand it any longer. I dialed the 1and1 Support Department (something I truly hate to do) and waited. Within a short time, I was on the line with someone from India who had undergone a significant amount of accent reduction, and explained what was going on. When he was unable to find my ticked ID, I explained that I’d gotten an e-mail. He put 2 and 2 together and connected me with the Abuse Department.
Then… for the first time in the 8 years that I’ve had this account, I spoke to an American. I mean… fluent English. Clearly no foreign accent. And also for the first time, he knew something about what he was talking about!
He reviewed the ticket and was able to explain a little better what had occurred. Hackers had gotten in through unpatched software (which I knew) and had managed to execute shell commands with my account’s user privileges.
Within what must’ve been a very short period of time, they inserted malicious code into approximately 1,500 files in my webspace. This means that they infected even the WordPress sites that were all patched and running the latest versions.
All told, somewhere near 40 sites were infected.
1and1’s systems were automatically changing the file permissions for any infected files to 200 in order to keep anyone from accidentally downloading malware when visiting my sites.
So… then began the painstaking process of removing all the malicious code that had been inserted and bringing the sites back on line one by one.
I’m sure there are lots and lots of these making the rounds at any given time. However, given that a client of ours was recently hijacked with a rather convincing-looking phishing scam, I felt it appropriate to publish this as a courtesy.
This one came in the form of an email. The message came from someone she knew, and it had a personal tone that made it seem a little more convincing than usual. Also, it contained the usual email signature of the sender (complete with their usual “sign-off” phrase, logo, contact info, etc.)
The subject line of the message making the rounds right now reads:
Please check out the document a very useful document that I believe we can all gain from.
If you see one like this, typically you’ll see that you were a bcc recipient. The message that got her had a body that read as follows:
Dear, I tried to get these document across to you before. Did you ever get it? VIEW HERE and sign on with your email to access it as attached on Google.doc, get back to me so we can discuss.
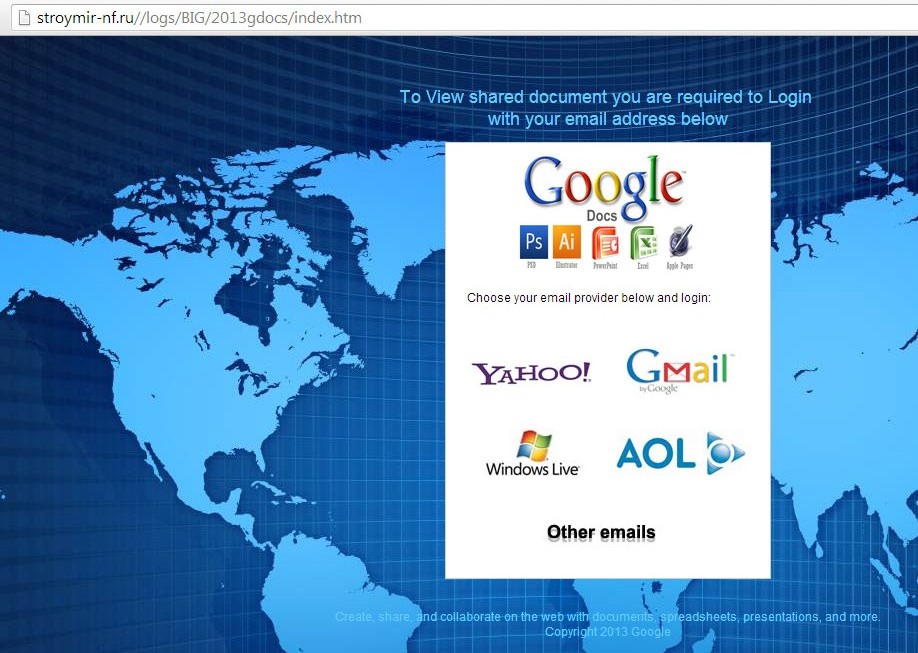
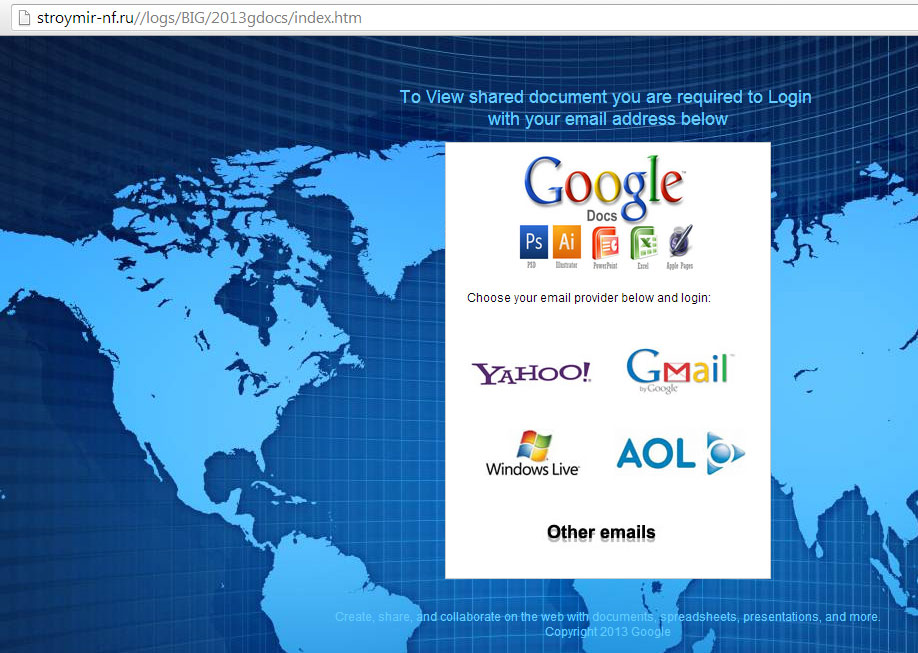
There were a couple of fonts in the message, so it was poorly formatted. The “VIEW HERE” phrase was linked to a website that looked like this:
Google Account Phishing Site
Clicking on any of the logos opens a small box that seems very official looking and you’re invited to enter your email address and password.
In the case of our friend, this all happened to her several days ago. She ultimately thought nothing had happened… until today. What tipped me off was that I got a message from her. I knew right away that it was a scam (the .ru domain name was a big clue), so I checked with other members of our team… and some had received the message and fallen for it.
Today, she found that after several hours of working, she suddenly couldn’t login to her Google Apps (corporate Gmail) account any more. This caused her to panic. So did the phone call from their corporate banker, who had been getting email requests for various bits of account information (including current balances, etc.). Thankfully, their banker refused to provide info via email and was kind enough to pick up the phone. Others may not be so lucky.
When In Doubt… Don’t
So like I said earlier, I’m pretty sure that there’s a new “flavor of the day” scam running at any point in time. So here are a couple of pointers that may help you:
Don’t enter your email address & password into unknown websites. This particular one showed a lot of official-looking logos, so it seemed convincing. That’s why you always want to…
Double-check the address of the website you’re visiting. This particular domain name was “stroymir-nf.ru” — and boy if ever anything screamed “I’m a Russian criminal,” this one does. But the little “Copyright 2013 Google” at the bottom might be enough of a distraction to keep you from noticing your browser’s address bar. So… always double check.
Remember: You shouldn’t have to login to view a Google Doc if you’re already logged into your Gmail account. This goes for Google Apps users as well, of course. Google docs will automatically open for you because you’re already authenticated in your web browser. If you have to enter your Google account info again, it’s a red flag.
What If I Did It Before I Realized What I Was Doing?
If you enter your Google (or other) account info into an unknown website like this one before you realize it’s a scam, immediately go change your password. This is a pain, I know it. But you’ve just given away the keys to your personal kingdom, so you need to change the lock.
In our client’s case, she got kicked out of her Google account 3 days later when the thieves got around to trying to make use of her information. Thankfully, hers was a Google Apps account, and the domain administrator was able to reset her password for her, which effectively kicked the Russian crooks out of her account.
Which brings me to another important point: set up two-factor authentication for your Google account. It’s a little bit of an inconvenience, because it means that you have wait for Google to text a code to your mobile phone before you can log in to your account on a new browser or device, but it’s worth the short delay and the extra step because anyone trying to get into your account will also have to have your cell phone in order to get in. If you haven’t done this yet, now’s the time. Here’s more info about Google’s two-step verification process, including a guide to getting it set up for your account.
Is your laptop absolutely crawling? Can you drive to Starbucks, buy coffee beans, come home and grind them, boil water, dump everything in your French press, wait 4 minutes for it to steep, pour your freshly-brewed cup of coffee into a mug and still get back to your desk in the time it takes your machine to reboot?
That’s where I was earlier this week. And tired of it!
So let’s just say I’m not running a high-end laptop here. Mine is squarely in the middle of the road.
It was perfectly usable 2 years ago when I bought it, but I made it out of my local Best Buy with $20 left of my $500 budget at the time. (I decided a long time ago that laptops are almost disposable, so I refuse to pay big bucks for them.)
But 2 years of updates to Windows 7 (which I love, by the way… another reason why I don’t want to buy a new one yet), 2 years of installing various bits of software, a really bad habit of having 50-60 Chrome tabs open at once, and a tendency to run Photoshop or InDesign (or both) all adds up to a really terrible user experience.
I’d already maxed out the RAM… I did that about 6 months after I bought it.
So… what was left to do?
Well… SSD envy set in about a year ago when I bought my wife an HP Ultrabook. She gets a higher laptop budget because she replaces them less often, and she doesn’t subject them to all the abuse of travel nearly as often as I do. Oh… and she likes them light and thin. And boy is hers ever light and thin! But it’s also blazingly fast. I’m talking… Windows 7 reboots completely in under 10 seconds. Forget that cup of coffee and keep working!
One of the reasons the thing is so darn fast is because of the Solid State Drive (SSD) that was installed from the factory. SSDs, if you aren’t already aware, are much faster than traditional hard drives because they have no moving parts. That’s right, no motors or spindles… just pure NAND flash memory (usually), and lots and lots of speed.
So… I began scheming back then about when (and how) I could get an SSD into my laptop. But the problem is that I do have much more significant storage needs. My laptop has a 500GB drive, and I keep it nearly full with stuff. Could I be more diligent and picky about what stays on my hard drive? Sure. But that takes time. Plus, I’m always of the opinion that I’d rather have that obscure file with me when I’m traveling because of the one time I get somewhere and need something that other people would’ve left on an external drive back home.
Why is that a problem for SSDs? Well… they don’t tend to do so well with higher capacities. And they’re expensive — quite unreasonably so when it comes to the higher capacities. In fact, had I been looking at a 500GB (or bigger) SSD, I’d have been back in the “that costs more than a new machine” zone.
So a few months ago I ran across this nifty idea. Some manufacturers had begun to produce “SSD Caddies” that take the place of an optical (DVD or CD-ROM) drive in a laptop. The idea is that you yank the DVD drive that came with your laptop and drop an SSD into one of these caddies and stick it in your machine instead.
Hmmmmm…. but IÂ use that DVD drive, don’t I?
I decided to find out. When I’d gone more than 30 days without even opening it, I realized that the idea that I needed one was actually legitimately outdated.
So I waited for the right moment… in my case, it was an afternoon of waiting, waiting, waiting for some file to open while something else was running and my physical memory usage was up over 90% and 10 minutes of staring at the dumb blue blinking LED Â that represents hard drive activity had passed without the light ever flickering (because it was on solid from activity)… annnnnnnnd, I’d had enough.
I took the plunge, ordered the parts, and began the long, drawn-out process of waiting 2 business days for shipping. (Sad, I know.)
What Do You Need?
Well first, you’ll need an SSD caddy that matches your machine. At first, I searched for one that was clearly advertised as made for my particular laptop (using the manufacturer name and model number of my laptop). That seemed like a good idea. Price? Around $45 from some unknown online vendor.
Hmmmm…. I wonder…. is this laptop really all that unique?
So, I did some more digging around and found SilverStone Technology. They seem to make a handful of these unusual gadgets, and in my research, the TS09 model seemed like a good fit for my laptop (even though no specific laptops were mentioned).
To make sure it would work, I located the proper method for removing my ODD (optical disk drive), just to do some quick measurements.
Gateway NV57H44u
For my Gateway NV57H44u, the optical drive (DVD writer, in this case) is held in place by a single screw which is located to the right of the Windows 7 COA label and Gateway info sticker.
I few twists with a screwdriver (while the machine was turned off, power supply disconnected and battery removed, of course), and the optical drive came free. I tugged on it to get it out, and checked it with a ruler. It was, in fact, a 12.7mm height drive. This is something of a “standard” size, although you’ll want to confirm with your manufacturer regarding the specs for your device (or just measure like I did).
Optical Drive: Slimline SATA connector
The next thing I wanted to verify was that the optical drive that shipped with my laptop was using a typical “slimline” SATA connector (shown in photo). This is how the device gets power and how it communicates with your system. It was, so the TS09 looked like it might be the right fit. At less than half the price ($20 from Amazon) of the other caddy I’d looked at, this was feeling more and more like the right way to go.
The next big question:Â which SSD to get?
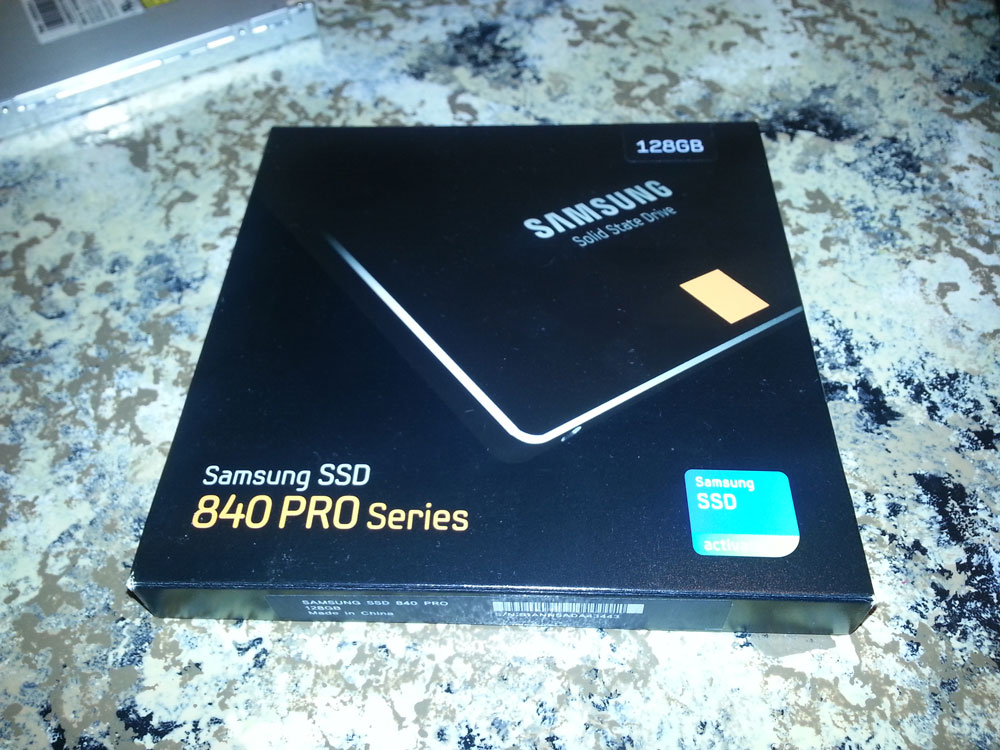
Well, this is where I’d done my homework. After lots of research, I had decided on the Samsung 840 series. The problem you may run into is that there are at least 3 different types of drives bearing that moniker: the 840, the 840 EVO, and the 840 PRO.
Samsung 840 PRO Series 128GB SSD
These drives are significantly different. Sure, they all look nearly identical, and they all have “840” in the name. Frankly, they’re all fairly reputable as well.
The next decision I had to make was about capacity… which, frankly, is all about how much you want to spend. I’d already decided that since my SSD was a new, second hard drive (and I was keeping my original 500GB drive for storage), I could live with having only 128GB on it. This is plenty for me to install Windows 7 and a few core applications that I need to run speedily (Google Chrome, the Adobe Creative Suite apps like Photoshop, InDesign, Illustrator, etc.) and Microsoft Office. All my data would stay on the traditional hard drive that shipped with my laptop.
Now… you can find 128GB SSDs for less. I’m guessing that even the 840 EVO (120GB) or standard 840 would be decent choices. I was willing to spend a little more for the PRO because I just don’t like to gamble with hard drives. Any of them can (and do) fail, so there are certainly no guarantees, but I prefer to give myself the best chances right out of the gate. Also, the PRO model’s additional speed was important to me, since speed was the whole reason to take this project on to begin with.
So you need an SSD and a caddy. That’s it!
Well… at least that’s it for hardware.
Unboxing the 840 PRO was a breeze. It dropped into the TS09 caddy, no problem. The trickiest part was deciding which of the screws to use to cinch it down to the caddy, which shipped with a couple of different sets for you to use. You can’t goof this part up, though, since the screws either fit or they don’t.
Once the drive was secured to the caddy, it only remained to insert the caddy into the laptop. One detail that could easily be missed is that the retaining screw (remember the screw that I removed earlier to loosen the optical drive?) has to screw into something. On my optical drive, there was a small metal bracket which received the screw and held it in place. I removed that bracket from the optical drive (it’s obviously a separate piece) and attached it to the same spot on the caddy, which had a hole in just the right place for it.
Once inserted, I fired up the laptop to make sure that everything was working. I saw a very satisfying green and blue color emanating from the new SSD’s LEDs, which shone through the well-placed hole in the caddy.
OK, Everything’s Installed… Now What?
Well… this is where you have some options about how to proceed.
To get the maximum benefit out of your SSD, you’re going to want it to be your primary drive… meaning the one that Windows (or your O/S of choice) is installed on.
There are two major ways to make this happen: migration or clean install.
If you choose to migrate, you’ll essentially be moving your current Windows installation from your existing hard drive over to your SSD. There are a few advantages to this:
It’s easier (in theory, at least)… the 840 PRO series ships with migration software designed to make this happen for you. (Ironically, it ships on a CD. So, if you’re adding the SSD to your system instead of replacing your primary hard drive with it, you’ll need to plug your optical drive back in to use it.)
You keep your current Windows setup completely intact. This means you don’t need to re-install any software, locate drivers, find product keys, installation files, etc. You’ll also keep your all-too familiar configuration… simple things like desktop backgrounds, sound “themes” and even locations of files will (most likely) all stay exactly the same as before.
You may find that you’re up and running faster. Once you complete the migration, you reboot, and you’re in business. No need to install every Windows update since the beginning of time… and so on.
On the down side, migration:
keeps all the crud that’s built up over time in your Windows installation. Software that you install and subsequently uninstall leaves traces behind… clogging up your Windows registry and ultimately slowing things down. Admittedly, I’m a power user, so I’m more prone to this sort of thing, but it’s worth a consideration. If you have only installed a few pieces of software, this is a non-issue. But if you’re like me and you’ve forgotten about more software than you remember, then those small effects can really add up.
may not work! If you’re moving from a 500GB hard drive (that’s nearly full) to a 128GB hard drive, you can do the math. The important things that need to be moved are the boot partition and your O/S itself. However, if you had only one partition on your hard drive—which is how virtually every laptop ships from the manufacturer—and not separate partitions for your O/S and your data, then you’re going to have problems. The migration process may not adequately handle all the details that need to be handled, leaving you with a mess. On the other hand, if you are moving to an SSD with equivalent (or greater) capacity (or if you have a boot partition that’s equivalent or smaller than your new SSD), then you won’t have this consideration to worry about.
Besides migration, your other option is to perform a clean install of Windows. This means that you’ll be starting fresh… possibly even enjoying that OOBE (“out of box experience”) like you did on day 1 with your PC all over again.
Some of the advantages to a clean install are:
You’ll have a clean slate. Only software that you choose to install will be installed. Often, this single factor alone can produce enough of a speed boost that people will do it even without moving to a faster hard drive.
You can map out your new configuration as you see fit. Where will your “My Documents” folder be located? (i.e. Which drive will it live on?) Which programs do you want installed on the SSD (because you particularly need them to run faster) and which ones can stay on your legacy hard drive?
Keeping your SSD clutter-free. I personally don’t want to store data and other static files unnecessarily on the SSD. It’s intended to be lean, fast, and unencumbered. My older hard drive can shoulder the load for storage and so forth.
Disadvantages to a clean install include:
It can be a pain to do. Ever tried installing Windows 7 to a laptop without a Windows 7 installation CD/DVD? Even more fun… without a place to put the CD/DVD (since you yanked your DVD drive out to make room for your SSD)! A little extra effort (and perhaps some downright creativity) is required to pull this off.
You may be out of commission longer. Nothing will be installed on your laptop until you install it. This means you’ll start with the essentials (Windows, Chrome, and your most-used software), and then you may find yourself discovering another missing item weeks afterward.
Once you’re up and running, additional energy may be required to get everything back to where you like it.
For me, the decision between a migration and a clean install was a complete no-brainer: hands-down, I wanted a clean install. I was looking to squeeze every possible ounce of benefit (read: speed) out of this project. There’s no better way to pull that off than to start fresh with Windows. Being the extremist that I am (at times), I wanted to even be sure I avoided any of the bloatware that Gateway originally installed on my machine. So… I chose to not even bother trying to use the “recovery” partition. Instead, I went on the hunt for an official Microsoft image of Windows 7 to install.
Being a geek, I’ve performed many a clean install of Windows. Even so, it had been a while… so, I made a couple of blunders that cost me a little bit of time. Here are some notes so you can perhaps avoid running into any problems yourself.
Prepare your Windows installer ahead of time. Before you take the big plunge and render your existing setup inoperable, do yourself a favor and get everything ready. It’s a long story, but I ended up needing to use another computer to do this. Chances are, you don’t have a Windows CD or DVD to install from, since most manufacturers quit distributing them long ago. So, you’ll have to work around this dilemma, which means you’re going to need a 4GB or larger USB flash drive, and you’ll also need to…
Understand which version of Windows you have. If you bought your PC at retail, then you have the “OEM” version of Windows. That product key on the colorful COA sticker on the bottom of your laptop won’t work if you try to install the “retail” version of Windows. You also need to know if you’re using the 32-bit or 64-bit version. Once you figure out which one you have (mine worked out to be “Windows 7 64-bit Home Premium OEM”), you’ll need to download an .ISO file (DVD image) for that version. There are lots of places to look for these… some of them legitimate (read: legal) and some of them less so. To save time and energy, I located a version that included SP1 (“Service Pack 1”), which had a huge batch of the earliest Windows 7 updates rolled up into it already.
Create a bootable USB drive with your Windows installer on it. Once you’ve located and downloaded an appropriate .ISO file, you can use Microsoft’s official Windows 7 USB/DVD download tool (more info about this here) to push the Windows 7 installer to your USB flash drive. (Note: I had a little trouble with this tool… in fact, it never did completely finish without an error. But I finally realized that if the tool made it to 98% before the error occurred, then chances are it actually had finished. This turned out to be true.)
Before you get started installing, download all the drivers for your machine. Hit your laptop manufacturer’s website and locate the downloads for your model number. You’re going to need (at least): the chipset driver, video driver, audio driver, and network drivers for both LAN and wireless. You may also need to get drivers for your touchpad, webcam, card reader, bluetooth device and maybe some other peripherals in your system. That last batch can be downloaded from your new, fresh Windows install if necessary. But you’ll want the first batch in a folder on your USB stick so they’ll be handy when Windows comes up for the first time.
Block off some time and be ready to reboot quite a few times. The actual Windows 7 installation went pretty quickly for me… maybe even under an hour. Once you have your basic driver set installed, however, Windows 7 will start pulling down updates. They number into the hundreds… and that’s when you start from SP1! Some of your drivers will even require a reboot upon installation, which is a good idea.
Get your other software installation media ready to go as well. If you need to install other programs (such as Microsoft Office apps) from a CD, it’s a good idea to get those installers onto your USB stick ahead of time also. Many, many programs can be downloaded, so if you aren’t able to locate discs, it may not be the end of the world.
Once you’ve got your tools in place, then plug that USB stick in and go!
My laptop had no problem booting from the USB flash drive, and when the Windows 7 installer came up, it was pretty clear which drive I wanted to target for the installation. Be careful to select the right drive, though, as choosing the wrong option from the installer could end up wiping your existing hard drive. I plan to keep all the data on that drive (eventually I’ll delete the Windows folder, I guess), especially at first, so I made sure that Windows 7 got installed to my brand new SSD.
Once the Windows 7 installer reaches the point where it needs to reboot, you may want to take a look at your BIOS or “Boot Order” settings. My machine’s BIOS didn’t recognize the SSD as a hard drive in the boot sequence options, which led to a moment of panic. It did, however, still show the option of booting from the CD-ROM/DVD-ROM drive, which I realized pointed to the SATA channel that the SSD was connected to. So, I set the machine up to boot from that first (once I was finished with the USB flash drive portion of the process), and it worked like a charm.
As the installation process completes and a reboot is necessary, you may see an option to select from a couple of different Windows 7 installations at boot-up. The “top” option will be your new one. In my case, I can still boot to the previous Windows 7 install (from my legacy hard drive) using the 2nd option. This is nice for when you need to locate that one setting (piece of software, etc.) you forgot about. Later, you can remove the 2nd entry if you want to eliminate this step in the boot process.
The Results
I’ve now had a couple of days to enjoy using my machine since installing the SSD and getting a clean install of Windows 7 going. Wow, what a difference! I’m certainly seeing all the speed benefits I was hoping for. All the waiting from hard drive lag is gone. Reads and writes to the drive are  pretty much invisible to me now. The machine boots up in a fraction of the time that it used to take. Some of the more hard-drive heavy software tools I use regularly (Photoshop, etc.) are faster than I’ve ever seen them on my own hardware.
An unexpected benefit that I’m seeing is a reduction in both heat and noise. The machine is quieter than ever… partly because the 2nd hard drive (meaning my legacy hard drive, which is now exclusively for storage) doesn’t have the constant read/write activity that made it noisy and caused it to get hot. In turn, with less heat in the chassis, the fan is running a lot less often. Those two combine to make this the quietest laptop I’ve ever owned.
Regarding battery life, I had expected it might suffer with the two hard drives. However, the power consumption of my SSD is virtually nil when compared to the legacy hard drive. Since the SSD is my boot drive (and my Windows drive), the reads and writes to the legacy drive are cut by 90% or more. Thus, I’m expecting to see a nice bump in battery life. I haven’t done any actual measurement of this yet, so I lack the evidence to make this claim unequivocally, but it wouldn’t surprise me if this bears out after some real testing.
In short, this is the best ~$150 I’ve ever spent upgrading a laptop. There is truly no comparison between the “after” and the “before.” I highly recommend it.
Even factoring in all the time I’ve spent… whether checking prices and doing my pre-planning or actually installing the gear and/or Windows and the accompanying joys of getting everything back up and running, this is well worth the effort. My payoff in terms of speed, responsiveness, and overall usability are beyond my wildest expectations.
In short: if you’re suffering from a slow laptop, add an SSD via a caddy and get yourself a major speed boost!