How to Check DNS for Multiple Domains at Once Using Google Sheets

Yesterday, I needed to get current results for the “Nameservers” for a batch of about 400 domains. To look each domain up manually would take forever—even using dig from the Linux terminal like I do it. Plus, I wanted to record the results in a spreadsheet for reference and for some quick analysis.

I had the domains in a Google Sheet already, so it was just a matter of spinning up a quick Google Apps Script to perform the DNS lookups and return the results to the Google Sheet.

Naturally, I turned to Google to help with this situation and stumbled across this piece by Alex Miller on Medium that suggested a method for doing exactly what I wanted to do. Unfortunately, I had some trouble with Alex’s code, which relied upon queries to a Google DNS service.

Thankfully, he linked out to a useful Stackoverflow thread which provides quite a few code options for performing DNS lookups in Google Sheets. It’s clear from the history of the responses that various public DNS resolvers have come and gone in the ~6 years since the question was originally asked. Naturally, changes in Google Apps script have also affected the utility of some of the scripts in the replies.

The Solution: Using Cloudflare’s 1.1.1.1 DNS Resolver with Google Sheets

I tested some code that appears in this reply to the Stackoverflow thread linked above, but had some difficulty at first. No matter what I added to my formula for “record type,” the query returned an IP address corresponding to the “A record” for the domain.

That led me to find this code from Cloudflare’s Github respository.

I’m not 100% sure how close the two code snippets are to one another (they may be identical, I just didn’t check). Once I implemented the code from Cloudflare, though, the issue with only receiving the “A” record result persisted.

Here’s what I learned about getting it to work.

The mistake I was making was that I was manually adding the record type to the formula I was typing in Google Sheets. For example:

=NSLookup(NS,A2)

where “NS” is the record type I was hoping to retrieve and “A2” is the cell containing the domain name.

Once I added a column for the record type, everything worked. My updated formula reads:

=NSLookup(D2,A2)

where “D2” is the cell containing the record type.

In hindsight, I probably could have just wrapped the NS in quotes and my first attempt at this formula probably would have worked.

In any case, this worked beautifully. I was able to retrieve the Nameserver records for more than 400 domains in a matter of just a few seconds, and then do some quick “conditional formatting” to easily note the specific situations I was trying to track down.

One thing that occurred, though, was that Cloudflare’s DNS resolver returned refused for maybe 20 or 30 of the domains. I suspect this was a result of throttling. I was able to force the query to run again by modifying the “record type” value, which triggered Google Sheets to notice the formula reference was no longer current, and the script ran again. Changing the record type back to “NS” in the corresponding cell caused the query to return the proper result for the “Nameserver” record as expected.

I hope this helps someone! Feel free to ping me in the comments if you have questions or thoughts. Cheers!

The Easy Way to Display Full URLs in Chrome

Something about a recent update to the Chromium browser on my Linux machine borked one of my user profiles.

No big deal. I’ll just set it back up, right?

Well sure. It took a couple of minutes. But one of my big pet peeves about Google Chrome is this ridiculous idea that the full URL doesn’t need to be displayed.

We could argue the merits of this idea elsewhere (feel free to leave a comment below or reply to me on Twitter if you feel strongly about it), but at least for technologists who build, support, debug, or otherwise work very closely with web properties, WE NEED TO SEE THE WHOLE FREAKING URL, GOOGLE.

Since my user profiles normally keep this setting, I hadn’t needed to solve this problem in a fresh way for quite some time. The old methods involved using chrome://flags (which I definitely used in the past) or even installing an extension (EW!). Many of those solutions persist out there on the web (or even in the Google Chrome help center’s community).

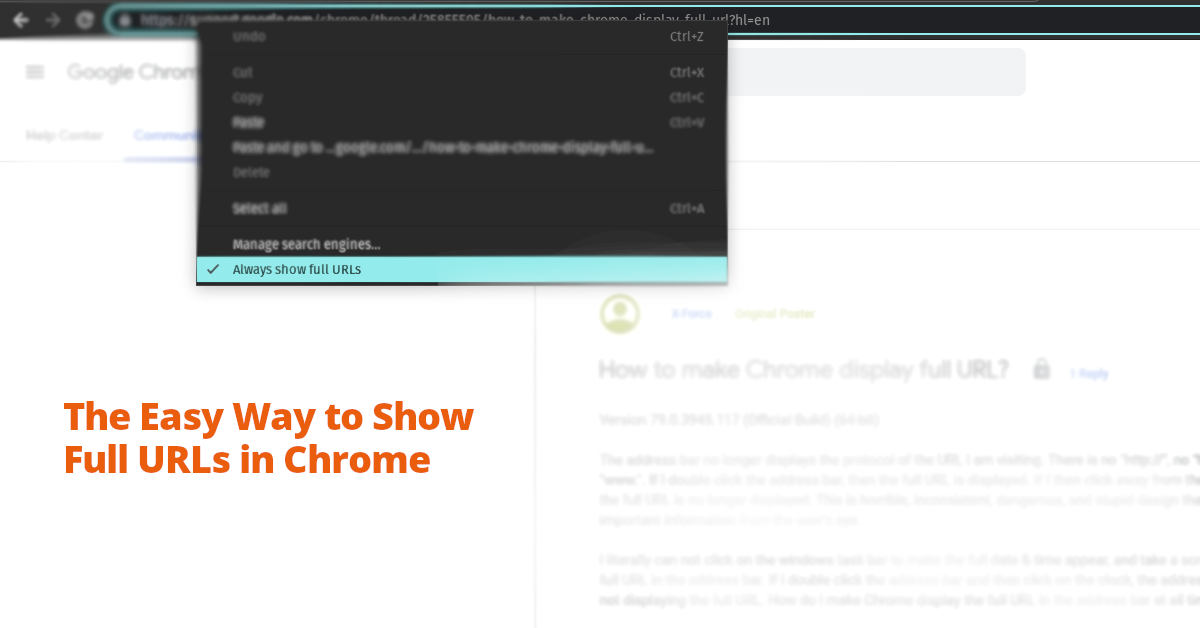
Here It Is: Right-Click in the Address Bar

We’re now formally calling it the “omnibox,” but whichever way you refer to it, you want to:

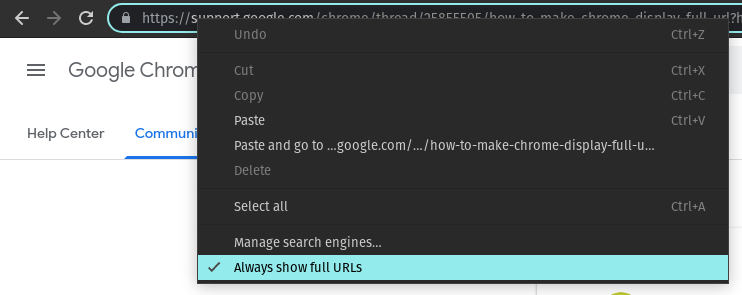
  1. Right-click in the omnibox (address bar)
  2. Choose “Always show full URLs”

I hope this helps!

Setting Up WordPress Multisite with Subdomains and a Wildcard Let’s Encrypt Certificate on NGINX

Recently I found myself needing to move an existing WordPress Multisite installation off of a popular shared host. The main goal was to improve the site’s performance (load speed, etc.) and we have more ability to fine-tune things in an environment we fully control.

But it’s been awhile since I tinkered with Multisite and so I didn’t have a current set of “best practices” around how to set configure the nginx server block to handle subdomains that might be set up on the fly any time the site’s owner wants to add a new “site” to the network.

More importantly, we’ve switched to Let’s Encrypt as our provider for TLS certificates, and when we initially did so, they weren’t yet handling wildcard certificates. They added this capability some time ago now, but this was my first excuse to try it out.

So the goal was: configure nginx and Let’s Encrypt to properly handle any new subdomains added to the WordPess install without having to manually change the server configuration.

Quick Overview of the Tech Involved

We moved the site to a VPS on a Digital Ocean droplet with a LEMP stack with:

  • Ubuntu 20.04
  • nginx 1.18.0
  • MySQL 8.0.22
  • PHP 7.4

The other sites hosted on this droplet are mostly standard WordPress sites where the www subdomain is redirected to the domain name, so they use a more or less standard nginx server block that we’ve fine-tuned over time.

We’re obtaining TLS certificates from Let’s Encrypt using certbot and the --nginx flag to manage the certificate installation process.

First: nginx Config for WordPress Multisite

Our “standard” nginx server block works really well for WordPress and we get great performance out of a socket connection to php-fpm.

Our nginx rewrite rules, however, don’t anticipate the need to handle multiple subdomains that are subject to change over time.

Thankfully, there’s an nginx recipe for WordPress multisite that we were able to use as a starting point. The important thing to remember is that WordPress can be configured to add new sites as subdirectories (e.g. example.com/mysite) or as subdomains (e.g. mysite.example.com). We’re using the subdomain method, and so this recipe was the one we needed.

The recipe calls for a new section before the server block in the file located at /etc/nginx/sites-available/domain.com that leverages the nginx map module to set up a variable to handle the various subdomains.

map $http_host $blogid {
	default       -999;
}

Then inside the server block itself (i.e. between the server { and } for the domain in question), we add some lines that call those variables:

	#WPMU Files
	location ~ ^/files/(.*)$ {
		try_files /wp-content/blogs.dir/$blogid/$uri /wp-includes/ms-files.php?file=$1 ;
		access_log off; log_not_found off;      expires max;
	}

and

	#WPMU x-sendfile to avoid php readfile()
	location ^~ /blogs.dir {
		internal;
		alias /var/www/example.com/html/wp-content/blogs.dir;
		access_log off;     log_not_found off;      expires max;
	}

Aside from those additions, we’re using our standard set of parameters for a typical WordPress installation.

Next: Get a Wildcard Certificate from Let’s Encrypt

Our typical method is to call certbot with the --nginx flag and let it put its ACME protocol token in the /.well-known subfolder to handle domain validation. This method, known as the HTTP-01 challenge, works well when we’re requesting issuance of a cert for the domain itself and for the www subdomain.

That request typically looks something like this:

sudo certbot --nginx -d example.com -d www.example.com

But we cannot use the HTTP-01 challenge to request a wildcard cert.

What is a wildcard TLS certificate?

Requests like the one shown above result in the issuance of that is valid for exactly 2 domains: example.com and its subdomain www.example.com.

Thus, when a visitor’s web browser connects to the server and requests a URL containing one or the other of those addresses, the server can legitimately negotiate a TLS connection and encrypt the traffic for it.

But since we’re setting up WordPress as a multisite installation in order to allow the site owner to create new sites on the fly, we aren’t able to predict all of the subdomains that need to be listed on the TLS certificate.

What we need instead is a TLS certificate that is valid for the domain itself (i.e. example.com) and for any subdomain of the domain. Thus, we want to request a certificate using a wildcard to represent the subdomain. In this case, the asterisk character serves as the wildcard, and so we want the cert to be valid for: example.com and all possible subdomains *.example.com.

The problem is that Let’s Encrypt does not permit the issuance of wildcard certificates using the HTTP-01 challenge. Instead, we need to make use of the DNS-01 Challenge.

Configuring the Let’s Encrypt DNS-01 Challenge on the Digital Ocean Platform

The DNS-01 Challenge requires that you prove that you have control over DNS for the domain rather than just a web server for the domain. It works by setting a TXT record for the domain at _acme-challenge.example.com which contains the ACME protocol token as its value.

As you might imagine, having to create this record manually and then update it every 90 days when Let’s Encrypt needs to renew the certificate would be a painful manual process.

Thankfully, there are DNS plugins for certbot which help automate the process as long as DNS is hosted by one of the compatible providers. Currently, that list includes: Cloudflare, CloudXNS, Digital Ocean, DNSimple, DNS Made Easy, Google, Linode, LuaDNS, NS1, OVH, Route53 (from Amazon Web Services), and any DNS provider that supports dynamic updates as described in RFC 2136.

It was a happy accident that I had decided to use Digital Ocean to host the DNS for this domain. I did it without realizing that I needed this kind of compatibility. So I was pleased to discover that Digital Ocean supports DNS updates via its API and that there’s a certbot plugin for their platform: dns_digitalocean.

I found some of the documentation around getting this plugin installed on my server a little confusing. One recommendation involved using pip3 (the Python 3.x package manager) to install it. But since I had installed certbot from the Ubuntu standard PPAs using the apt package manager, the version of the plugin that I got using pip3 wasn’t actually connected to the certbot installation I was using.

Ultimately, I realized I could install the plugin I needed using apt like this:

sudo apt install python3-certbot-dns-digitalocean

To fully configure it, I got a shiny new personal access token for the Digital Ocean API from the Applications & API page of my Digital Ocean account.

Then, I created a new file at /home/myloginusername/.secrets/certbot/digitalocean.ini that looked like this example from the plugin documentation:

# DigitalOcean API credentials used by Certbot
dns_digitalocean_token = 0000111122223333444455556666777788889999aaaabbbbccccddddeeeeffff

Note: in case this isn’t abundantly obvious, the token shown above is fake and will need to be replaced by a real token that is unique to you and should be treated as if it’s the password to your Digital Ocean account… because anyone with your API token has access to all of the capabilities of their API.

Also, one potential point of confusion I ran across. Since I use sudo to run certbot with elevated privileges, I thought perhaps this file should be located in the root user’s home folder (e.g. home/root/.secrets/...), but this turned out to be incorrect. It belongs in the home folder for the user that you authenticate with when you log in to Ubuntu.

Also, chmod that file to 0600 to help keep it safe:

chmod 0600 /home/myloginusername/.secrets/certbot/digitalocean.ini

You shouldn’t need sudo for that command since it’s in your home folder.

With the certbot dns plugin for your dns provider successfully installed and configured properly, you’re ready to request the cert.

In my case, I wanted to use the dns-digitalocean plugin to handle the authentication part of the certificate issuance, but I still wanted to use the nginx plugin to handle the installation of the certificate. This would greatly simplify ongoing maintenance tasks because I’d used the nginx plugin to handle installation of the other certs on this server.

Thankfully, it’s possible to combine certbot plugins to do exactly this by using the --installer flag with “nginx” as its value.

The command I used ended up looking something like this:

sudo certbot \
  --dns-digitalocean \
  --dns-digitalocean-credentials ~/.secrets/certbot/digitalocean.ini \
  --dns-digitalocean-propagation-seconds 60 \
  --installer nginx \
  -d example.com \
  -d *.example.com

Bascially, the command tells certbot to create an ACME protocol token, create (or update) the TXT record for this domain using the Digital Ocean API so that the record’s value matches the ACME token, then wait 60 seconds to give DNS a little time to propagate, and then run the DNS-01 challenge and issue/install the cert.

Your Mileage May Vary

Obviously, different server configurations and hosting environments will work differently, but if you happen to be running a VPS with a LEMP stack based on Ubuntu 20.04 and need WordPress Multisite to work with wildcard subdomains and a wildcard TLS certificate from Let’s Encrypt, then this process will generally be workable.

What questions do you have? I hope you found this useful. It’s always great to hear about it either here (feel free to comment below), or you can hit me up on Twitter: @TheDavidJohnson.

Cheers!

Image credit: Fikret tozak on Unsplash

Stop Microsoft Products from Auto-Starting on Linux

TL;DR: Change the settings inside each app. Step by step instructions here.

The pain I experienced years ago when I realized I would need to install a Microsoft product on my Ubuntu laptop was substantial on top of being ironic. After all, I became a full-time Linux user to avoid Microsoft.

But back then, Skype was important for certain client work, and even today it’s useful for recording podcast guests because Skype can be configured to provide decent quality audio.

Fast forward to earlier this year, and I discovered that Microsoft makes a Teams client for Linux. Who knew, right? Bizarrely, I found myself installing it in order to collaborate with a client. And while I wouldn’t use it of my own free will, it’s really not that bad.

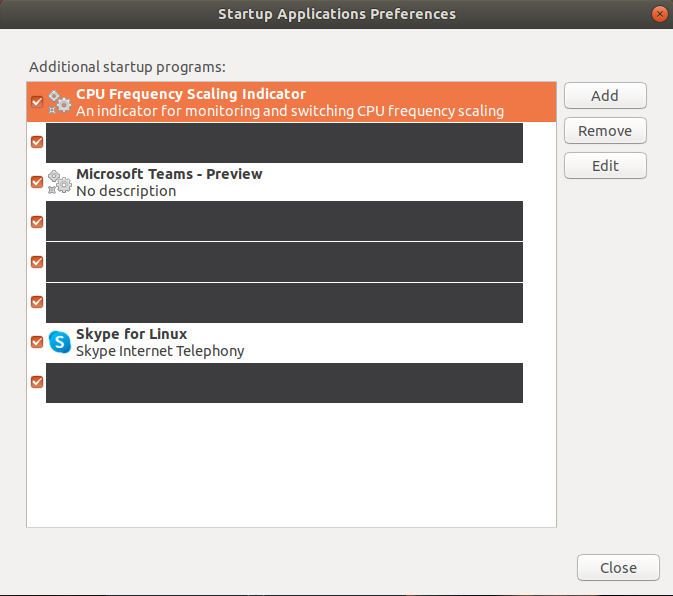
But both Skype for Linux and Microsoft Teams for Linux suffer from the same problem. They don’t behave as expected when using the GNOME Startup Applications preferences tool.

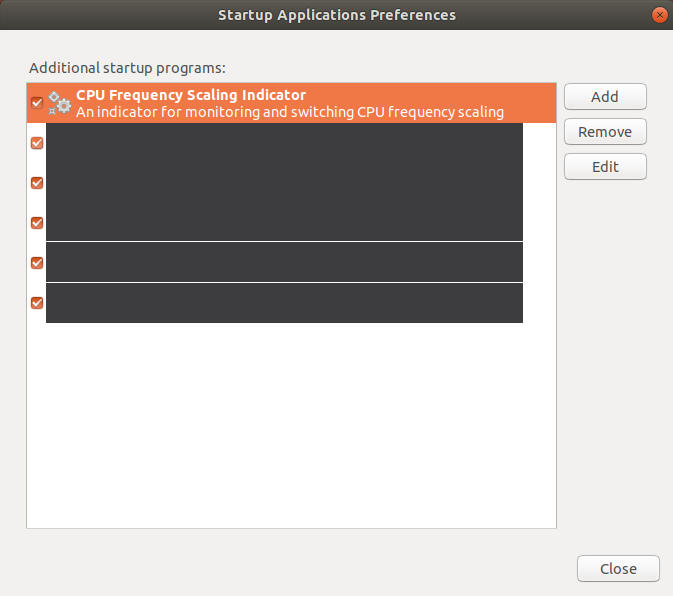
Screenshot of GNOME Startup Applications Preferences dialogue showing the reappearing Microsoft Teams and Skype applications

For months now, I’ve been dealing with the minor irritation of having Skype and Microsoft Teams autostart when I sign in to Linux, despite my repeated efforts to stop them.

I’d casually looked for ways to solve this, but recently it happened one too many times. Microsoft Teams launched itself and slowed me down on my way to get important stuff going. And Teams is a resource hog—even on my relative beast of a system.

It turns out that both Skype for Linux and the Microsoft Teams Linux client have their own settings for this which (naturally) default to autostart on boot.

Thankfully, I did finally find a solution that seems to work for both apps.

Step-By-Step Instructions to Disable Microsoft Apps from Launching at Boot in Linux

Prevent Microsoft Teams from Launching at Boot on Linux

  1. Open the Settings Menu

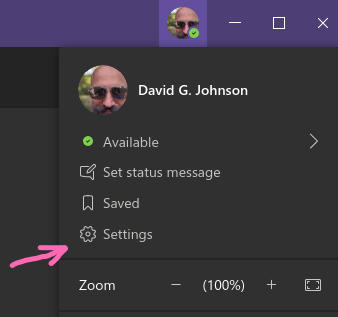
    With the Linux client for Microsoft Teams running, click on your user profile image in the upper right, then choose “Settings” from the menu that drops down.

  2. Uncheck the “Auto-start application” box

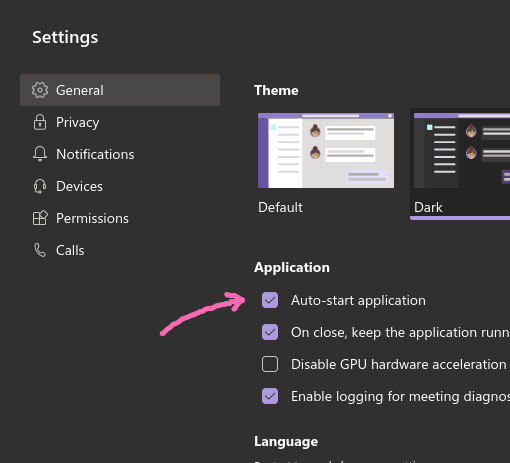
    In the “General” tab, under the “Application” heading, you should find a checkbox labeled “Auto-start application.” It is checked by default. Uncheck it to prevent Microsoft Teams from launching when your system boots.

  3. Close the “Settings” dialogue box

    There is no “save” button in the Linux client for Microsoft Teams. Just hit the “X” in the upper right-hand corner of the “Settings” window to close it.

Prevent Skype from Launching at Boot on Linux

Similar to the Microsoft Teams client, Skype for Linux has an option buried in its settings.

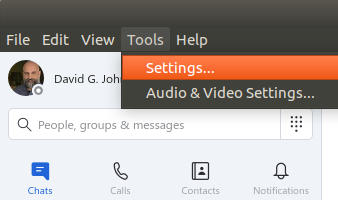
Start with the “Settings” menu option, which you’ll find under “Tools” in Skype’s main menu.

Then choose “General” from the options that appear in the left-hand side of the “Settings” menu:

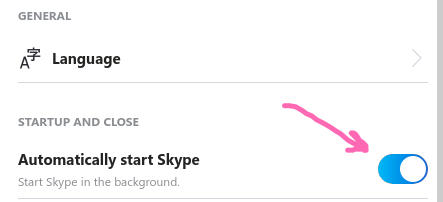
Then find the switch marked “Automatically start Skype” under the “Startup and Close” header. It defaults to the “On” (blue) position:

Slide it to the “off” (gray) position, and you’re all set.

Why Doesn’t Microsoft Follow Conventions?

Ironically, after setting both of these switches, you’ll find the programs no longer appear in the GNOME Startup Applications Preferences:

In my experience, other apps built for Linux can be maintained right from here—at least in terms of their settings for starting up at boot time.

As of this writing, however, these two Microsoft apps cannot. The current settings for Skype and Microsoft Teams related to auto-starting can be viewed from here, but changes made here will be overridden by in-app settings.

I hope you find this helpful!

How to Convert a Word Document to Markdown Format

So you need to get your nifty Word doc into a format that can be used on the web, handled by a wide variety of editors, or — if you’re like me — included in a git repository.

The Problem: You Created Your Content in Microsoft Word

Isn’t that always a problem?

OK I’m not a Microsoft fan these days—almost across the board. Haven’t been for many years.

But not long ago I created a massive proposal for a client that we’re partnering with for some projects. Our client is a Microsoft shop through and through, and I’ve been forced to install Microsoft Teams on my Linux machine to collaborate with their crew. This has actually been a surprisingly good experience—allowing me to use Microsoft Word on Ubuntu. (Yes, this could have been done in the browser, but I find the desktop client for Teams to be quite good.)

But now we need to be able to repurpose and reuse much of the content in the proposal in future proposals, which will require a fair amount of editing, version control, change tracking, etc.

Sure. This could theoretically be done in Microsoft Word, but we all know that git is a much better tool for that job, am I right?

The Goal: Edit Content from Word in a git Repository

From a high-level viewpoint, what I want to do is create a modular set of content elements that can then be loaded into the client’s proposal generator tools with nice formatting.

The Process: Converting a .DOCX File into a Markdown File Using pandoc

I engaged in some trial and error (details below if you’re interested), but for my purposes, pandoc was the tool for the job. Since it’s written in Haskell, there’s an installer for Windows, MacOS, various flavors of Linux … heck, there’s even something for ChromeOS and a Docker image, to boot!

Time needed: 5 minutes

  1. Download and install pandoc

    Save yourself some trouble download the latest release from the pandoc GitHub repository. Ubuntu’s package manager had a very outdated version, but the release in the code repository includes a handy .deb file, which was exactly what I needed for my system.

  2. Open a command prompt and navigate to the folder where your Word doc is located

    On Ubuntu, I hit CTRL+ALT+T to open a new terminal window, and then changed directories:

    cd ~/Documents/MyFolder/

    where MyFolder is the name of the directory where your Word doc is located.

  3. Convert the file

    Running pandoc is relatively straightforward for a job like this:

    pandoc MyWordDoc.docx -f docx -t markdown -o MyWordDoc.md

    where MyWordDoc.docx is the name of the Word document you want to convert and MyWordDoc.md is the name of the output file (call yours anything you want, but it’s useful to name it with a .md file extension).

Frankly, this yielded fantastic results for me. The proposal was intentionally crafted with relatively simple formatting, so there weren’t too many bizarre elements to worry about.

That said, even a cursory glance at the pandoc documentation reveals that it has substantial capabilities. I’m filing that one away for future reference! For now, I’m not even scratching the surface of what it can do.

Huge thanks to John MacFarlane for building pandoc and making it available!

That’s it! I hope this helps! Feel free to throw a comment below one way or the other.

Also: thanks to V. David Zvenyach (@vdavez) for posting this fantastic Gist on GitHub to get me started down the right path on this!

Here’s What Didn’t Work For Me

Everything that follows is just here because it’s cathartic for me to document stuff that I’m nearly 100% certain no one else will find useful. You’re welcome to ignore this part!

Mr. Zvenyach’s approach was to convert a Word document (in .DOCX format) to Markdown using 2 tools: unoconv and then pandoc.

It wasn’t until I’d installed both tools on Ubuntu and run the Word doc through unoconv that I discovered a comment on the gist which indicated that pandoc could now handle Word docs directly.

In fact, using the version of <unoconv> from Ubuntu 18.04’s package manager, I got a nasty error message:

func=xmlSecCheckVersionExt:file=xmlsec.c:line=188:obj=unknown:subj=unknown:error=19:invalid version:mode=abi compatible;expected minor version=2;real minor version=2;expected subminor version=25;real subminor version=26

The unoconv repository’s readme file mentions python compatibility issues related to the version it’s compiled with and the version used by LibreOffice/OpenOffice (my system has LibreOffice given that’s what comes with Ubuntu).

I was going to attempt a workaround as described in the readme to see if the python version might be behind the error message I got, but then I noticed that the script had output an html file.

So I ran that file through pandoc and got a Markdown file. The resulting output wasn’t pleasant.

So I decided to upgrade pandoc and just skip unoconv altogether. Seemed like it might be worth a try.

My Ubuntu 18.04 LTS system ended up with pandoc 1.19.2.4 when I installed using apt install pandoc, but the current release shown on the pandoc website as of this writing is pandoc 2.9.2.1.

Since I got such great results, that was where I stopped. But I certainly could have tried a more recent version of unoconv to see what it might be capable of doing. And I’m sure there are other ways to accomplish this, but I’ll be sticking with pandoc for now.

Be sure to let me know what you’ve discovered or run into. I’d be very interested in hearing about it! Just drop a comment below. Thanks!

Editing Vertical Video in Blender

Just set the “Properties” to 1080×1920, right?

Wrong. The video clip I brought in was weirdly cropped and distorted instead.

I wouldn’t have thought this would’ve been difficult. I tried a few things and nothing was turning out quite like I had expected.

But thankfully, there are generous people on the internet who make things, answer questions, and are all-around good people. I did a fair amount of snooping and testing before sorting out what I think is probably the easiest way to edit and render a clip shot vertically using Blender.

Here’s what I settled on.

How to Edit and Render Vertical Video in Blender.

  1. Download the VSE Transform Tools add-on script for Blender.

    The original project hasn’t been updated in a while, so this fork is the one that worked for me.

    To get the right downloadable ZIP file for your system, go to the releases page and look for the release that matches the version of Blender you’re using.

    Important: double-check your Blender version. I’m on Ubuntu and could’ve sworn that I was using the 2.8 branch of Blender. I hit an error message with the add-on and eventually checked my Blender version and found that I was actually on the 2.79 branch. Oops!

    Make sure to download the .zip file named “VSE_Transform_Tools.zip”

    Huge thank-you to Daniel Oakey for updating this script and of course to kgeogeo for posting the first version.

  2. Install the VSE Transform Tools add-on

    Launch Blender and go to File → User Preferences and then click “Add-ons”.

    Click the “Install Add-on from File…” button and browse to the .zip file you downloaded in step 1. Once you’ve clicked the filename to select it, click the “Install Add-on from File…” button.

    Now click the check mark next to “Sequencer: VSE Transform tools” to activate the add-on.

    Note: here’s where I got an error message the first time. It was because I had installed the latest “Release” of the add-on and it turned out that I wasn’t yet using the 2.8 branch of Blender. That meant I had to remove the add-on (since it wouldn’t activate anyway) and go back and download an earlier “Release” of VSE Transform Tools and install it instead.

  3. Save your user settings if you plan to edit vertical video in the future.

    The add-on is active for your current Blender session. Before you close the “Blender User Preferences” dialogue box, click the “Save User Settings” button to make sure the new add-on will be active every time you launch Blender in the future.

  4. Set the vertical aspect ratio in the “Properties” of the Blender Video Sequence Editor.


    If the “preview” window in Blender still shows a horizontal layout instead of a vertical layout, then you’ll need to set the aspect ratio.

    Note: the remaining steps assume that your source video clip was shot in HD at a resolution that would’ve been 1080p if your camera hadn’t been rotated to shoot vertically.

    View the “Properties” for the Video Sequence Editor just like you would if you were about to render your clip.

    Go to the “Dimensions” panel and find the “Resolution” section.

    Since I usually edit at 1920×1080, my values were set that way. If yours are like mine were, simply swap the X and Y values so that they read:

    X: 1080
    Y: 1920

    Again: if your source video was shot at a different resolution, you’ll need to use values that match your clip.

    Now’s a good time to go ahead and set the slider underneath those values to 100% if yours defaults to 50% the way mine does.

  5. Rotate and Scale Your Video Strip

    Thanks to these instructions, I found it very simple to rotate the video and get it scaled correctly.

    If you haven’t already done so, add your source video clip to the Video Sequence Editor in Blender.

    Select your video strip in the timeline by right-clicking on it. Be sure that just the video strip is selected and not the associated audio strip (assuming you have one of those).

    Press “t” on your keyboard. This creates a transform effect using the add-on we installed.

    Move your mouse to the “preview” window and press “r” on your keyboard. This activates the rotation tool. You can try to rotate it with your mouse, or you can type “90” on your keyboard to get an exact 90 degree rotation.

    With your mouse over the “preview” window, press “s” on your keyboard. This activates a scaling tool. I had no success with the mouse here, but you’ll see an “effect strip” in your video timeline that you can select. With that strip selected, look for the “Scale” section in the Properties (“Edit Strip”) and enter these values:

    X: 1.777777778
    Y: 0.5625

That’s it! Your video should look right in the “preview” window in Blender.

Edit away and render as usual!

How to Undo an Import into Google Calendar

Well crap.

I mistakenly imported an .ICS file into Google Calendar which added 758 events to my personal calendar that I don’t want to have.

Where’s the undo button?

There isn’t a way to undo an import into Google Calendar.

However, thanks to this blog post I found a trick that ended up working for me—with one important modification.

The file I imported into my calendar did not have a “STATUS” field for any of the events. So the find & replace function described in that blog post didn’t work exactly as described.

Here’s the exact process I used.

Undo an import into Google Calendar

  1. Open the original .ics file in a text editor

    Yes… take the same file you imported into Google Calendar. We’re going to make some changes and re-import it. I used Sublime Text, which is one of my absolute favorite editors of all time.

  2. Search for occurrences of “STATUS”

    If your .ics file has “STATUS” fields, then you want to edit each one of them. You can do this in bulk using the “Find & Replace” function in your text editor of choice. If your file has these fields, you can follow the directions in this post to replace the existing status entries. If your file doesn’t have any of those fields, then you can go to the next step like I did.

  3. Find & replace the “END:VEVENT” field

    We need to add a new field to every event in the .ics file. To do this, we’re going to find every occurrence of a field that every event has. I chose to use the “END:VEVENT” field for this.

    The trick is that we need to replace that field with itself plus a new field.

    So I used this as the “Find” criteria:

    END:VEVENT

    And used this as the “Replace” value:

    STATUS:CANCELLED
    END:VEVENT


    This effectively adds a “STATUS” field to every event, and sets the value of that field to “CANCELLED.”

  4. Save the edited .ics file and re-import it into Google Calendar

    I recommend saving the .ICS file with a new name to avoid any confusion. Then, import the newly edited file into Google Calendar exactly as you imported the original file. Once Google Calendar processes this, it will find every matching event and mark them “Cancelled”—effectively removing them from your calendar.

This technique is especially effective if you intended to subscribe to a feed rather than importing a static set of events.

This is precisely what I wanted to do. I want to stay up to date with changes on the 3rd-party calendar, not capture a snapshot of everything on it today and then treat them all as appointments.

Hopefully, this will help someone other than me. Cheers!

How to Actually Change Nameservers for a Route 53 Domain

If you registered a domain using Route 53 (the domain registrar built in to Amazon’s AWS cloud platform) and you need to change the nameservers for it, then you might be tempted to edit the NS (“Nameserver”) records inside Route 53’s “Hosted Zones” area.

The problem is that while that change might look valid, you haven’t actually changed the authoritative Nameservers for the domain.

This is because Route 53 maintains the NS records with the domain registration details (as most domain registrars do), not with the DNS records—despite the fact that NS records can be viewed (and even seemingly edited!) with all the other DNS records at Route 53 (something that most domain registrars in my experience do not do).

I found this out the hard way… by editing the NS records shown in the “Hosted zones” for a particular domain, then waiting. And waiting. And waiting. (If you’re not sure if your settings changes have been effective, take a look at How to Check the Propagation of Your NS Records below.)

Route 53 is a Fantastic DNS Hosting Service. Why Change?

Why even bother switching from Route 53 as the DNS host at all?

It’s a great question. In this particular situation, I found myself needing to use Cloudflare’s DNS in order to accommodate a CNAME record at the root (“zone apex”) of my domain. This is technically not allowed, but Cloudflare facilitates it via some magic they call CNAME flattening. Amazon’s Route 53 actually has something kinda similar they call Alias records, but this turned out to not work for my needs.

Where to Find (and Change) the REAL NS Records for a Route 53 Domain

Note: this section only applies to domains registered with Route 53 from AWS (“Amazon Web Services”). Registered at Route 53 is not necessarily the same thing as hosted (at least with respect to DNS) by Route 53. If your domain was registered elsewhere (e.g. GoDaddy or a registrar that offers a better value like Namecheap,) then the authoritative Nameserver (NS) records must be changed at the registrar, not the DNS host.

Time needed: 5 minutes

Step By Step Instructions for Changing the Authoritative Nameserver (“NS”) Records for Your Domain Registered at Route 53

  1. Go to Route 53 from the AWS Console

    Click here to go directly to Route 53 in the AWS Console (opens in a new tab). If you’re not signed in to your AWS account, you’ll need to do so.

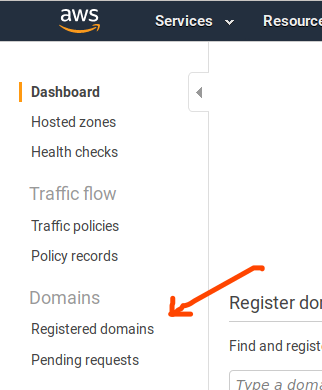
  2. Click on “Registered domains”

    If you’re using a desktop browser, you can find “Registered domains” in the menu on the left-hand side, under the heading, “Domains.”

  3. Click on the domain name whose NS records you want to change

    A list of domains you have registered via the AWS domain registrar connected to the Route 53 service will appear. Click on the domain you need to change.

    Note: if you do not see the name of the domain in this list, then the domain wasn’t registered via the AWS account you are logged into.

    If you are certain that Route 53 / AWS is the domain registrar, then you may need to log in to a different AWS account.

    If you are unsure which registrar the domain was registered with, you may find it helpful to run a WHOIS search for authoritative information about the domain you’re working with. ICANN operates a WHOIS service, and it is arguably the most authoritative one available. Simply enter the domain name into the search box and look for the section labeled, “Registrar.” If you see “Amazon Registrar, Inc.” or something similar, then Amazon / AWS is indeed the registrar. If not, you will need to log in to system for the domain registrar shown in the WHOIS record in order to change the NS records. If the name of the registrar shown doesn’t look familiar to you, try finding it in this list of ICANN-Accredited Registrars. Sometimes the names change or don’t seem related to the website used to registered the domain.

  4. Locate the “Name servers” section

    From a desktop browser, the “Name servers” section can be found in the right-hand column of domain settings.


    It’s likely that you will see the old settings here, which in most cases will be Amazon’s own nameservers, since Route 53 puts those values in by default when a domain is registered. The image above shows the new settings for my domain, since I grabbed the screenshot after saving the settings.

  5. Click “Add or edit name servers”

    To change the nameservers, click the “Add or edit name servers” link. You can see it in the screenshot (above) in Step 4. It’s the blue link inside the orange circle.

  6. Edit the name servers.

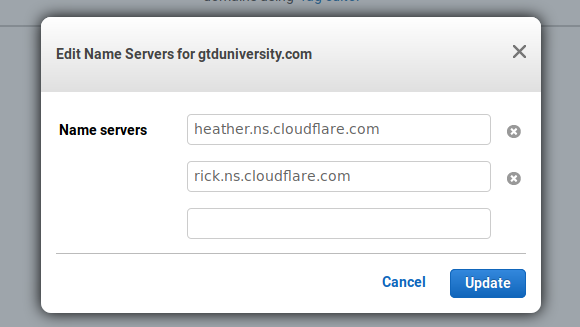
    You will see a popup (shown below) with an editable field for each of the name server (“NS”) records for your domain. Simply edit the contents of each box as needed. Often, only 2 NS records are necessary, but your requirements will vary depending upon the hosting provider / service you’re switching to for your domain.


    If you need to delete extraneous Nameserver records as I did (since AWS adds 4 NS records by default and Cloudflare only provided 2), you should see a small “x” to the right of the box containing the records you want to delete. In most cases, you will want to eliminate any extra records. Leaving them can cause problems if you’re not absolutely certain that you want them to remain.

    To add more records, simply start typing in the empty box that will appear below the last record. You will see another empty box appear below the one you’re typing in. Repeat as needed.

  7. Click the “Update” button to save your changes.

    The last thing you need to do is simply hit the “Update” button. You can see it in blue in the screenshot (above) in Step 6.

    That’s it!

What to Do If Your Nameserver (NS) Records Change Is Taking a Long Time to Propagate

In my case, I began this process by changing the NS records in the Route 53 “Hosted zone” for my domain, and I then waited nearly 48 hours for my NS record changes to propagate. While many DNS servers found in the DNS propagation checkers did, in fact, show the new settings, a number of DNS servers around the world still showed my old NS records instead.

This was troubling to me, because for many years now, DNS changes—especially nameserver changes—often propagate very quickly. In fact, changes like this often propagate in seconds or minutes, not 24 hours, 48 hours, or even 72 hours like in the good old days. These faster propagation timeframes are especially common for newly registered or infrequently used (read: not hugely popular) domain names, since DNS records for these are frequently not found in the caches of very many DNS servers at all.

It was only as I was about to contact Cloudflare support that I stopped to try to analyze why that little fact was bugging me so much.

How to Check the Propagation of Your NS Records

You can easily test for the global propagation of any DNS change using a propagation checker like these:

There’s Something Strange Going On

For my barely-used domain, the old records shouldn’t have been appearing at all in most of the far-flung global DNS servers, and since ICANN’s WHOIS database also returned the old values, I realized that something wasn’t right. There had to be a different setting somewhere that was more authoritative.

Ultimately, it was this answer to a thread the Cloudflare Community that helped me realize my mistake. Thank you, @mnordhoff!

This Seems Unnecessarily Confusing

In my experience, most domain registrars make this process a bit simpler by only providing one place to change the name servers for a domain. In hindsight, it is obvious to me that changing the NS records should happen at the registrar and not at the DNS settings level. But having never needed to make this particular change for a Route 53 domain, it never occurred to me that the NS records I found under “Hosted zones” weren’t the actual NS records for the domain.

Further confusing the matter was the simple fact that some DNS queries that I ran did return values that reflected the edits I made in Route 53’s “Hosted zones” area.

I’m not clear on why Amazon Web Services designed Route 53 to work this way, but perhaps there’s some scenario or another that requires this level of configurability.

Thanks, Cloudflare!

At the end of the day, I’m grateful that Cloudflare’s system refused to consider the NS change complete until the correct records had been changed.

Had Cloudflare recognized the changes I made, I most likely would have carried on with the very mistaken belief that everything was working properly. In reality, some (if not many) systems that tried to access my domain would have encountered weird errors. I probably would not have found out about those issues for quite some time, if ever!

Finally!

Incidentally, once I edited the Name server settings found under Route 53’s “Registered domains” area, I noticed that it was only a matter of seconds before both ICANN’s WHOIS database reflected the change. This seemed to coincide with Cloudflare’s system recognizing the change as well.

I hope you find this useful! This was one heck of a perplexing situation for me—especially after managing domains for ~20 years!

Feel free to throw questions my way in the comments below. I’ll be glad to tackle them when I have a chance. You can also hit me up on Twitter. Cheers!

How to Stop Websites from Offering to Send Notifications

Perhaps someone out there woke up one day and thought to themselves:

You know what I want? I want nearly every website I visit today to throw a pop-up in my face offering to notify me about whatever they find exciting! That way, when I’m minding my own business trying to get stuff done, I’ll have brand new distractions to prevent me from being able to concentrate!

…but that isn’t something I’ve dreamed of, personally. And you may have detected a mild tone of sarcasm here (if not, I apologize that it wasn’t more obvious), but the bottom line is that I really don’t want to be bothered.

I don’t want to be bothered with the question about whether I’d like to get notifications, not to mention notifications themselves!

Good News: You Can Block These in Your Browser

And I mean you can block the questions as well as the actual notifications.

Thanks to Steve Gibson from Gibson Research Corporation, who mentioned this on a recent episode of the Security Now! podcast, here’s a handy set of instructions for you.

Time needed: 2 minutes

How to Block Websites from Offering Notifications in Google Chrome

  1. Open Chrome’s 3-dot menu and click “Settings”

    Using any desktop version of Google Chrome*, locate the 3-dot menu (from Windows and Linux, this is typically at the top right), click it, and then choose “Settings” from the menu that drops down.

    *or Chromium, if you’re rocking the open source version like I am.Security Now!

  2. Click “Advanced” (at the bottom), then find “Content Settings” (or “Site Settings”) in the “Privacy and Security” section

    The setting we’re looking for is hidden under the “Advanced” section, which you can find by scrolling all the way to the bottom of the “Settings” page that opens up. Once you click “Advanced,” the page expands and you’ll see a new section called “Privacy and Security” which contains a number of rows of options.

    Look for the option labeled “Content Settings” (that’s what it was called in my version) or “Site Settings” (this is what Steve Gibson’s instructions said, so his version—and maybe yours too!—might be different).

  3. Click on the “Notifications” option, then move the “Ask before sending” slider to the left

    When you click “Notifications,” a new screen opens up, and if your version of Google Chrome still has the default setting, you’ll see a line near the top that reads, “Ask before sending (recommended).”

    When you move that slider to the left, it turns the notifications requests off, and you should see the text change to “Blocked”.

    Voila! No more requests from websites!

    (While you’re here, you should see a list of any specific sites you’ve either “blocked” or “allowed” notifications from, and you can review/edit your settings.)

How to Block Notification Requests in Firefox

If you use Mozilla Firefox, which is my “daily driver” browser these days, you can block these notifications requests there as well. Here’s how:

  1. Open a new tab in Firefox and type the following in the address bar:

    about:config
  2. You will most likely see a warning that says, “This might void your warranty!” If so, click “I accept the risk!” to continue.
  3. You’ll see a search box at the top of a long list of configuration items. Type in:

    webnotifications

    …and press “Enter”
  4. Locate the setting named, “dom.notifications.enabled” and toggle it to “false.” (I did this by double-clicking it.) It should turn “bold” in appearance, and the “status” column should change to “modified.”
  5. Close the tab. You’re done!

How to Test Your Browser to Confirm the New Settings

As Steve Gibson pointed out, Mozilla (makers of Firefox) were kind enough to build a page just so we can test our browsers to see if the notifications settings change was successful or not.

Well actually, the page was built to serve as part of Mozilla’s excellent developer documentation, but if you visit it from a browser that has the notifications enabled (which they are in most browsers by default), it will pop up a request every time!

The page is called Using the Notifications API. Click it now to see if your settings change worked!

Did You Find This Useful?

I hope so! Feel free to share it, of course. But maybe head on over to Twitter and give Steve Gibson a quick “thank you” for sharing!

And if you’re interested in security and privacy online, be sure to subscribe to Security Now! on your favorite podcast app. It’s worth the listen!

How to Recover a Lost Draft in DokuWiki

TL;DR grep your filesystem for a unique fragment of text that’s likely to only appear in the content you lost when your draft disappeared. Step-by-step instructions here.

Not long ago, we started using DokuWiki as an internal solution for documenting technical details, systems, and best practices in our digital marketing agency. Let me just say that I love the software. It’s easy to install and configure, training users on it is relatively painless, and its simplicity makes it an amazing solution for purposes like ours.

But… like any new system, getting accustomed to its quirks can take some time—especially quirks you don’t run into very often.

Today, I was working on a lengthy new page in DokuWiki and I got busy researching something in another browser tab (or 10). Naturally, I hadn’t hit the “Preview” button, nor had I saved a version.

You can probably guess where this is headed.

I returned to the browser tab where I had DokuWiki open and found the dreaded “editing lock expired” message.

Normally, this wouldn’t be a big deal. We aren’t typically handling lots of concurrent users, so often only one of us is doing any editing at one time, much less the same page. And I’ve found that just by clicking one of the options, I can usually get right back to the editor.

But this was a brand new page that hadn’t been saved yet.

And, being in a hurry, I just started clicking buttons and not paying attention to what I was doing. The next thing I knew, I was looking at an empty editing window..

And this was after spending more than an hour working on the content for the page. It was gone. All of it.

The one thing I had going for me is that I had noticed a “draft autosave” message in the browser at one point. So, I went looking to see if I could find the draft.

Where DokuWiki Stores Drafts

If there had been a saved draft, DokuWiki would have shown it to me when I visited the “edit” screen for that page again. But I didn’t get a message about an existing draft. Also, the “Old Revisions” tab for the page was empty. This made me suspect that my draft had been lost.

So… I connected to the server (via SSH) where the instance of DokuWiki was running and started looking around.

After some Googling, I found that by default, DokuWiki drafts are automatically saved in the /data/cache folder, sorted into numbered subfolders.

Issuing the ls -lt command, I could see which subfolders were the most recent ones, and I looked through them. There were no files with a .draft extension, which explained why DokuWiki hadn’t shown me a draft for my page when I re-opened the editor.

But since I knew I had seen the “draft autosave” message previously, I knew there had been a .draft file at one point. Given that the file no longer existed, surely it had been deleted!

Well that’s great… we can undelete files, right?

Not so fast. This particular server is a VPS instance at Digital Ocean that we use for intranet purposes. Being that it’s a VPS, the typical data recovery tools for Linux like TestDisk and foremost aren’t much help. Virtualized disks means virtualized storage… or something. I’m out of my depths here.

Let’s just say that I tried both of them and didn’t get the result I was hoping for.

Recovering Text Files in Linux

Since DokuWiki stores content in text files on the server, it occurred to me that I should look specifically for a means of recovering .txt files (not even one of the available options in foremost, which has command line options for various file types).

A found a tidbit on recovering deleted plain text files in Linux that gave me some hope. And after just a couple of minutes, I found the entire contents of the last “draft” of my DokuWiki page. Here’s exactly how I did it.

Steps to Recover a Deleted DokuWiki Draft in Linux

  1. Browse the filesystem on the server where your DokuWiki installation is located. In my case, I used ssh to connect to our intranet server in a terminal window.
  2. Determine where the partition containing your filesystem is “mounted” in Linux. From my terminal window, I ran the mount command (on the server, of course) to display a list of mounted filesystems (details on the mount command here). Just running the command by itself with no command line options will display the full list. It’s a lengthy, hairy mess.

    On a normal Linux workstation (non-virtualized), you’d typically be looking for something like /dev/sda1 or /dev/sdb2. On the Digital Ocean VPS, I spotted a line that began with /dev/vda1 on / type ext4. I decided to give that a try.
  3. Next, you’ll need to recall a bit of text from the page you were writing when your draft got lost. The more unique, the better. Also, the longer, the better.

    The command we’re going to run is going to look for bits of text and then kick out the results from its search into a file you can look through. If you use a short or common string of text in the search, then you’ll get a huge file full of useless results (kinda like running a Google search for a common word like “the” would produce).

    In my case, I’d been working on some technical documentation that had a very specific file path in it. So I used that as my search string.
  4. Run the command below, substituting your unique phrase for ‘Unique string in text file’ (be sure to wrap your text in single quotes, though) and your filesystem location for /dev/vda1
    grep -a -C 200 -F 'Unique string in text file' /dev/vda1 > OutputFile
  5. Wait a few minutes. In my case, the grep command exhausted the available memory before too long and exited.
  6. Look through the file that got created. You could use a command like cat OutputFile or, as long as the file isn’t too huge, you could even open the file in an editor like nano by using nano OutputFile. The advantage to the latter method is that you can then use CTRL+W to search through the file.

    On my first attempt, I used a shorter, more common phrase and got an enormous file that was utterly useless. When I gave it some thought and remembered a longer, more unique phrase, the resulting file from the second attempt was much smaller and easier to work with. I found several revisions of my draft, and that gave me options to work with. I decided which was the most complete (recent) and went with it.
  7. Copy the text. You can then paste it somewhere to hold onto it, or just put it right back in DokuWiki. Just be sure you hit “Preview” or “Save” your page this time around.

One quick note: I’m not sure if it was necessary or not, but I actually ran the commands above as “root” by running sudo -i first. I haven’t tested it, but this may actually be a requirement. You might also just be able to preface the commands with a sudo (e.g. sudo grep -a -C 200 -F 'Unique string in text file' /dev/vda1 > OutputFile ). For either of these to work, you’ll obviously need to have an account that has the ability to run sudo.

I hope you find this useful! If so, I’d love to hear about it. Also: if you have questions or problems, you’re welcome to leave those in the comments as well. If I can help, I will gladly do so!