Notice: Function _load_textdomain_just_in_time was called incorrectly. Translation loading for the health-check domain was triggered too early. This is usually an indicator for some code in the plugin or theme running too early. Translations should be loaded at the init action or later. Please see Debugging in WordPress for more information. (This message was added in version 6.7.0.) in /var/www/epiphanydigest.com/html/wp-includes/functions.php on line 6121 Tech Stuff Archives - Page 2 of 6 - EpiphanyDigest
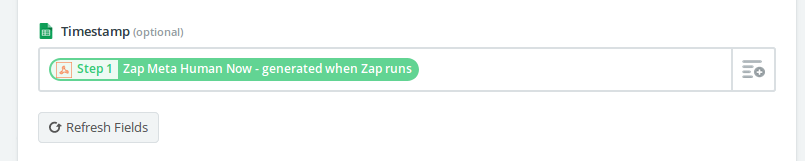
So you’re building a Zap and you need to add a timestamp to an Action, but your Trigger doesn’t include a timestamp. You’re in luck! Zapier has a handy-dandy built-in method for doing this:
{{zap_meta_human_now}}
For example, I just connected up a Webhooks subscription using Zapier’s built-in “Catch Hooks” Trigger.
The REST API I connected to it supplies several data fields, but there’s no record of when the Webhook fires (there’s no date, time, or timestamp in the incoming webhook).
As I had already connected the Trigger to a Google Sheets action (“create a new row”), it occurred to me that there should be a way to just add a timestamp column in Google Sheets and then automate a timestamp when the new row gets created.
Enter Zapier’s fantastic documentation. I thought I might have to use one of Zapier’s nifty built-in “Filter” apps, but actually, all it required was copying and pasting the value above into the Zap Action’s field that correlates to the new column I added in Google Sheets!
As soon as you paste `{{zap_meta_human_now}}` into the field in your Zap, Zapier transforms it like this:
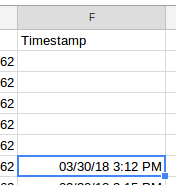
This automagically showed up in Google Sheets like this:
Zapier Timestamp Added to Google Sheets
Time Zone Considerations
One “gotcha” that didn’t occur to me until this Zap started running: I didn’t have a timezone preference set in my Zapier account, so it defaulted to UTC time. Thankfully, this is configurable!
Not only is the time zone in your Zapier account configurable, but you can use multiple time zones in the same account if you need to by using a more specific “timestamp” formula. For example:
{{zap_meta_edt_iso}}
This will spit out a “machine-readable” (ISO 8601) timestamp, including the offset for the timezone you choose. The example above uses edt for “Eastern Daylight Time.” This allows for a little more clarity so that you don’t have a situation where the app receiving your data also offsets for timezone, which would goof up the accuracy of your time (and date).
All the options are at the link reference above.
Reason #537 to Love Zapier
This is a small thing, but it’s a big deal in a situation like the one I was in today. One more reason to love Zapier!
A few weeks ago, I did something I'd been planning to do for a long time: I ordered a Lenovo ThinkPad.
Having looked forward to this for years, I was refreshing the UPS tracking URL like a
fiend, and I knew the moment it arrived. Imagine my shock when I opened the box and discovered that a completely different machine than the one I ordered was in the box.
What followed can only be described as a sequence of customer service SNAFUs that I can only hope were accidents.
Regardless, I'm happy to report that as of today, Lenovo USA has gone above and beyond and made everything right.
Some Important Thanks
There were a few key players who got involved when this situation was rapidly devolving into a disaster:
Kayle, who answered one of my phone calls and then really took ownership of the issue until it was resolved
Erica, who was one of the helpful folks staffing the @lenovohelp Twitter account, and who pushed a case through the necessary escalation to get it to Tonya
Tonya, who called me back in response to the case that was created after my Twitter outreach, and who emailed me her direct contact info in case Kayle's efforts were unsuccessful.
Perhaps the biggest hero of this whole story is a guy from Pennsylvania named Cameron. When I reached out to him because I'd received the machine he ordered, he responded and agreed to ship me my machine (which thankfully he had received) while I shipped his to him.
A Dream Machine
My Lenovo ThinkPad T570 is truly a fantastic piece of hardware. It lives up to the longstanding reputation of the ThinkPad family of laptops going back to the IBM days.
To give you some context: I hatespending money on laptops. There are a number of reasons for this, but the most significant one is probably the sheer amount of abuse that gets dealt out to any laptops I own. With frequent travel for consulting and speaking, my devices get a lot of miles.
Consequently, years ago, I adopted a policy that I would buy the cheapest possible machines that I could find. This approach served me well. My last machine lasted me for over 6 years (a record by at least a factor of 2), and I originally paid less than $500 for it (including tax) at a local Best Buy.
Because I'm a geek and I like to tinker (another reason I don't enjoy laptops as much as the good old days of desktops that you could take apart and upgrade), I'd done a number of things to my last machine, including:
doubling the ram (something which I did twice, much to my own chagrin)
replacing the LCD screen when it died
re-soldering the power supply
connection to the motherboard
Like I said… I've been cheap where laptops were concerned.
But that last machine (a Gateway), was seriously on its last leg. And part of the reason I kept trying to stretch out its life was
because I was avoiding Windows 10 at all cost, and was grateful that Windows 7 was still serving me reasonably well.
Since I'd proven I could make a cheap machine last so long, I decided to re-think my strategy a bit. What could I do with a
high quality piece of hardware that was
spec'd out with a super-fast SSD, a top-of-the-line processor, a decent GPU, and tons of RAM?
For
high quality hardware in the laptop space, there's nothing better than Lenovo's ThinkPad line. And they tend to be built to be taken apart and upgraded, which adds an enormous benefit to me personally.
So I started watching the Lenovo Outlet (yes, even when I'm making a bigger investment, I can be a little cheap) for a ThinkPad with at least 32GB of RAM, an Intel I7 CPU, and a decent NVIDIA GPU video adapter. When I found this ThinkPad T570 that I'm writing this blog post on right now, I was elated. It was a great
price, and had everything I was looking for (except the SSD capacity, which I planned to fix by adding another SSD).
Perhaps now you can see why I was so utterly disappointed when I got a completely different machine that didn't have anywhere near the specs that I had paid for.
I immediately opened a chat session with a support person on the Lenovo Outlet website, got lots of assurances, but ultimately no help. After a few days of giving plenty of time for people to work and swapping emails, I took to Twitter:
Hey @lenovohelp: this week, I received the wrong laptop, & the one I ordered from the Lenovo Outlet got delivered to someone in another state. Chatting with support has gotten me nowhere. Can you help?
They responded, but
initially they just investigated my existing case and weren't able to improve the situation.
A few days later, I was tired of waiting, so I placed a phone call and expressed significant displeasure with the entire support experience. I kept poor Kayle on the line for far longer than she wanted to be, while I tried to urge her to do the right thing for me.
Not confident that that would turn out well, I took to Twitter again:
Another day of runaround from @lenovohelp with no resolution to my issue. This is quickly turning into a very negative experience.
That resulted in a call from Tonya, who checked into what was being done for me, and who also invited me to contact her directly if things didn't turn out well.
Ultimately, Lenovo paid for the shipping cost I incurred when I sent the laptop I initially received to its rightful owner. I'm sure that had my initial contacts with their support people worked out, they would have arranged for that to occur, but they were simply not responding fast enough nor appropriately.
It was an unusual situation, to be sure. When I compared the order numbers for my order and that of Pennsylvania Cameron's, they looked similar. It would be easy if you were working in a Lenovo warehouse full of nearly identical boxes to stick the wrong shipping labels on two boxes. Thankfully, the person who made this simple mistake managed to swap the shipping labels. It would have been a real disaster if multiple orders/shipments were affected.
In any event, I couldn't imagine having Pennsylvania Cameron ship my long-awaited machine back to Lenovo's warehouse, letting them sort out what happened, and then almost certainly be unable to ship it to me for one reason or another. (In fact, the first thing the customer support person I initially contacted via chat wanted to do was cancel and refund my order. I didn't want my money back, dangit. I wanted the machine I had watched the Lenovo Outlet for!)
In any event, I've managed to write one of my longest blog posts in recent history about a customer service issue. I'm going to wrap it up now by saying this:
Even though I initially had a poor experience, Lenovo USA has truly won my trust and turned a negative situation into a perfectly acceptable one.
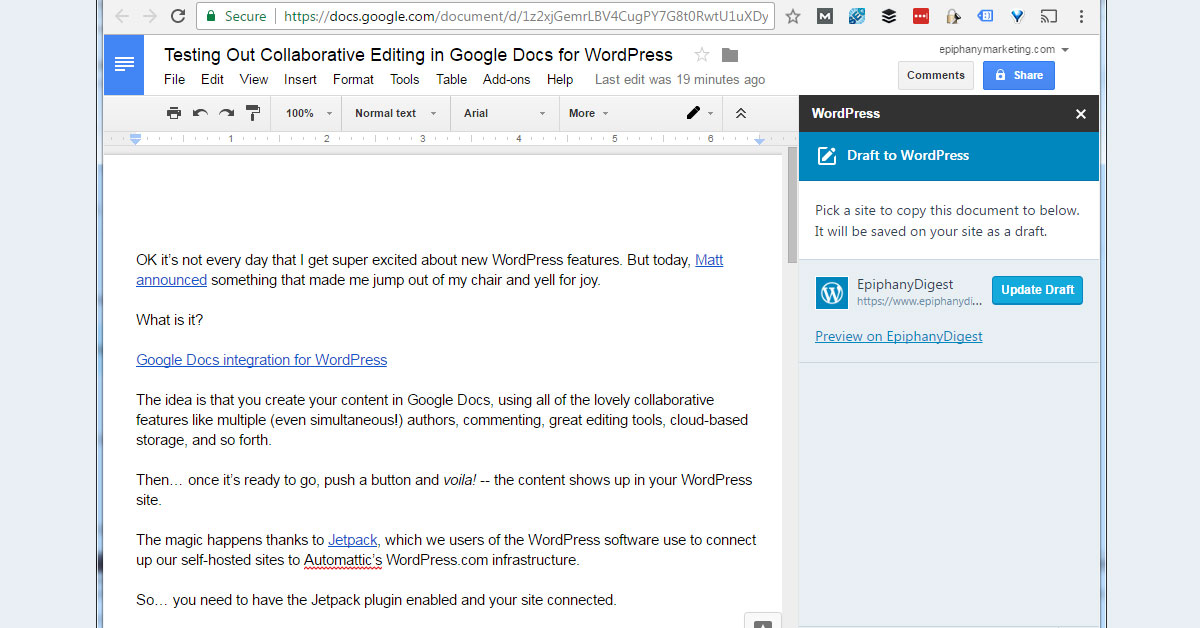
OK it’s not every day that I get super excited about new WordPress features. But today, Matt announced something that made me jump out of my chair and yell for joy.
The idea is that you create your content in Google Docs, using all of the lovely collaborative features like multiple (even simultaneous!) authors, commenting, great editing tools, cloud-based storage, and so forth.
Then… once it’s ready to go, push a button and voila! — the content shows up in your WordPress site.
The magic happens thanks to Jetpack, which we users of the WordPress software use to connect up our self-hosted sites to Automattic’s WordPress.com infrastructure.
So… you need to have the Jetpack plugin enabled and your site connected.
Then you need to use the WordPress.com for Google Docs add-in (that link goes to the Google Web Store page for the add-in, but you can also get it by going to “Add-ons” inside a Google Doc).
As much as I love the WordPress editor, this is a game changer. I live in Google Docs, especially since I acquired my first Chromebook about a year ago.
There’s one more hiccup. The authentication passes through multiple layers (after all, you wouldn’t want just anyone editing a Google Doc to be able to push content to your website, would you?):
Your Google Account (make sure you’re signed in to the one you want)
Your WordPress.com account — meaning the account that you used to connect your self-hosted WordPress site up to the Jetpack/WordPress.com infrastructure. (Here again: make you’re signed in to the right one!)
Your local WordPress account (meaning the account that you sign in to your actual WordPress site with)
It was at that last authentication step that I hit a snag:
I had never activated the Jetpack JSON API on this site. So… I had to go through the Authorization process one more time after fixing that.
But hey! Needing to screenshot an error message gave me a chance to see how images work in this whole process. I’ll let you know once this content gets pushed to my WordPress site!
Update
After hitting the “Save Draft” button, my content got magically pushed to this site. (If you hadn’t figured it out, I wrote the first draft of this in Google Docs!)
The image came along with it!
But…. my cropping didn’t. The image above is the full screenshot. In Google Docs, I had cropped it to get rid of the 37 Chrome tabs and so forth (hyperbole, I know, but that’s only one of my 3 current Chrome windows!).
All in all, this is a fantastic experience. There’s even a button in Google Docs to “Preview” the post on the live site, and of course a way to update the draft from Google Docs.
I’m guessing you’ll have to manage your own workflow for which version is the latest. I assume if I make changes on my site, but then hit the “Update Draft” button in Google Docs, that version will overwrite whatever is on the site. But this is to be expected. (And I haven’t tested it yet, so… who knows?)
Recently, I wrote about the book, Learn to Program With Minecraft, and shared my experience getting set up to use the book with Ubuntu instead of with Windows or Mac OSX.
Yesterday I learned that the author of that book, Craig Richardson, appeared on this week’s episode of Triangulation with Leo Laporte. It’s a fun episode… they set up Leo’s Mac to run a local Minecraft server, and test out a bunch of fun stuff from the book. Well worth the watch!
Update 3/20/2016: Thanks to one of our readers, Fabrizio Fazzino, for pointing out that a software update since these instructions were prepared makes it necessary to modify them. Specifically, we’re changing how the Spigot Server component gets installed & used. I’ve updated the instructions below accordingly.
Also, he’s prepared a more succinct set of instructions that summarizes the steps. If you’re not interested in learning as much about how and why this works, I’d recommend you check my “Quick Note About Folder Structure” (in the yellow box below) and then follow his instructions in this comment, which Fabrizio was kind enough to post here since his original blog post is no longer accessible to the public.
Python is a programming language that I’ve long wanted to get acquainted with, and since she loves Minecraft so much, I felt like this book would be an ideal way for my daughter to also gain some exposure to it.
The only problem? We each use the Ubuntu distribution of Linux instead of Windows or Mac OSX.
You wouldn’t think this would be a problem: Minecraft is built in Java, which runs without a problem on Ubuntu (and many other platforms). Python is readily available for Ubuntu. Seems like a no-brainer, right?
Well… not quite. After the Amazon box arrived, I spotted this note on the back cover of the book:
The code in this book will run on Windows 7 or later, OS X 10.10 or later, or the Raspberry Pi. (See the last page for detailed requirements.)
No problem! The Raspberry Pi runs a special distribution of Linux called “Raspbian,” which is a version of Debian Linux, which is the upstream version of Linux that Ubuntu is based on. In other words: Raspbian & Ubuntu are cousins.
It seems reasonable, then, that if you can get this stuff working on the Raspberry Pi, then a much more powerful laptop running Ubuntu should be great!
Even more encouraging, there’s a nifty footnote at the bottom of Page 1 of the Learn to Program With Minecraft book which reads:
Since the book had already been out for a few weeks, this note gave me hope that perhaps some instructions for setting up all the tools on Ubuntu might’ve already been added. Unfortunately, this is not the case (yet, anyway).
So… I decided to try to do it anyway. Since author Craig Richardson and the No Starch Press team had prepared download packages for the Mac & Windows platforms, I figured that at the very worst, there would be some clues in those packages that might help me get going.
Getting Minecraft & Python Set Up On Ubuntu
First, here is a simple set of requirements (as I understand them) for you to be able to use the instructions in the Learn to Program With Minecraft book on Ubuntu:
Minecraft – this is the game itself. If you don’t already have a license for the game, you’ll need to pick one up and install it. “Installing” Minecraft for Ubuntu is quite easy: simply download the .jar file from your Mojang account and launch it. We had done this long ago, so this step was already completed for us.
Python – This is the programming language you’re learning. More on finding & installing it in a moment.
Java – while you probably have a basic interpreter (the “runtime environment”) for Java already, you’ll need the Java Development Kit to run this next tool..
Spigot Server – This is Minecraft “server” software, which you can run on the same computer that Minecraft will run on. You need this because the Python connection to Minecraft relies on a server plugin that you can’t just run with your plain old Minecraft installation.
Minecraft Python API (py3minepi) – It turns out that this connection between Python and Minecraft was originally developed especially for the Raspberry Pi. The way I understand it, this tool is an API for Minecraft that works with Python. You need it.
Raspberry Juice Some brave souls created Raspberry Juice as a way to run the Python/Minecraft connection on other platforms (not just the Raspberry Pi). When you follow the instructions in the book for Windows or Mac, this little gem is bundled in. But if you’re installing from scratch for Ubuntu, you’ll need to get it yourself. Not realizing this, I installed all the other tools and ran into a really nasty error that I couldn’t get around:
This error message was the part of the installation that was trickiest to resolve, but after a bit of digging, I was able to work it out.
The detailed instructions for each of these items follows (below). The one note I’d like to insert here is this:
I’m using Ubuntu 14.04 LTS, so your installation steps may vary somewhat if you’re using a different Ubuntu version.
Installing Python 3
You actually need 3 separate items that fall under the Python 3 heading:
Python 3 (the programming language itself)
IDLE (the development environment for Python, a/k/a the place where you’ll type commands and write programs)
PIP (the “package manager” for Python). You need this to install
For packages that are developed for Ubuntu, I tend to prefer using the “Ubuntu Software Center” to install stuff like this.
The only “gotcha” with Python is that there are a number of software versions and tools and so forth. So… launch the Software Center and search “python3” (with no space).
You should see a listing that says something like, “Interactive high-level object-oriented language (default python3 version)”
That’s the one you want. Do yourself a favor and click on “more info” so you can check the box for “IDLE 3” while you’re at it.
Install those, then run a similar search for “python3-pip” so you can use the package manager.
Prefer the command line to the Software Center?
Here are the commands to get python installed if you’d rather do this than use the Software Center. You’ll need to open a terminal to run these:
With Ubuntu, as is often the case, you have options here. You definitely need the Java SE SDK version 7 (presumably something newer would work as well) for the Spigot server to run.
From the Ubuntu Software Center, just search “openjdk-7” and look for the “headless” option (this is lighter weight because it doesn’t include a GUI).
Or from the terminal:
sudo apt-get install openjdk-7-jre-headless
Installing Spigot Server
Update 3/20/2016 As I mentioned in the update at the top of this post, Spigot Server has released a new version: 1.9. Since the other components we’re using have not yet (as of today) updated to accommodate this, you’ll need to make sure that you download Spigot 1.8.8 and use it even though it is not the most recent version available.
Spigot is one of the most popular Minecraft server options, and is a necessary component in order to get Python & Minecraft talking to each other.
Getting the server software up & running is a matter of compiling the latest version. This reference page from the Spigot wiki is the one I used, and it seems to stay up to date. However, since it contains the instructions for multiple platforms, I’ll endeavor to simplify here.
One item to install first that will make this simpler is git. You’re going to need a terminal window anyway, so I’d recommend going ahead and opening it now and running this command to install git:
To help make things easier on yourself, you might find it useful to use a somewhat similar folder structure to the one described in Learn to Program with Minecraft for the Windows & Mac users.
To accomplish this for myself, I opened the “Files” application and browsed to my “Documents” folder, then created a new folder called “MinecraftPython”, then inside that folder another called “MinecraftTools”.
I recommend moving the BuildTools.jar file that you just downloaded into that “MinecraftTools” folder.
To do this, you have a few options:
You can drag and drop using 2 “Files” windows, or
you can cut & paste if you just have one of those windows open.
Otherwise, you can move the file from the command line in a Terminal window with something like: mv ./Downloads/BuildTools.jar ./Documents/MinecraftPython/MinecraftTools/BuildTools.jar. Of course, you’ll need to modify that command to suit your particular situation (if you’re using a different folder structure or starting from a different location in your Terminal window than I did, for example).
Once that’s done, from your Terminal window, you’ll need to change directories to the location of your BuildTools.jar file. Depending upon where you’re starting from, that might mean a command that looks something like: cd ./Documents/MinecraftPython/MinecraftTools.
Then you’ll want to execute these 2 commands:
git config --global --unset core.autocrlf
java -jar BuildTools.jar This needs to be tweaked to make sure you use version 1.8.8 of the Spigot Server component (for now).
java -jar BuildTools.jar --rev 1.8.8
This will get the Spigot Server built. In order to finish installing, creating a startup script will be helpful. You can create one with gedit by running a command like this:
gedit start.sh
The gedit text editor will open. Copy and paste this into the editor:
Note: the filename “spigot-1.8.8.jar” was the current filename as of this writing. You’ll need to confirm that filename based upon your build, and edit the command here if it’s different use that filename as is for now (until the other components are updated to accommodate newer versions of Spigot server). Also, the Spigot instructions specifically note that the ‘MaxPermSize’ directive is no longer needed or supported in Java 8, but since I’m using Java 7, I left it in mine.
Save the file and close gedit.
Next, you’ll need to make the script executable. From the same terminal window, type:
chmod +x start.sh
Before you launch this file, you’ll need to accept the End User License Agreement. Locate the eula.txt file in your “MinecraftTools” folder and open it for editing. You can do this from a terminal window by typing gedit eula.txt . From the “Files” application, you can right-click the eula.txt file and choose the option to edit it with gedit.
Before you change the line that reads eula=false to eula=true, you’ll want to review the Minecraft End User License Agreement and verify that you’re ready to agree to its terms. Once you are, changing the value to “true” and saving the file will allow you to launch the Spigot Server without a hiccup (assuming that it is installed correctly).
Starting Your Spigot Server
Once that’s completed, you can start the Spigot Server to ensure it’s working properly. You’ll use this same command start the server each time you need to use it:
./start.sh
If all has gone according to plan, you should see the output of the server startup process in your terminal window. The Spigot Server will create a new Minecraft world as it launches, and once it’s up and running, you’ll see a > prompt with a flashing cursor next to it. You need to keep this window open.
Testing Your Spigot Server Installation
To test your server, launch Minecraft as usual.
Click “Multiplayer” and then choose “Add Server”
Give your new local server a name. The book recommends Minecraft Python World for it. In the “Address” box, type localhost. There’s a picture at the top of page 17 of the book which you can refer to as an example.
Quick note: if you’re using a typical Minecraft installation, then your Minecraft version will have updated by now to a version newer than the Spigot Server version. If so, you’ll need to edit your “Profile” and specify the Minecraft version to run so that it matches your Spigot Server version (1.8.8 if you’re following this writing exactly). Alternatively, you can create a new profile instead (this is what I chose to do) so that your main Minecraft profile continues to use the latest Minecraft version.
You can double-click the Minecraft Python World and check out your new world.
Note:The author’s downloads for Mac & Windows operating systems are pre-configured to be in Creative Mode. This world will be in Survival Mode instead. This can be changed by editing the server.properties file in your “MinecraftTools” folder and changing the line that reads gamemode=0 to gamemode=1 . You may also find that you need to change the line that reads force-gamemode=false to force-gamemode=true .
Play as long as you like, but before proceeding: you’ll want to stop the Spigot Server. In the window with the flashing cursor, simply type stop at the > prompt, and the Spigot Server will save everything and shut itself down.
Installing the Minecraft Python API
Next, you’ll need the Minecraft Python API. There’s a Github repository here:
https://github.com/py3minepi/py3minepi
I recommend just hitting the “Download Zip” button there. The file will be saved to your “Downloads” folder. You’ll want to extract the .zip file’s contents. You’ll end up with a folder called py3minepi-master, which we need to copy into the “Documents/MinecraftPython/MinecraftTools/” folder.
Once the folder has been relocated to the “MinecraftTools” folder, we need to run a command to install it. From your terminal window (assuming your current directory is still the “MinecraftTools” folder), type:
sudo pip3 install ./py3minepi-master
Installing Raspberry Juice
The last piece, I believe, is the actual Raspberry Juice plugin for Spigot. You can find it on the project’s home page:
Look for the “Recent Files” link on the right. As of this writing, the latest was RaspberryJuice v1.7 for 1.8.1. Follow the links, and eventually, you’ll end up with a .jar file.
This file needs to be copied into the “plugins” folder of your Spigot Server installation. If you’re following the directions here specifically, then you’ll find that folder at “/Documents/MinecraftPython/MinecraftTools/plugins”
Put the .jar file in that folder. Your Spigot Server will automatically find it the next time it starts up.
Time to Test!
If all has gone well, you should be ready for the “Getting to Know IDLE” section of the setup instructions on Page 20 of the book. If you’re able to successfully run the tests there, you’ve got everything set up correctly!
It was at this stage that I got that nasty error I mentioned earlier:
When I got the “connection refused” error, I did a bunch of searching, but nothing seemed to fit. Ultimately, I hunted down the port number that the “minecraft.py” script was trying to connect to (port 4711). This didn’t make any sense, because the Minecraft server software defaults to port 25565. Searching around for information about what might be running (or not running, in my case) on port 4711 was what yielded the information about the Minecraft Python API.
Thankfully, author Craig Richardson left some clues for us in the pre-packaged downloads he made available for Windows & OSX. On my Ubuntu system, I opened up the download he prepared for OSX (since OSX and Linux are more or less cousins, I figured it would be worth a shot) and found Raspberry Juice. It was perhaps the least obvious component of this whole setup.
So far, this setup has been working for me. I’m not 100% certain that I haven’t missed something, but if I have, then it doesn’t appear to be affecting things so far.
I hope you find this helpful! Let me know what you run into in the comments. I’ll do my best to help!
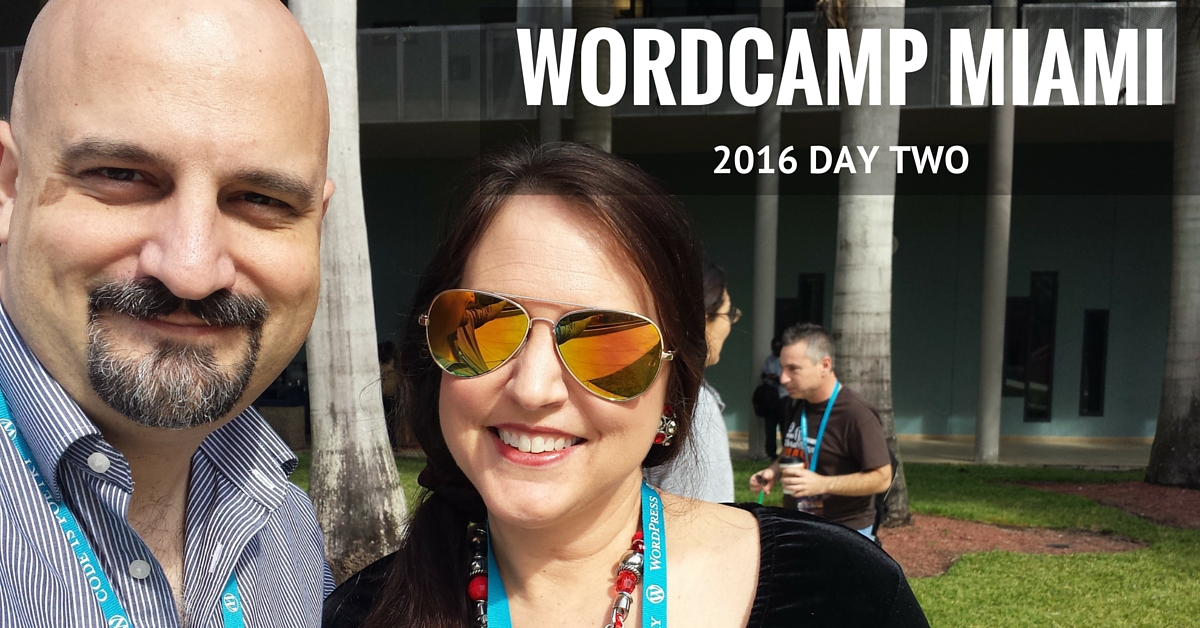
My wonderful, gorgeous wife, Jill, and I arrived on campus at Florida International University for day 2 of WordCamp Miami 2016… just in time to enjoy another round of bagels & coffee from Einstein Brothers Bagels.
After the opening remarks, we got our dose of Cain & Obenland in the Morning, which was a riot.
Their final segment on WordPress news was fun. Some of the tidbits they shared about what’s happening with WordPress Core were exciting, including the fact that we’ll soon be saying goodbye to the “Bleak Screen of Sadnessâ„¢”
Jill and I stayed together for the first session of the morning, and we caught “Bootstrapping Your WordPress Business – Going from 0 to 10 Employees” with Scott Mann, who runs Highforge, an agency in Central Florida. Scott started with a compelling story about smoke jumper Wagner “Wag” Dodge and a famous firefighting incident at Mann Gulch which resulted in an on-the-spot innovation that continues to be used by firefighters today.
The point: when you’re bootstrapping your business, you’ll probably need to keep replacing your straps, because they’re going to get burned off!
Scott’s session ran the gamut from tools you can use as you bootstrap to finding and hiring the right talent and even when and how to raise your rates. Very practical. If you own a business and you’re bootstrapping and trying to grow, check out his slides or catch the replay if you can.
Next, Jill headed off to the “All Users” track, and I stuck around for “Product Marketing Tips for Commercial Plugins” with Chris Lema. Â While he was specifically focused on developers who are selling premium WordPress plugins, his actual talk contained a ton of useful tactics for any business.
The Afternoon
The Business track that the organizers put together for today has turned out to be utterly fantastic.
A very pleasant surprise was the panel discussion which featured Brett Cohen, co-founder of emagine, Karim Marucchi, CEO of Crowd FavoriteAndrew Norcross, founder of Reaktiv Studios, and Kimberly Lipari, COO, Valet. The listed topic was, “How to Scale Your Business,” and the discussion was incredibly real and authentic. Most of all, it was really valuable.
My amazing wife & business partner, @GracefulJill, and I arrived on campus at FIU today just in time to get a great parking spot and jump in the registration line.
Right away, the #WCMIA team showed that they had done a great job getting things organized—the registration line ran smoothly, and we got some great event swag.
After visiting some of the sponsors’ tables, we staked out a couple of seats for the opening remarks session
We planned to divide & conquer, but ended up both catching the session “How to Keep a Client Happy” by Christina Siegler on the Content & Design track.
After that session, I snuck over to the Development track to hear a couple of more technical sessions, and Jill stayed for more Content & Design goodness. She spoke very highly of the session with Michelle Schulp on “Becoming The Client Your Developer Loves”—so much so that I’m planning to catch the recording.
In “Writing Multilingual Plugins and Themes,” John Bloch didn’t shy away from tech issues, and he dug right into code samples while explaining the concepts around internationalization (“I18N” for short).
Then I caught Chris Wiegman, whom I’ve gotten somewhat acquainted with since he relocated to paradise Sarasota a little over a year ago. He’s known as an expert in WordPress security, and his “Application Security For WordPress Developers” was entertaining, informative, and thorough… not to mention somewhat over my head in spots.
On my way to the Development track, I bumped into Pam Blizzard, one of the organizers of the WordPress community in Sarasota.
Pam Blizzard, a valuable member of the Sarasota WordPress community
I’ll try to come back and fill in more about our experience as time permits!
The Afternoon
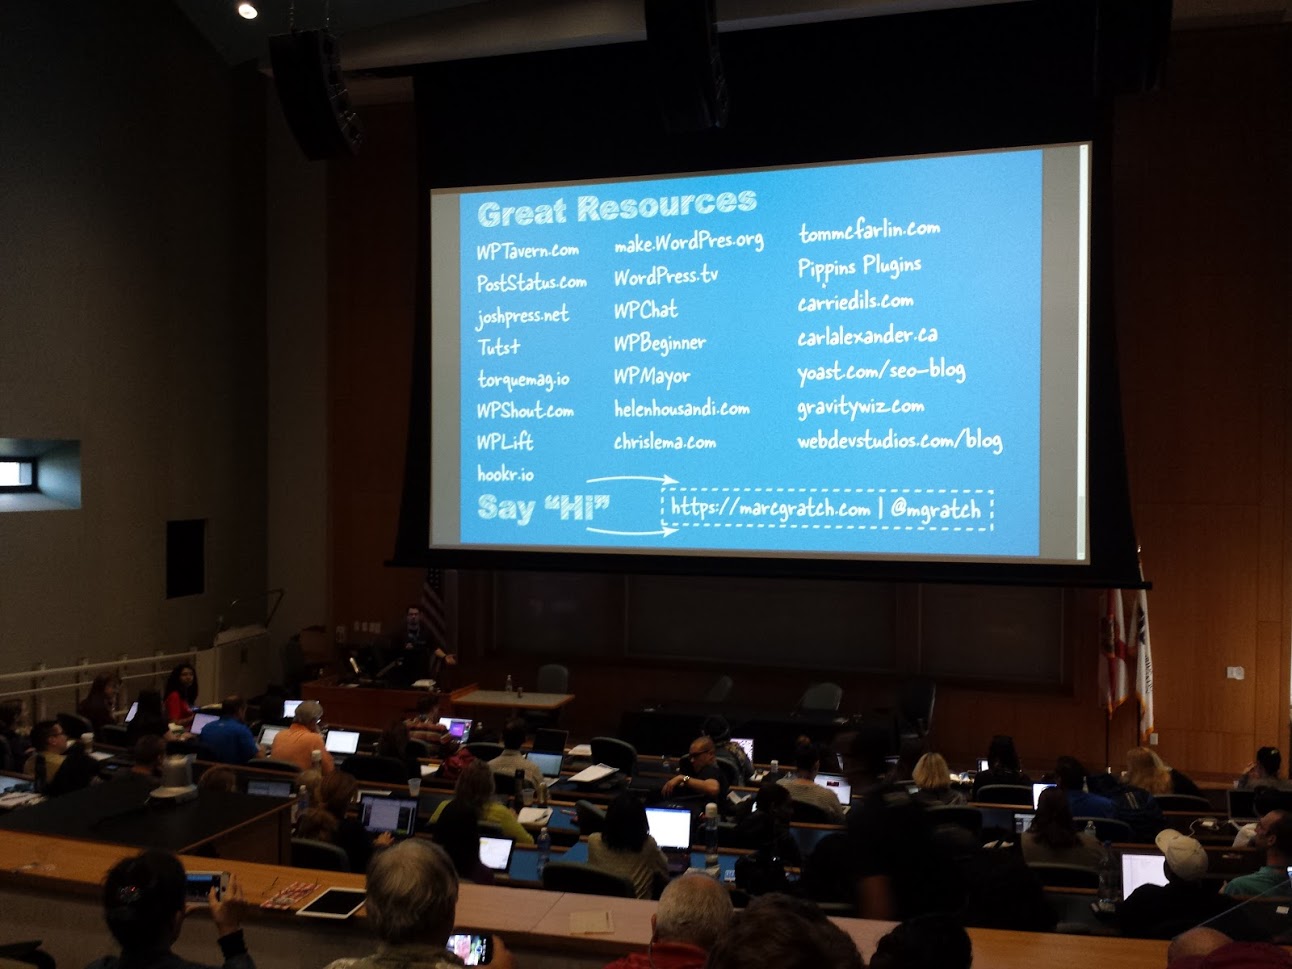
There was an authentic, vulnerable talk on getting the most out of the WordPress community from Marc Gratch. He shared some very personal experiences (that I’m sure many of us can identify with) about working alone & working remotely, and how the amazing WordPress community can be a great support system.
His “give more than you get” approach was fantastic, and true to form, he gave a great of resources he’s built over time:
Then a fast-paced session on building a 6-figure email list with Syed Balkhi, creator of Opt-In Monster, WPBeginner, and many other sites & tools.
Nile Flores did a thorough, informative session on Yoast SEO, but managed to cover quite a bit of “SEO basics” ground in the process. This session should be mandatory for site owners who are new to how Google’s search results work and need a nice overview.
Then I caught up with Jill and we got some great lessons from Dr. Anthony Miyazaki about what is an acceptable number of times to dip your chip into the guacamole. He showed how you have to plan ahead so that you have enough of your chip left to really maximize your dip.
One of the serious considerations of our time is the need to store and have reasonably usable access to all the digital media we are creating.
How often do we snap a photo and upload straight from our mobile devices to services like Instagram and Facebook?
How easy is it, using the apps on our phones, to bang out a tweet or a status update?
But have you ever given any thought to what might happen if those sites disappeared? How much of your personal life is recorded there?
Consider my own situation.
I joined Facebook in 2008, coming up on 8 years ago now, and have had countless meaningful interactions there with people I care about (let’s set aside all the less meaningful interactions for the moment).
In that time, I’ve been through maybe 6 or 7 smartphones. I’ve snapped thousands of photos, many of which I have no idea where to find at the moment*, but some of which I have uploaded to sites like Facebook, Twitter, and various iterations of what is now Google Photos.
Unlike in decades past, today we simply don’t “print” the photos we take (I can’t think of a good reason why I would, frankly), but this means that we also don’t give much consideration to what happens to those photos—not to mention our personal interactions and communications, and even stuff we upload to the web or social networks—after the fact.
I don’t purport to have all the answers. In fact, my purposes in writing this post today are more around sparking some thought rather than speaking to specific solutions, which almost certainly will vary from person to person.
But if you treat your social media profiles like a de facto backup of some of your most treasured photos (like I have), and you’ve had meaningful interactions with others on social networks (like I have), then an important question needs to be raised:
What would you lose if one or more of these sites were to shut down?
This week, I spent a fair amount of time getting better acquainted with some of the principles established by the #Indieweb community. This is a group of people committed to the creation and viability of the “open web.”
The terminology around the “open web” is used to draw a distinction between the web that can and should be created and used by individuals, as opposed to the “corporate web,” which is centered around commercially driven services.
One of the goals of the movement is to keep the web open and free. This doesn’t exclude the usage of paid services—on the contrary, it’s clear that even users of the open web will need to pay for services like domain registration and web hosting (although there are, as I discovered this week, more free options for those items than I would’ve guessed).
In fact, the distinction between the “free and open” web and the “corporate” web isn’t so much one of payment, but rather of ownership, access to, and control over one’s own data.
To illustrate this, IndieWebCamp, one of the groups central to the #IndieWeb movement, maintains a list of “site deaths,” which are often free (but not always) services for users to write blogs and upload/store/share photos, among other things, but which have famously shut down over the years. Often, this leaves users with little or no opportunity to download the data they’ve stored on these services.
Examples? When Geocities shut down in 2009, something like 23 million pages disappeared from the web. Previously, AOL killed off AOL Hometown, removing more than 14 million sites from the web. Google has killed off a number of products, including Google Buzz, Google Reader (which personally affected me), Google Wave, and countless others.
In many cases, users had even paid for the services, but due to a variety of factors, such as:
lack of profitability
changes in ownership
mismanagement
shifts in direction, and even
loss of interest on the part of the owner(s)
…the services get shut down anyway.
There are a couple of tragic ramifications of these site deaths.
One is that often the people most harmed are the ones least knowledgeable about setting up and maintaining their own web presence.
Often the appeal of a free or inexpensive blogging platform (for example) is that one doesn’t need to gain any real know-how in order to use it.
While that’s great in terms of getting people to get started publishing on the web or otherwise using the web (which I’m certainly in favor of), it has often ultimately sucker-punched them by never creating an incentive (until it’s too late, of course) to gain the minimal amount of knowledge and experience they would need to maintain something for themselves.
Even when the users are given the opportunity to download their data, which is not always the case, these are the very people least likely to know how to make use of what they’ve downloaded.
Another tragic loss is for the web community at large. When a service of any significant size shuts down, often this results in the loss of tremendous amounts of information. Vanishing URLs means broken links throughout the parts of the web that remain, which makes the web less useful and more costly to maintain for us all.
Some of what is lost is of more value to the individuals that originally uploaded or published it than to the rest of us, of course. But even personal diaries and blogs that are not widely read contribute to our large-scale understanding of the zeitgeist of the times in which they were created, and that is something that could be preserved, and for which there is value to us from a societal perspective.
Geocities, as an example, has accurately been described as a veritable time capsule of the web as it was in the mid-1990s.
Maintaining Our Freedoms
At the risk of being accused of philosophizing here, I’d like to step away from the pragmatic considerations around the risk of losing content we’ve uploaded, and look for a moment at a more fundamental risk of loss: our freedom of speech.
The more we concentrate our online speech in “silos” controlled by others, the more risk we face that our freedoms will be suppressed.
It’s a simple truth that centralization tends toward control.
Consider this: according to Time, as of mid-2015 that American Facebook users spend nearly 40 minutes per day on the site.
According to a study published in April, 2015, a team of researchers found that the majority of Facebook users were not aware that their news feed was being filtered and controlled by Facebook. (More on this here.)
As a marketer, I’ve understood for many years that as a practical consideration, Facebook must have an algorithm in order to provide users with a decent experience.
But the question is, would Facebook ever intentionally manipulate that experience in order to engineer a particular outcome?
So… we’re spending an enormous amount of our time in an environment where most of the participants are unaware that what they see has been engineered for them. Furthermore, the audience for the content they post to the site is also then being manipulated.
Let me emphasize that it’s clear (to me, at least) that Facebook has to use an algorithm in order to provide the experience to their users that keeps them coming back every day. Most users don’t realize that a real-time feed of all the content published by the other Facebook users they’ve friended and followed, combined with content published by Pages they’ve liked, would actually be unenjoyable, if not entirely unusable.
But the logical consequence of this is that a single point of control has been created. Whether for good or for ill—or for completely benign purposes—control over who sees what we post exists. Furthermore, anyone is at risk of having their account shut down for violating (knowingly or unknowingly, intentionally or otherwise) a constantly-changing, complex terms of service.
So… even if you aren’t concerned about a service like Facebook shutting down, there remains the distinct possibility that you risk losing the content you’ve shared there anyway.
Includes “Freedom of Thought Ben Franklin” by k_donovan11 – Congressional Quote. Licensed under CC BY 2.0 via Wikimedia Commons
In other words, someone else controls—and may, in fact, own—what you’ve posted online.
What Can We Do?
All of this has strengthened my resolve to be committed to the practice of owning and maintaining my own data. It isn’t that I won’t use any commercial services or even the “silos” (like Facebook and Twitter) that are used by larger numbers of people, it’s just that I’m going to make an intentional effort to—where possible—use the principles adopted by the IndieWeb community and others in order to make sure that I create and maintain my own copies of the content I create and upload.
There are 2 principal means of carrying out this effort. One is POSSE: Publish on your Own Site, Syndicate Everywhere (or Elsewhere). This means that I’ll use platforms like Known in order to create content like Tweets and Facebook statuses, as often as practical, and then allow the content to be syndicated from there to Twitter and Facebook. I began tinkering with Known more than a year ago on the site social.thedavidjohnson.com.
As an example, here is a tweet I published recently about this very topic:
Spending some time this week getting better acquainted with the #indiewebcamp community. Lots to learn!
While it looks like any other tweet, the content actually originated here, where my personal archive of the content and the interactions is being permanently maintained. This works for Facebook, as well.
I’m making the decision now to gradually shift the bulk of my publishing on social networks to that site, which will mean sacrificing some convenience, as I’ll have to phase out some tools that I currently use to help me maintain a steady stream of tweets.
The payoff is that I’ll have my own permanent archive of my content.
In the event that I’m not able to find suitable ways to POSSE, I will begin to utilize the PESOS model: Publish Elsewhere, Syndicate to your Own Site.
Since some of the silos that I use don’t permit federation or syndication from other platforms, I’ll be pulling that content from the silo(s) in question back to my own site. An example is Instagram, for which inbound federation is currently difficult, but for which outbound syndication (back to my own site) isachievable.
Not as Hard as it Sounds
I am, admittedly, a geek. This makes me a bit more technically savvy than some people.
But… the truth of the matter is that this really isn’t hard to set up. The IndieWebCamp website provides an enormous wealth of information to help you get started using the principles of the IndieWeb community.
And it can begin with something as simple as grabbing a personal domain name and setting up a simple WordPress site, where if you use the self-hosted version I’ve linked to, you’ll have the ability to publish and syndicate your content using some simple plugins. Alternatively, you could use Known, which has POSSE capabilities (and many others) baked right in.
There are loads of resources on the web to help you take steps toward owning and controlling your own data.
Note: For those who live in or around Sarasota, if there’s enough interest, I’d be open to starting a local group (perhaps something of a Homebrew Website Club), to help facilitate getting people started on this journey. Respond in the comments below or hit me up on Twitter if you’re interested.
Personal Note of Gratitude
I’m indebted to a long series of leaders who have worked to create the open web and have personally influenced me over a number of years to get to where I am today in my thinking. There are many, but I’d like to personally thank a few who have had a greater direct impact on me personally. They are:
Matt Mullenweg, co-founder of WordPress. Matt helped me understand the important role of open source software, and although he didn’t invent the phrase, he personally (through his writings) introduced me to the idea of “free as in speech, not free as in beer.”
Kevin Marks, advocate for the open web whose tech career includes many of the giants (e.g. Google, Apple, Salesforce, and more). Kevin understands the technology, the ethical and societal implications of factors effecting the open web, and has taken on the responsibility of serving as a leader in many ways, including in the IndieWeb community.
Ben Werdmuller, co-founder of Known. Ben and his co-founder, Erin Jo Richey, have also stepped up as leaders, not only creating technology, but endeavoring to live out the principles of the open web.
Leo Laporte, founder of TWiT. As a broadcaster, podcaster, and tech journalist, Leo was instrumental in introducing me to people like Kevin Marks and Ben Werdmuller by creating and providing a platform for concepts like these to be discussed.
As I said, there are plenty more I could mention. In today’s world of the internet, we all owe an incredible debt of gratitude to many who have worked tirelessly and often selflessly to create one of the greatest platforms for free speech in all of history. Their legacy is invaluable, but is now entrusted to us.
Let’s not screw it up.
*I’ve got most of them. They’re stored on a series of hard drives and are largely uncatalogued and cumbersome to access. Obviously, I need to do something about that.
So AWeber has been working hard to create buzz around a big announcement they’re making on October 20th.
I’ll admit that I haven’t been paying close attention, but it appears that they’re going to be introducing some new features or perhaps an update to the UI/UX in their system.
The “benefit” they’re touting is that you’ll be able to “do more with email.”
I’m interested. We’ve used and recommended their system since 2007, if I recall correctly.
But the email they sent me this morning—which, again, endeavors to build anticipation for next week’s announcement—had an interesting twist: a live Twitter feed.
Please be aware that if your spoken words include personal or other sensitive information, that information will be among the data captured and transmitted to a third party through your use of Voice Recognition.
For the record, I don’t own a Samsung Smart TV. And this sentence doesn’t say anything that any of us wouldn’t have guessed… had we thought about it.
But… how many devices do we own today that are listening all the time? And exactly how much of what we say is being recorded and sent to 3rd parties for “voice recognition?”1
I can think of a handful of other devices which are actively listening all the time and are often found in our homes (like the Xbox One / Kinect) or even on our persons (e.g. Google Now on Android — “OK Google” anyone?) and in newer automobiles.
Samsung’s privacy policy is the first instance I can think of wherein I’ve actually read a warning that your “personal” or “sensitive” information may actually be leaking to 3rd parties.
Unnecessary Cause for Alarm?
I would imagine that the bulk of information being transmitted out of our living rooms via Samsung TVs is largely uninteresting to anyone.
But what are the policies that govern the storage (long term or short term) of this data? How sophisticated are the tools that interpret speech? Are transcripts of this speech stored separately or together with audio recordings?
What government agencies have or will gain access to either audio recordings or speech transcripts?
Perhaps the data doesn’t get stored by anyone for any longer than it takes to decide if you’ve issued a command to your device. And maybe there is no reason to even question what happens to all of the information scooped up by these listening devices.
I don’t want to sound like a conspiratorial alarmist. But on the other hand, maybe keeping some tinfoil close by isn’t such a bad idea…
1Geek moment: “voice recognition” is likely a misnomer. It is quite commonly and quite incorrectly used to refer to technologies that recognize speech. True “voice” recognition is a much different technology than “speech” recognition, and involves identifying who the speaker is rather than what he or she is saying. If Samsung or its 3rd-party vendor does have “voice” recognition, that’s a completely different cause for alarm.