
If you registered a domain using Route 53 (the domain registrar built in to Amazon’s AWS cloud platform) and you need to change the nameservers for it, then you might be tempted to edit the NS (“Nameserver”) records inside Route 53’s “Hosted Zones” area.
The problem is that while that change might look valid, you haven’t actually changed the authoritative Nameservers for the domain.
This is because Route 53 maintains the NS records with the domain registration details (as most domain registrars do), not with the DNS records—despite the fact that NS records can be viewed (and even seemingly edited!) with all the other DNS records at Route 53 (something that most domain registrars in my experience do not do).
I found this out the hard way… by editing the NS records shown in the “Hosted zones” for a particular domain, then waiting. And waiting. And waiting. (If you’re not sure if your settings changes have been effective, take a look at How to Check the Propagation of Your NS Records below.)
Route 53 is a Fantastic DNS Hosting Service. Why Change?
Why even bother switching from Route 53 as the DNS host at all?
It’s a great question. In this particular situation, I found myself needing to use Cloudflare’s DNS in order to accommodate a CNAME record at the root (“zone apex”) of my domain. This is technically not allowed, but Cloudflare facilitates it via some magic they call CNAME flattening. Amazon’s Route 53 actually has something kinda similar they call Alias records, but this turned out to not work for my needs.
Where to Find (and Change) the REAL NS Records for a Route 53 Domain
Note: this section only applies to domains registered with Route 53 from AWS (“Amazon Web Services”). Registered at Route 53 is not necessarily the same thing as hosted (at least with respect to DNS) by Route 53. If your domain was registered elsewhere (e.g. GoDaddy or a registrar that offers a better value like Namecheap,) then the authoritative Nameserver (NS) records must be changed at the registrar, not the DNS host.
Time needed: 5 minutes
Step By Step Instructions for Changing the Authoritative Nameserver (“NS”) Records for Your Domain Registered at Route 53
- Go to Route 53 from the AWS Console
Click here to go directly to Route 53 in the AWS Console (opens in a new tab). If you’re not signed in to your AWS account, you’ll need to do so.
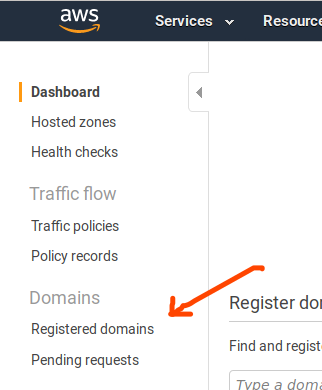
- Click on “Registered domains”
If you’re using a desktop browser, you can find “Registered domains” in the menu on the left-hand side, under the heading, “Domains.”
- Click on the domain name whose NS records you want to change
A list of domains you have registered via the AWS domain registrar connected to the Route 53 service will appear. Click on the domain you need to change.
Note: if you do not see the name of the domain in this list, then the domain wasn’t registered via the AWS account you are logged into.
If you are certain that Route 53 / AWS is the domain registrar, then you may need to log in to a different AWS account.
If you are unsure which registrar the domain was registered with, you may find it helpful to run a WHOIS search for authoritative information about the domain you’re working with. ICANN operates a WHOIS service, and it is arguably the most authoritative one available. Simply enter the domain name into the search box and look for the section labeled, “Registrar.” If you see “Amazon Registrar, Inc.” or something similar, then Amazon / AWS is indeed the registrar. If not, you will need to log in to system for the domain registrar shown in the WHOIS record in order to change the NS records. If the name of the registrar shown doesn’t look familiar to you, try finding it in this list of ICANN-Accredited Registrars. Sometimes the names change or don’t seem related to the website used to registered the domain. - Locate the “Name servers” section
From a desktop browser, the “Name servers” section can be found in the right-hand column of domain settings.
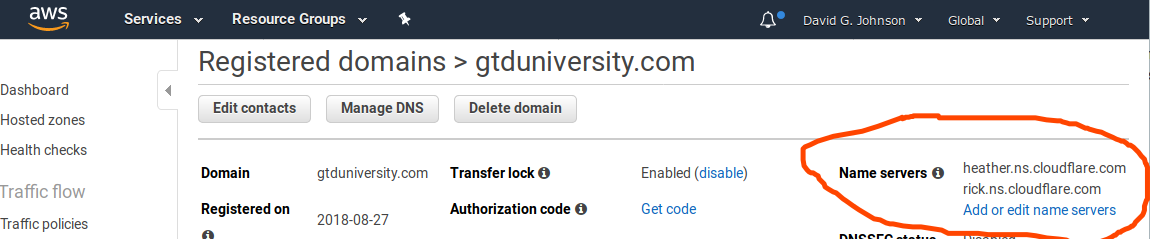
It’s likely that you will see the old settings here, which in most cases will be Amazon’s own nameservers, since Route 53 puts those values in by default when a domain is registered. The image above shows the new settings for my domain, since I grabbed the screenshot after saving the settings. - Click “Add or edit name servers”
To change the nameservers, click the “Add or edit name servers” link. You can see it in the screenshot (above) in Step 4. It’s the blue link inside the orange circle.
- Edit the name servers.
You will see a popup (shown below) with an editable field for each of the name server (“NS”) records for your domain. Simply edit the contents of each box as needed. Often, only 2 NS records are necessary, but your requirements will vary depending upon the hosting provider / service you’re switching to for your domain.
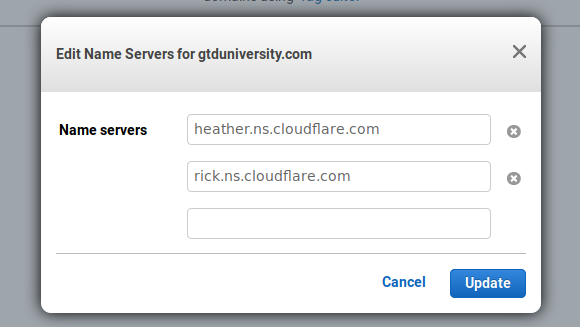
If you need to delete extraneous Nameserver records as I did (since AWS adds 4 NS records by default and Cloudflare only provided 2), you should see a small “x” to the right of the box containing the records you want to delete. In most cases, you will want to eliminate any extra records. Leaving them can cause problems if you’re not absolutely certain that you want them to remain.
To add more records, simply start typing in the empty box that will appear below the last record. You will see another empty box appear below the one you’re typing in. Repeat as needed. - Click the “Update” button to save your changes.
The last thing you need to do is simply hit the “Update” button. You can see it in blue in the screenshot (above) in Step 6.
That’s it!
What to Do If Your Nameserver (NS) Records Change Is Taking a Long Time to Propagate
In my case, I began this process by changing the NS records in the Route 53 “Hosted zone” for my domain, and I then waited nearly 48 hours for my NS record changes to propagate. While many DNS servers found in the DNS propagation checkers did, in fact, show the new settings, a number of DNS servers around the world still showed my old NS records instead.
This was troubling to me, because for many years now, DNS changes—especially nameserver changes—often propagate very quickly. In fact, changes like this often propagate in seconds or minutes, not 24 hours, 48 hours, or even 72 hours like in the good old days. These faster propagation timeframes are especially common for newly registered or infrequently used (read: not hugely popular) domain names, since DNS records for these are frequently not found in the caches of very many DNS servers at all.
It was only as I was about to contact Cloudflare support that I stopped to try to analyze why that little fact was bugging me so much.
How to Check the Propagation of Your NS Records
You can easily test for the global propagation of any DNS change using a propagation checker like these:
- What’s My DNS?
- DNS Checker
- MX Toolbox offers a DNS Propagation test alongside their full suite of mail server and other highly useful e-mail related tests.
There’s Something Strange Going On
For my barely-used domain, the old records shouldn’t have been appearing at all in most of the far-flung global DNS servers, and since ICANN’s WHOIS database also returned the old values, I realized that something wasn’t right. There had to be a different setting somewhere that was more authoritative.
Ultimately, it was this answer to a thread the Cloudflare Community that helped me realize my mistake. Thank you, @mnordhoff!
This Seems Unnecessarily Confusing
In my experience, most domain registrars make this process a bit simpler by only providing one place to change the name servers for a domain. In hindsight, it is obvious to me that changing the NS records should happen at the registrar and not at the DNS settings level. But having never needed to make this particular change for a Route 53 domain, it never occurred to me that the NS records I found under “Hosted zones” weren’t the actual NS records for the domain.
Further confusing the matter was the simple fact that some DNS queries that I ran did return values that reflected the edits I made in Route 53’s “Hosted zones” area.
I’m not clear on why Amazon Web Services designed Route 53 to work this way, but perhaps there’s some scenario or another that requires this level of configurability.
Thanks, Cloudflare!
At the end of the day, I’m grateful that Cloudflare’s system refused to consider the NS change complete until the correct records had been changed.
Had Cloudflare recognized the changes I made, I most likely would have carried on with the very mistaken belief that everything was working properly. In reality, some (if not many) systems that tried to access my domain would have encountered weird errors. I probably would not have found out about those issues for quite some time, if ever!
Finally!
Incidentally, once I edited the Name server settings found under Route 53’s “Registered domains” area, I noticed that it was only a matter of seconds before both ICANN’s WHOIS database reflected the change. This seemed to coincide with Cloudflare’s system recognizing the change as well.
I hope you find this useful! This was one heck of a perplexing situation for me—especially after managing domains for ~20 years!
Feel free to throw questions my way in the comments below. I’ll be glad to tackle them when I have a chance. You can also hit me up on Twitter. Cheers!