Business Strategy, Marketing, Sarasota, WordPress & More…
Author: David G. Johnson
I have owned and operated Grow The Dream in Sarasota, Florida since 1998. We are a strategic consulting firm focused on small to mid-size organizations, and we specialize in making things grow!
It's hard to describe just how thoroughly I'm enjoying The Geography of Genius. It's my first exposure to the work of @Eric_Weiner. What an unexpected delight! pic.twitter.com/cSbdySuJ0d
This evening I picked up The Geography of Genius out of the pile of books I’m currently reading and dove in again. As I mentioned in the tweet (above), this book is the first of Eric Weiner‘s brilliant writing that I’ve been exposed to, and I am hooked.
I’m only about 100 pages in, and I’ve traveled with Weiner to Athens, Hangzhou, and now Florence. He’s making the case that something about these locales—not just the places, but the conditions that existed at specific moments in history—sparked creativity and innovation in ways that are worth studying.
Reading his accounts, you get the sense that the individual geniuses who made these places famous required the opportunity to bump up against other geniuses in a “nitro, meet glycerin” way in order to produce the explosive bursts of talent (and the products of talent) we attribute to them individually.
This line of reasoning called to mind a point that Walter Isaacson loves to make. He drills the idea home in The Innovators, but it shows up in his other works as well. The one I just finished was his brilliant biography of Leonardo Da Vinci, and it surprised me to find that he made the same point in it as well. The point he makes is that the most effective innovators (geniuses, inventors, change agents, whatever you want to label them) collaborate.
We may remember the names of certain individuals, but usually only when they were surrounded (by choice or by happenstance) with others who helped fuel their creativity, add missing ingredients, or even finish their works of genius.
If you registered a domain using Route 53 (the domain registrar built in to Amazon’s AWS cloud platform) and you need to change the nameservers for it, then you might be tempted to edit the NS (“Nameserver”) records inside Route 53’s “Hosted Zones” area.
The problem is that while that change might look valid, you haven’t actually changed the authoritative Nameservers for the domain.
This is because Route 53 maintains the NS records with the domain registration details (as most domain registrars do), not with the DNS records—despite the fact that NS records can be viewed (and even seemingly edited!) with all the other DNS records at Route 53 (something that most domain registrars in my experience do not do).
I found this out the hard way… by editing the NS records shown in the “Hosted zones” for a particular domain, then waiting. And waiting. And waiting. (If you’re not sure if your settings changes have been effective, take a look at How to Check the Propagation of Your NS Records below.)
Route 53 is a Fantastic DNS Hosting Service. Why Change?
Why even bother switching from Route 53 as the DNS host at all?
It’s a great question. In this particular situation, I found myself needing to use Cloudflare’s DNS in order to accommodate a CNAME record at the root (“zone apex”) of my domain. This is technically not allowed, but Cloudflare facilitates it via some magic they call CNAME flattening. Amazon’s Route 53 actually has something kinda similar they call Alias records, but this turned out to not work for my needs.
Where to Find (and Change) the REAL NS Records for a Route 53 Domain
Note: this section only applies to domains registered with Route 53 from AWS (“Amazon Web Services”). Registered at Route 53 is not necessarily the same thing as hosted (at least with respect to DNS) by Route 53. If your domain was registered elsewhere (e.g. GoDaddy or a registrar that offers a better value like Namecheap,) then the authoritative Nameserver (NS) records must be changed at the registrar, not the DNS host.
Time needed: 5 minutes
Step By Step Instructions for Changing the Authoritative Nameserver (“NS”) Records for Your Domain Registered at Route 53
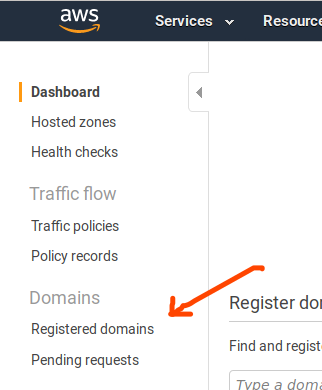
If you’re using a desktop browser, you can find “Registered domains” in the menu on the left-hand side, under the heading, “Domains.”
Click on the domain name whose NS records you want to change
A list of domains you have registered via the AWS domain registrar connected to the Route 53 service will appear. Click on the domain you need to change.
Note: if you do not see the name of the domain in this list, then the domain wasn’t registered via the AWS account you are logged into.
If you are certain that Route 53 / AWS is the domain registrar, then you may need to log in to a different AWS account.
If you are unsure which registrar the domain was registered with, you may find it helpful to run a WHOIS search for authoritative information about the domain you’re working with. ICANN operates a WHOIS service, and it is arguably the most authoritative one available. Simply enter the domain name into the search box and look for the section labeled, “Registrar.” If you see “Amazon Registrar, Inc.” or something similar, then Amazon / AWS is indeed the registrar. If not, you will need to log in to system for the domain registrar shown in the WHOIS record in order to change the NS records. If the name of the registrar shown doesn’t look familiar to you, try finding it in this list of ICANN-Accredited Registrars. Sometimes the names change or don’t seem related to the website used to registered the domain.
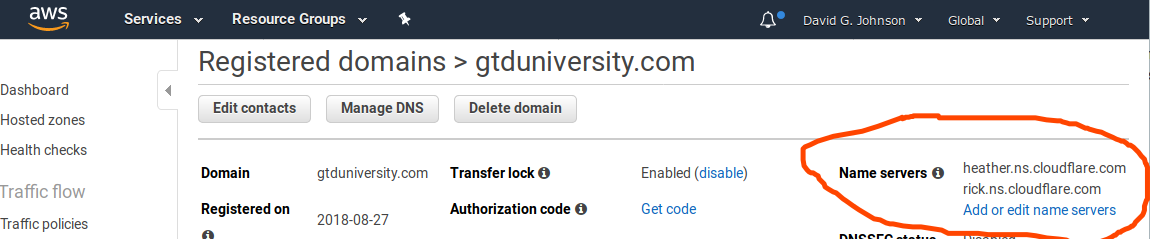
Locate the “Name servers” section
From a desktop browser, the “Name servers” section can be found in the right-hand column of domain settings.
It’s likely that you will see the old settings here, which in most cases will be Amazon’s own nameservers, since Route 53 puts those values in by default when a domain is registered. The image above shows the new settings for my domain, since I grabbed the screenshot after saving the settings.
Click “Add or edit name servers”
To change the nameservers, click the “Add or edit name servers” link. You can see it in the screenshot (above) in Step 4. It’s the blue link inside the orange circle.
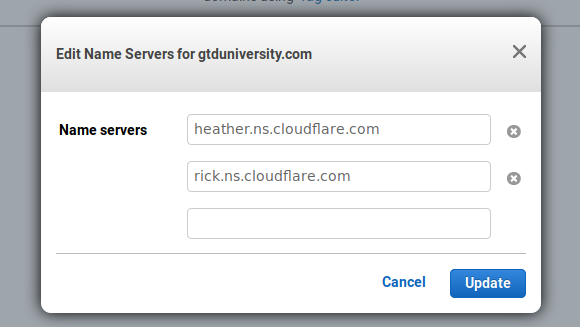
Edit the name servers.
You will see a popup (shown below) with an editable field for each of the name server (“NS”) records for your domain. Simply edit the contents of each box as needed. Often, only 2 NS records are necessary, but your requirements will vary depending upon the hosting provider / service you’re switching to for your domain.
If you need to delete extraneous Nameserver records as I did (since AWS adds 4 NS records by default and Cloudflare only provided 2), you should see a small “x” to the right of the box containing the records you want to delete. In most cases, you will want to eliminate any extra records. Leaving them can cause problems if you’re not absolutely certain that you want them to remain.
To add more records, simply start typing in the empty box that will appear below the last record. You will see another empty box appear below the one you’re typing in. Repeat as needed.
Click the “Update” button to save your changes.
The last thing you need to do is simply hit the “Update” button. You can see it in blue in the screenshot (above) in Step 6.
That’s it!
What to Do If Your Nameserver (NS) Records Change Is Taking a Long Time to Propagate
In my case, I began this process by changing the NS records in the Route 53 “Hosted zone” for my domain, and I then waited nearly 48 hours for my NS record changes to propagate. While many DNS servers found in the DNS propagation checkers did, in fact, show the new settings, a number of DNS servers around the world still showed my old NS records instead.
This was troubling to me, because for many years now, DNS changes—especially nameserver changes—often propagate very quickly. In fact, changes like this often propagate in seconds or minutes, not 24 hours, 48 hours, or even 72 hours like in the good old days. These faster propagation timeframes are especially common for newly registered or infrequently used (read: not hugely popular) domain names, since DNS records for these are frequently not found in the caches of very many DNS servers at all.
It was only as I was about to contact Cloudflare support that I stopped to try to analyze why that little fact was bugging me so much.
How to Check the Propagation of Your NS Records
You can easily test for the global propagation of any DNS change using a propagation checker like these:
For my barely-used domain, the old records shouldn’t have been appearing at all in most of the far-flung global DNS servers, and since ICANN’s WHOIS database also returned the old values, I realized that something wasn’t right. There had to be a different setting somewhere that was more authoritative.
Ultimately, it was this answer to a thread the Cloudflare Community that helped me realize my mistake. Thank you, @mnordhoff!
This Seems Unnecessarily Confusing
In my experience, most domain registrars make this process a bit simpler by only providing one place to change the name servers for a domain. In hindsight, it is obvious to me that changing the NS records should happen at the registrar and not at the DNS settings level. But having never needed to make this particular change for a Route 53 domain, it never occurred to me that the NS records I found under “Hosted zones” weren’t the actual NS records for the domain.
Further confusing the matter was the simple fact that some DNS queries that I ran did return values that reflected the edits I made in Route 53’s “Hosted zones” area.
I’m not clear on why Amazon Web Services designed Route 53 to work this way, but perhaps there’s some scenario or another that requires this level of configurability.
Thanks, Cloudflare!
At the end of the day, I’m grateful that Cloudflare’s system refused to consider the NS change complete until the correct records had been changed.
Had Cloudflare recognized the changes I made, I most likely would have carried on with the very mistaken belief that everything was working properly. In reality, some (if not many) systems that tried to access my domain would have encountered weird errors. I probably would not have found out about those issues for quite some time, if ever!
Finally!
Incidentally, once I edited the Name server settings found under Route 53’s “Registered domains” area, I noticed that it was only a matter of seconds before both ICANN’s WHOIS database reflected the change. This seemed to coincide with Cloudflare’s system recognizing the change as well.
I hope you find this useful! This was one heck of a perplexing situation for me—especially after managing domains for ~20 years!
Feel free to throw questions my way in the comments below. I’ll be glad to tackle them when I have a chance. You can also hit me up on Twitter. Cheers!
Perhaps someone out there woke up one day and thought to themselves:
You know what I want? I want nearly every website I visit today to throw a pop-up in my face offering to notify me about whatever they find exciting! That way, when I’m minding my own business trying to get stuff done, I’ll have brand new distractions to prevent me from being able to concentrate!
…but that isn’t something I’ve dreamed of, personally. And you may have detected a mild tone of sarcasm here (if not, I apologize that it wasn’t more obvious), but the bottom line is that I really don’t want to be bothered.
I don’t want to be bothered with the question about whether I’d like to get notifications, not to mention notifications themselves!
Good News: You Can Block These in Your Browser
And I mean you can block the questions as well as the actual notifications.
Thanks to Steve Gibson from Gibson Research Corporation, who mentioned this on a recent episode of the Security Now! podcast, here’s a handy set of instructions for you.
Time needed: 2 minutes
How to Block Websites from Offering Notifications in Google Chrome
Open Chrome’s 3-dot menu and click “Settings”
Using any desktop version of Google Chrome*, locate the 3-dot menu (from Windows and Linux, this is typically at the top right), click it, and then choose “Settings” from the menu that drops down.
*or Chromium, if you’re rocking the open source version like I am.Security Now!
Click “Advanced” (at the bottom), then find “Content Settings” (or “Site Settings”) in the “Privacy and Security” section
The setting we’re looking for is hidden under the “Advanced” section, which you can find by scrolling all the way to the bottom of the “Settings” page that opens up. Once you click “Advanced,” the page expands and you’ll see a new section called “Privacy and Security” which contains a number of rows of options.
Look for the option labeled “Content Settings” (that’s what it was called in my version) or “Site Settings” (this is what Steve Gibson’s instructions said, so his version—and maybe yours too!—might be different).
Click on the “Notifications” option, then move the “Ask before sending” slider to the left
When you click “Notifications,” a new screen opens up, and if your version of Google Chrome still has the default setting, you’ll see a line near the top that reads, “Ask before sending (recommended).”
When you move that slider to the left, it turns the notifications requests off, and you should see the text change to “Blocked”.
Voila! No more requests from websites!
(While you’re here, you should see a list of any specific sites you’ve either “blocked” or “allowed” notifications from, and you can review/edit your settings.)
How to Block Notification Requests in Firefox
If you use Mozilla Firefox, which is my “daily driver” browser these days, you can block these notifications requests there as well. Here’s how:
Open a new tab in Firefox and type the following in the address bar:
about:config
You will most likely see a warning that says, “This might void your warranty!” If so, click “I accept the risk!” to continue.
You’ll see a search box at the top of a long list of configuration items. Type in:
webnotifications
…and press “Enter”
Locate the setting named, “dom.notifications.enabled” and toggle it to “false.” (I did this by double-clicking it.) It should turn “bold” in appearance, and the “status” column should change to “modified.”
Close the tab. You’re done!
How to Test Your Browser to Confirm the New Settings
As Steve Gibson pointed out, Mozilla (makers of Firefox) were kind enough to build a page just so we can test our browsers to see if the notifications settings change was successful or not.
Well actually, the page was built to serve as part of Mozilla’s excellent developer documentation, but if you visit it from a browser that has the notifications enabled (which they are in most browsers by default), it will pop up a request every time!
Many consultants demand Business Class or First Class seats as part of their contracts, and while I definitely see the rationale—time is valuable, reducing the frustrations associated with traveling allows one to be fresher and more at their best, etc.—it’s never felt right to me to push those kinds of requirements onto our clients who are already making substantial investments in our fees.
And so, I often look for ways to minimize travel expenses. But boy did I get nailed by that recently.
Surprise! You Can’t Sit With Your Wife…
Not long ago, I booked flights for my wife and me (she works closely with me these days) via Expedia to go spend some time with one of our clients. We looked at a bunch of different options that were all roughly in the same price range, and ultimately made our decisions mostly around departure and arrival times.
It was only after I booked the flights that I got an email from United “reminding me” of the restrictions on the “Basic Economy” fare:
Screenshot from United’s email with the subject line, “Important: Basic Economy restrictions on your United flight”
Oh. You wanted to choose your seat? We’re sorry. That privilege is reserved for people who paid more than $100 for the upsell to “Economy.”
Footnote #1 reads:
Seats are assigned prior to boarding, and customers traveling together, including families, may not be able to sit together. Advance seat assignments may be available for purchase during booking and up until check-in opens. Prices start at $5, based on route and availability. You will also not be eligible to purchase Economy Plus® seating or premium cabin upgrades, or receive Economy Plus subscription benefits. With standard Economy, customers traveling together can choose seats together if open seats are available.
Oh. Did you plan to actually sit next to your wife on the plane? We’re sorry. That privilege is reserved for people who paid more than $100 for the upsell to “Economy”
Oh. You wanted to bring a carry-on bag with you on the plane? We’re sorry. That’s only available for people who weren’t too cheap to pay for “Economy” tickets.
Mind you, I knew I couldn’t change the flight. I also noticed the nonrefundable nature of the tickets. These aspects of the airfare I chose were clear.
But these other restrictions were not clear at all during the checkout process at Expedia. And I pay attention to details like this, as a rule.
After tweeting about it, United was quick to let me know that I could potentially pay for the privilege of selecting seats:
Hey David, we apologize if the restrictions weren't clear during the booking process. Please know, you are able to purchase advanced seats prior to check-in. You can learn more about this on our website here: https://t.co/Egenw53QCr. ^KL
United: Show Some Basic Courtesy and Make This Clear, Will You?
In my opinion, if you’re going to compete with other airlines on a marketplace like Expedia, you should go to great lengths to inform passengers when basic privileges like selecting a seat and taking a carry-on with you aren’t included in your fare. The other airlines whose flights I passed over because the times were slightly less convenient included those privileges at the price point that I paid.
There were 2 major indications (after the purchase, of course), that things were awry.
The first was that I got an email from Expedia announcing that my seat assignment process had encountered an error. Funny. I don’t recall selecting seats. Hmmmm…
Then, the email (screenshotted above) from United which purported to remind me of the restrictions came in. That is how you draw attention to the differences between fares—not by hiding it in all the mouse-point type that a user has to click through in order to complete the booking process. (And I’m being generous here. I’m making the assumption that this information was actually in the mouse-point type on the page. Obviously, I can’t go back and confirm.)
I did skim the information presented to me at the time and didn’t notice these restrictions. Had they been obvious, I would’ve noticed it and chosen different flights.
Anyway, that “reminder” email from United Airlines went on to ask for feedback since this is a “new fare,” and it was immediately clear to me that they were trying to head off problems before I arrived at the airport and learned that I had none of the few remaining basic privileges that a passenger should be able to expect.
So now I’ve spent $76 in fees just to select the seats we’ll be occupying for our flights so that we don’t end up being “automatically assigned” the least-desirable middle seats on the plane. But even after doing that, it doesn’t appear that we can bring a full-sized carry-on bag aboard the flight. Thanks a lot, United.
I’m not the only one who has noticed just how bad the “Basic Economy” fare from United is:
United Airlines Basic Economy fares are more restrictive and punitive than any of the other US carriers. From having to see an agent at the airport to check-in when not checking a bag to not getting a carry-on bag to the worst seats being automatically assigned to basic economy passengers at check-in — United’s Basic Economy is the worst.
After this experience, and given United’s response to my Tweet, they’re going to the bottom of my list. Right down there next to Spirit Airlines, where apparently they now belong.
I’ve been using a “config” file located at ~/.ssh/config to list out the identities of the various SSH hosts that I connect to on a regular basis. It was successfully preventing me from having to keep track of the usernames for the various accounts I was connecting to on the servers, but when I got to a certain number of entries in the file, I started getting this error:
Received disconnect from *HOST*: 2: Too many authentication failures for *USERNAME*
I Googled around and tried various solutions, including using ssh-add and had limited success, but running an ssh -v hostentry command for a given connection (the -v puts the command in verbose mode) allowed me to see that my machine was still offering up multiple keys.
This seems counter-intuitive to me. The whole point of using the config file is to tell it which key to use, right? Why should I even need to add the identity to the SSH agent? And I wasn’t about to increase the number of retries on the servers. That seems like a recipe for disaster. I should only need one try because I have the right key sitting here!
I finally ran the right Google search and discovered this SuperUser (StackOverflow) question, which had the missing component I needed in one of its answers.
The critical element in the config file that forces the SSH client to use only the key specified is this line:
IdentitiesOnly yes
Adding that to each of the entries in the config file (immediately below the “IdentifyFile” declaration) did the trick.
So now a typical entry in my config file looks something like this:
Host myshortcut
     HostName somedomain.com
     user someuser
     IdentityFile ~/.ssh/somekey_rsa
     IdentitiesOnly yes
A few days ago, I was sharing my screen from my laptop with a colleague, when up popped a notification informing me that Comcast (through its Xfinity brand) was no longer supporting my equipment and instructing me that it had to be replaced.
Now before you jump to any conclusions, let me clarify the exact conditions under which this notification appeared:
The notification appeared in a single browser tab
The browser was the latest version of Firefox, running on Ubuntu 18.04.1
The page was from a server under my control, which my colleague and I were working on at the time. It was completely free of any foreign JavaScript that would have allowed or facilitated a Comcast code injection
The connection was encrypted via TLS 1.2 with a secure cipher
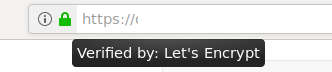
The TLS certificate on the server side was a current one issued by Lets Encrypt
Firefox gave the connection a “green padlock” with no mixed content warnings, as in this screenshot (except that I didn’t examine the cert in my browser at the time like I did when capturing this graphic):
This screenshot was captured at a different time, but is representative of what I saw on the page that Comcast injected its code into recently. The difference is that in this screenshot, I was connected to the same site through a VPN.
Authentic Comcast Notification
I didn’t have the presence of mind to screenshot everything at the time the notification appeared. I wish I had. The fact is that I was deep into a lengthy session with my co-worker, and we were focused on the project at hand.
And while I didn’t screenshot the “end of life notification” regarding the Comcast-issued on-premise equipment, I did click through from the notification.
In a new tab, I was shown the exact model numbers of the equipment for which Comcast was ending support (i.e. only the model numbers in use at my location, and in the correct quantity), and was taken through a simple “wizard” which offered to send me the replacement equipment in a self-install kit. Although I clicked through to see exactly what it would do, I did not submit the form, instead choosing to click a link which opened this support article about “end of life” equipment in a new browser tab.
Had I not been under time pressure related to the project we were working on (and had I not also been bearing the cost of the person’s time who was on the other end of the active screen-sharing session), I might have taken the time to investigate further. Regrettably, I did not do this. It surely would have netted me the specific lines of code injected into my browser on top of the screenshots which I should have captured, but didn’t.
The bottom line, however, is that the message was authentic. The equipment in question was correctly beyond its end of life, and the notification was being served from Comcast.
Also: my machine is clean. I run very few browser extensions. None of them are known to have any vulnerabilities. And my machine is—by every indication, including clean scans—free of malware.
Exit Xfinity
Rather than requesting a self-install kit with replacement equipment, I packed up the end-of-life gear and took it to a local Xfinity store, cancelling my service.
I’ve had television service with Comcast/Xfinity for the better part of the last decade, and internet service for many years longer.
But I would have cancelled the account much sooner were it not for the utter lack of competition in my area. Broadband service can essentially only be had from 2 vendors at the location in question. They both gouge customers with excessively high fees, exploiting the unfair economics of the situation.
But this incident was the last straw.
Comcast had violated me one too many times. Hopefully they won’t turn out to have been the lesser of two evils. Time will tell. In the meantime, something must be done to level the playing field so that ISPs who don’t egregiously abuse the privacy of their subscribers can compete effectively.
Call me picky, but I didn’t want to be forced to use a code block every time I wanted to include a little bit of code. Sometimes, it’s just handier for the code to be inline so it doesn’t disrupt your text, but still clearly looks like code.
So today, I’d had one too many occasions to try to make it work (unsuccessfully), and I dug around and found this answer on StackOverflow. It took me a moment, to realize that it was from Andreas Gohr, the creator of DokuWiki.
In short, just enclose your text in ''%% and %%'' like this:
Here's a sentence I'm typing and ''%%this is code%%'' I want to include inline.
This works beautifully!
Ironically, it’s not shown in the official syntax documentation, except that if you view the source for that documentation, you realize this technique is actually used to put inline code throughout the syntax documentation. 😉
(Now why didn’t I notice that and think to look at the source code? Sheesh.)
TL;DR grep your filesystem for a unique fragment of text that’s likely to only appear in the content you lost when your draft disappeared. Step-by-step instructions here.
Not long ago, we started using DokuWiki as an internal solution for documenting technical details, systems, and best practices in our digital marketing agency. Let me just say that I love the software. It’s easy to install and configure, training users on it is relatively painless, and its simplicity makes it an amazing solution for purposes like ours.
But… like any new system, getting accustomed to its quirks can take some time—especially quirks you don’t run into very often.
Today, I was working on a lengthy new page in DokuWiki and I got busy researching something in another browser tab (or 10). Naturally, I hadn’t hit the “Preview” button, nor had I saved a version.
You can probably guess where this is headed.
I returned to the browser tab where I had DokuWiki open and found the dreaded “editing lock expired” message.
Normally, this wouldn’t be a big deal. We aren’t typically handling lots of concurrent users, so often only one of us is doing any editing at one time, much less the same page. And I’ve found that just by clicking one of the options, I can usually get right back to the editor.
But this was a brand new page that hadn’t been saved yet.
And, being in a hurry, I just started clicking buttons and not paying attention to what I was doing. The next thing I knew, I was looking at an empty editing window..
And this was after spending more than an hour working on the content for the page. It was gone. All of it.
The one thing I had going for me is that I had noticed a “draft autosave” message in the browser at one point. So, I went looking to see if I could find the draft.
Where DokuWiki Stores Drafts
If there had been a saved draft, DokuWiki would have shown it to me when I visited the “edit” screen for that page again. But I didn’t get a message about an existing draft. Also, the “Old Revisions” tab for the page was empty. This made me suspect that my draft had been lost.
So… I connected to the server (via SSH) where the instance of DokuWiki was running and started looking around.
After some Googling, I found that by default, DokuWiki drafts are automatically saved in the /data/cache folder, sorted into numbered subfolders.
Issuing the ls -lt command, I could see which subfolders were the most recent ones, and I looked through them. There were no files with a .draft extension, which explained why DokuWiki hadn’t shown me a draft for my page when I re-opened the editor.
But since I knew I had seen the “draft autosave” message previously, I knew there had been a .draft file at one point. Given that the file no longer existed, surely it had been deleted!
Well that’s great… we can undelete files, right?
Not so fast. This particular server is a VPS instance at Digital Ocean that we use for intranet purposes. Being that it’s a VPS, the typical data recovery tools for Linux like TestDisk and foremost aren’t much help. Virtualized disks means virtualized storage… or something. I’m out of my depths here.
Let’s just say that I tried both of them and didn’t get the result I was hoping for.
Recovering Text Files in Linux
Since DokuWiki stores content in text files on the server, it occurred to me that I should look specifically for a means of recovering .txt files (not even one of the available options in foremost, which has command line options for various file types).
A found a tidbit on recovering deleted plain text files in Linux that gave me some hope. And after just a couple of minutes, I found the entire contents of the last “draft” of my DokuWiki page. Here’s exactly how I did it.
Steps to Recover a Deleted DokuWiki Draft in Linux
Browse the filesystem on the server where your DokuWiki installation is located. In my case, I used ssh to connect to our intranet server in a terminal window.
Determine where the partition containing your filesystem is “mounted” in Linux. From my terminal window, I ran the mount command (on the server, of course) to display a list of mounted filesystems (details on the mount command here). Just running the command by itself with no command line options will display the full list. It’s a lengthy, hairy mess.
On a normal Linux workstation (non-virtualized), you’d typically be looking for something like /dev/sda1 or /dev/sdb2. On the Digital Ocean VPS, I spotted a line that began with /dev/vda1 on / type ext4. I decided to give that a try.
Next, you’ll need to recall a bit of text from the page you were writing when your draft got lost. The more unique, the better. Also, the longer, the better.
The command we’re going to run is going to look for bits of text and then kick out the results from its search into a file you can look through. If you use a short or common string of text in the search, then you’ll get a huge file full of useless results (kinda like running a Google search for a common word like “the” would produce).
In my case, I’d been working on some technical documentation that had a very specific file path in it. So I used that as my search string.
Run the command below, substituting your unique phrase for ‘Unique string in text file’ (be sure to wrap your text in single quotes, though) and your filesystem location for /dev/vda1 grep -a -C 200 -F 'Unique string in text file' /dev/vda1 > OutputFile
Wait a few minutes. In my case, the grep command exhausted the available memory before too long and exited.
Look through the file that got created. You could use a command like cat OutputFile or, as long as the file isn’t too huge, you could even open the file in an editor like nano by using nano OutputFile. The advantage to the latter method is that you can then use CTRL+W to search through the file.
On my first attempt, I used a shorter, more common phrase and got an enormous file that was utterly useless. When I gave it some thought and remembered a longer, more unique phrase, the resulting file from the second attempt was much smaller and easier to work with. I found several revisions of my draft, and that gave me options to work with. I decided which was the most complete (recent) and went with it.
Copy the text. You can then paste it somewhere to hold onto it, or just put it right back in DokuWiki. Just be sure you hit “Preview” or “Save” your page this time around.
One quick note: I’m not sure if it was necessary or not, but I actually ran the commands above as “root” by running sudo -i first. I haven’t tested it, but this may actually be a requirement. You might also just be able to preface the commands with a sudo (e.g.sudo grep -a -C 200 -F 'Unique string in text file' /dev/vda1 > OutputFile ). For either of these to work, you’ll obviously need to have an account that has the ability to run sudo.
I hope you find this useful! If so, I’d love to hear about it. Also: if you have questions or problems, you’re welcome to leave those in the comments as well. If I can help, I will gladly do so!