TL;DR: Change the settings inside each app. Step by step instructions here.
The pain I experienced years ago when I realized I would need to install a Microsoft product on my Ubuntu laptop was substantial on top of being ironic. After all, I became a full-time Linux user to avoid Microsoft.
But back then, Skype was important for certain client work, and even today it’s useful for recording podcast guests because Skype can be configured to provide decent quality audio.
Fast forward to earlier this year, and I discovered that Microsoft makes a Teams client for Linux. Who knew, right? Bizarrely, I found myself installing it in order to collaborate with a client. And while I wouldn’t use it of my own free will, it’s really not that bad.
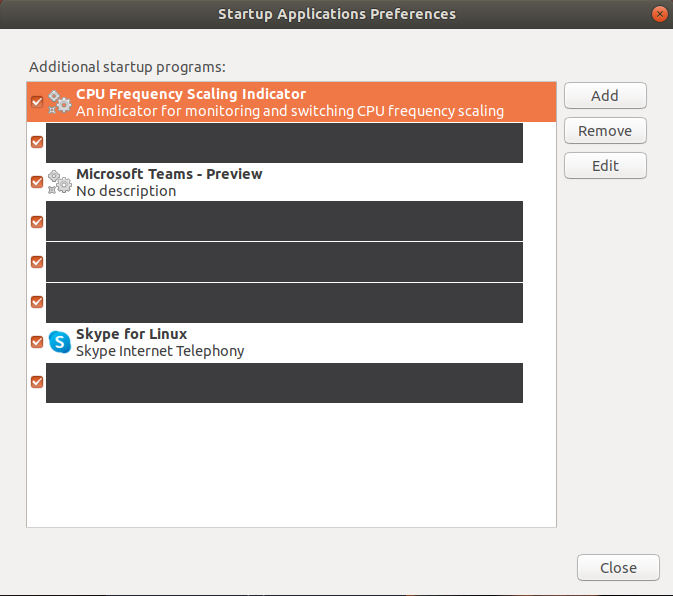
But both Skype for Linux and Microsoft Teams for Linux suffer from the same problem. They don’t behave as expected when using the GNOME Startup Applications preferences tool.
Screenshot of GNOME Startup Applications Preferences dialogue showing the reappearing Microsoft Teams and Skype applications
For months now, I’ve been dealing with the minor irritation of having Skype and Microsoft Teams autostart when I sign in to Linux, despite my repeated efforts to stop them.
I’d casually looked for ways to solve this, but recently it happened one too many times. Microsoft Teams launched itself and slowed me down on my way to get important stuff going. And Teams is a resource hog—even on my relative beast of a system.
It turns out that both Skype for Linux and the Microsoft Teams Linux client have their own settings for this which (naturally) default to autostart on boot.
Thankfully, I did finally find a solution that seems to work for both apps.
Step-By-Step Instructions to Disable Microsoft Apps from Launching at Boot in Linux
Prevent Microsoft Teams from Launching at Boot on Linux
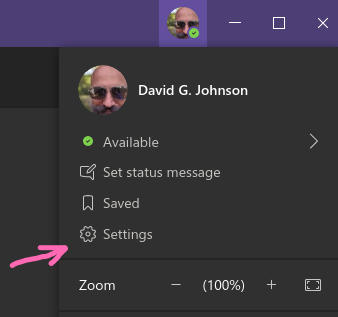
Open the Settings Menu
With the Linux client for Microsoft Teams running, click on your user profile image in the upper right, then choose “Settings” from the menu that drops down.
Uncheck the “Auto-start application” box
In the “General” tab, under the “Application” heading, you should find a checkbox labeled “Auto-start application.” It is checked by default. Uncheck it to prevent Microsoft Teams from launching when your system boots.
Close the “Settings” dialogue box
There is no “save” button in the Linux client for Microsoft Teams. Just hit the “X” in the upper right-hand corner of the “Settings” window to close it.
Prevent Skype from Launching at Boot on Linux
Similar to the Microsoft Teams client, Skype for Linux has an option buried in its settings.
Start with the “Settings” menu option, which you’ll find under “Tools” in Skype’s main menu.
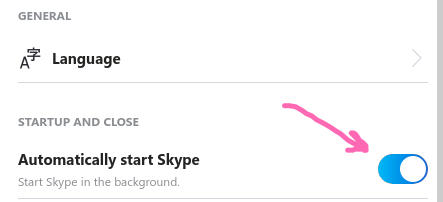
Then choose “General” from the options that appear in the left-hand side of the “Settings” menu:
Then find the switch marked “Automatically start Skype” under the “Startup and Close” header. It defaults to the “On” (blue) position:
Slide it to the “off” (gray) position, and you’re all set.
Why Doesn’t Microsoft Follow Conventions?
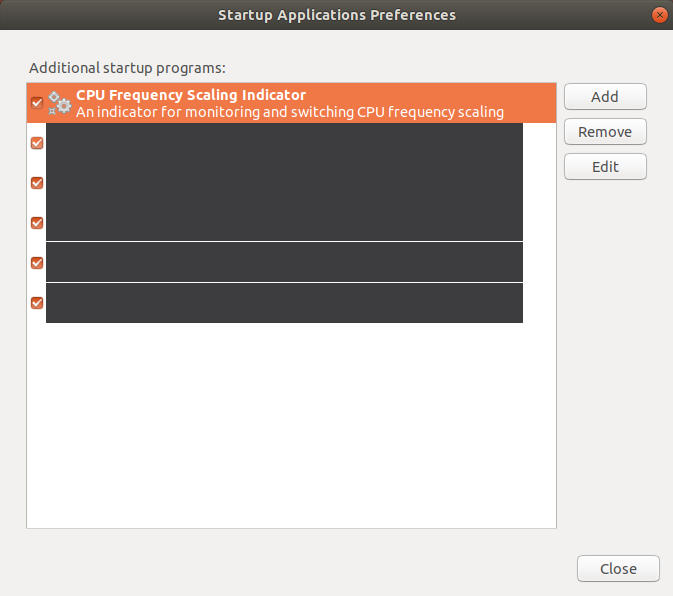
Ironically, after setting both of these switches, you’ll find the programs no longer appear in the GNOME Startup Applications Preferences:
In my experience, other apps built for Linux can be maintained right from here—at least in terms of their settings for starting up at boot time.
As of this writing, however, these two Microsoft apps cannot. The current settings for Skype and Microsoft Teams related to auto-starting can be viewed from here, but changes made here will be overridden by in-app settings.
Is your laptop absolutely crawling? Can you drive to Starbucks, buy coffee beans, come home and grind them, boil water, dump everything in your French press, wait 4 minutes for it to steep, pour your freshly-brewed cup of coffee into a mug and still get back to your desk in the time it takes your machine to reboot?
That’s where I was earlier this week. And tired of it!
So let’s just say I’m not running a high-end laptop here. Mine is squarely in the middle of the road.
It was perfectly usable 2 years ago when I bought it, but I made it out of my local Best Buy with $20 left of my $500 budget at the time. (I decided a long time ago that laptops are almost disposable, so I refuse to pay big bucks for them.)
But 2 years of updates to Windows 7 (which I love, by the way… another reason why I don’t want to buy a new one yet), 2 years of installing various bits of software, a really bad habit of having 50-60 Chrome tabs open at once, and a tendency to run Photoshop or InDesign (or both) all adds up to a really terrible user experience.
I’d already maxed out the RAM… I did that about 6 months after I bought it.
So… what was left to do?
Well… SSD envy set in about a year ago when I bought my wife an HP Ultrabook. She gets a higher laptop budget because she replaces them less often, and she doesn’t subject them to all the abuse of travel nearly as often as I do. Oh… and she likes them light and thin. And boy is hers ever light and thin! But it’s also blazingly fast. I’m talking… Windows 7 reboots completely in under 10 seconds. Forget that cup of coffee and keep working!
One of the reasons the thing is so darn fast is because of the Solid State Drive (SSD) that was installed from the factory. SSDs, if you aren’t already aware, are much faster than traditional hard drives because they have no moving parts. That’s right, no motors or spindles… just pure NAND flash memory (usually), and lots and lots of speed.
So… I began scheming back then about when (and how) I could get an SSD into my laptop. But the problem is that I do have much more significant storage needs. My laptop has a 500GB drive, and I keep it nearly full with stuff. Could I be more diligent and picky about what stays on my hard drive? Sure. But that takes time. Plus, I’m always of the opinion that I’d rather have that obscure file with me when I’m traveling because of the one time I get somewhere and need something that other people would’ve left on an external drive back home.
Why is that a problem for SSDs? Well… they don’t tend to do so well with higher capacities. And they’re expensive — quite unreasonably so when it comes to the higher capacities. In fact, had I been looking at a 500GB (or bigger) SSD, I’d have been back in the “that costs more than a new machine” zone.
So a few months ago I ran across this nifty idea. Some manufacturers had begun to produce “SSD Caddies” that take the place of an optical (DVD or CD-ROM) drive in a laptop. The idea is that you yank the DVD drive that came with your laptop and drop an SSD into one of these caddies and stick it in your machine instead.
Hmmmmm…. but IÂ use that DVD drive, don’t I?
I decided to find out. When I’d gone more than 30 days without even opening it, I realized that the idea that I needed one was actually legitimately outdated.
So I waited for the right moment… in my case, it was an afternoon of waiting, waiting, waiting for some file to open while something else was running and my physical memory usage was up over 90% and 10 minutes of staring at the dumb blue blinking LED Â that represents hard drive activity had passed without the light ever flickering (because it was on solid from activity)… annnnnnnnd, I’d had enough.
I took the plunge, ordered the parts, and began the long, drawn-out process of waiting 2 business days for shipping. (Sad, I know.)
What Do You Need?
Well first, you’ll need an SSD caddy that matches your machine. At first, I searched for one that was clearly advertised as made for my particular laptop (using the manufacturer name and model number of my laptop). That seemed like a good idea. Price? Around $45 from some unknown online vendor.
Hmmmm…. I wonder…. is this laptop really all that unique?
So, I did some more digging around and found SilverStone Technology. They seem to make a handful of these unusual gadgets, and in my research, the TS09 model seemed like a good fit for my laptop (even though no specific laptops were mentioned).
To make sure it would work, I located the proper method for removing my ODD (optical disk drive), just to do some quick measurements.
Gateway NV57H44u
For my Gateway NV57H44u, the optical drive (DVD writer, in this case) is held in place by a single screw which is located to the right of the Windows 7 COA label and Gateway info sticker.
I few twists with a screwdriver (while the machine was turned off, power supply disconnected and battery removed, of course), and the optical drive came free. I tugged on it to get it out, and checked it with a ruler. It was, in fact, a 12.7mm height drive. This is something of a “standard” size, although you’ll want to confirm with your manufacturer regarding the specs for your device (or just measure like I did).
Optical Drive: Slimline SATA connector
The next thing I wanted to verify was that the optical drive that shipped with my laptop was using a typical “slimline” SATA connector (shown in photo). This is how the device gets power and how it communicates with your system. It was, so the TS09 looked like it might be the right fit. At less than half the price ($20 from Amazon) of the other caddy I’d looked at, this was feeling more and more like the right way to go.
The next big question:Â which SSD to get?
Well, this is where I’d done my homework. After lots of research, I had decided on the Samsung 840 series. The problem you may run into is that there are at least 3 different types of drives bearing that moniker: the 840, the 840 EVO, and the 840 PRO.
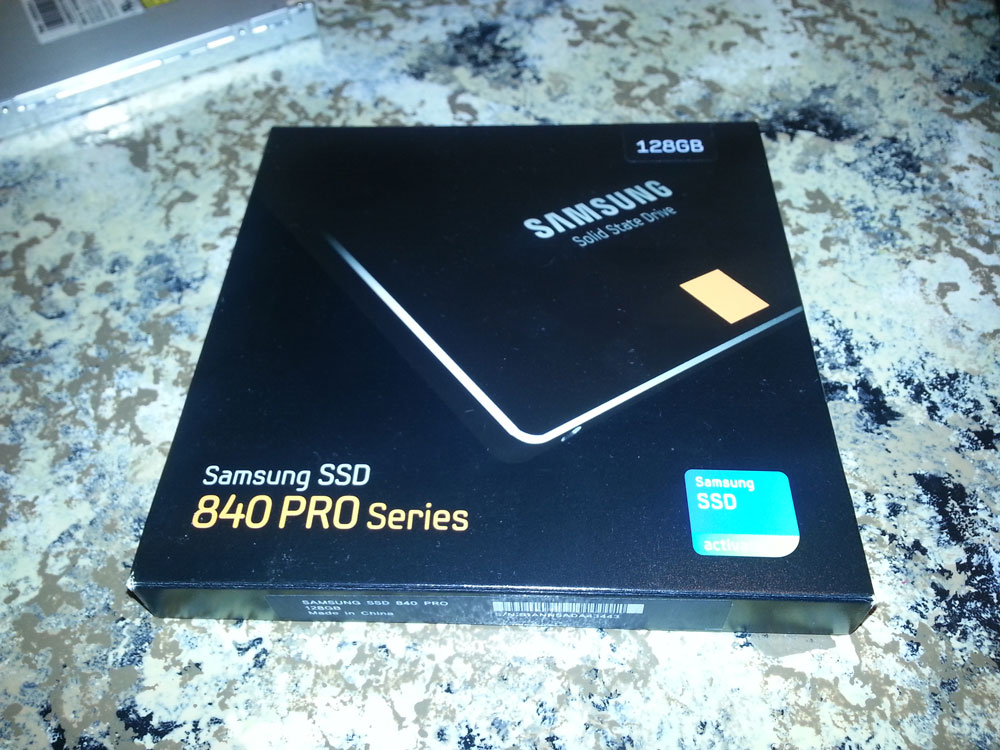
Samsung 840 PRO Series 128GB SSD
These drives are significantly different. Sure, they all look nearly identical, and they all have “840” in the name. Frankly, they’re all fairly reputable as well.
The next decision I had to make was about capacity… which, frankly, is all about how much you want to spend. I’d already decided that since my SSD was a new, second hard drive (and I was keeping my original 500GB drive for storage), I could live with having only 128GB on it. This is plenty for me to install Windows 7 and a few core applications that I need to run speedily (Google Chrome, the Adobe Creative Suite apps like Photoshop, InDesign, Illustrator, etc.) and Microsoft Office. All my data would stay on the traditional hard drive that shipped with my laptop.
Now… you can find 128GB SSDs for less. I’m guessing that even the 840 EVO (120GB) or standard 840 would be decent choices. I was willing to spend a little more for the PRO because I just don’t like to gamble with hard drives. Any of them can (and do) fail, so there are certainly no guarantees, but I prefer to give myself the best chances right out of the gate. Also, the PRO model’s additional speed was important to me, since speed was the whole reason to take this project on to begin with.
So you need an SSD and a caddy. That’s it!
Well… at least that’s it for hardware.
Unboxing the 840 PRO was a breeze. It dropped into the TS09 caddy, no problem. The trickiest part was deciding which of the screws to use to cinch it down to the caddy, which shipped with a couple of different sets for you to use. You can’t goof this part up, though, since the screws either fit or they don’t.
Once the drive was secured to the caddy, it only remained to insert the caddy into the laptop. One detail that could easily be missed is that the retaining screw (remember the screw that I removed earlier to loosen the optical drive?) has to screw into something. On my optical drive, there was a small metal bracket which received the screw and held it in place. I removed that bracket from the optical drive (it’s obviously a separate piece) and attached it to the same spot on the caddy, which had a hole in just the right place for it.
Once inserted, I fired up the laptop to make sure that everything was working. I saw a very satisfying green and blue color emanating from the new SSD’s LEDs, which shone through the well-placed hole in the caddy.
OK, Everything’s Installed… Now What?
Well… this is where you have some options about how to proceed.
To get the maximum benefit out of your SSD, you’re going to want it to be your primary drive… meaning the one that Windows (or your O/S of choice) is installed on.
There are two major ways to make this happen: migration or clean install.
If you choose to migrate, you’ll essentially be moving your current Windows installation from your existing hard drive over to your SSD. There are a few advantages to this:
It’s easier (in theory, at least)… the 840 PRO series ships with migration software designed to make this happen for you. (Ironically, it ships on a CD. So, if you’re adding the SSD to your system instead of replacing your primary hard drive with it, you’ll need to plug your optical drive back in to use it.)
You keep your current Windows setup completely intact. This means you don’t need to re-install any software, locate drivers, find product keys, installation files, etc. You’ll also keep your all-too familiar configuration… simple things like desktop backgrounds, sound “themes” and even locations of files will (most likely) all stay exactly the same as before.
You may find that you’re up and running faster. Once you complete the migration, you reboot, and you’re in business. No need to install every Windows update since the beginning of time… and so on.
On the down side, migration:
keeps all the crud that’s built up over time in your Windows installation. Software that you install and subsequently uninstall leaves traces behind… clogging up your Windows registry and ultimately slowing things down. Admittedly, I’m a power user, so I’m more prone to this sort of thing, but it’s worth a consideration. If you have only installed a few pieces of software, this is a non-issue. But if you’re like me and you’ve forgotten about more software than you remember, then those small effects can really add up.
may not work! If you’re moving from a 500GB hard drive (that’s nearly full) to a 128GB hard drive, you can do the math. The important things that need to be moved are the boot partition and your O/S itself. However, if you had only one partition on your hard drive—which is how virtually every laptop ships from the manufacturer—and not separate partitions for your O/S and your data, then you’re going to have problems. The migration process may not adequately handle all the details that need to be handled, leaving you with a mess. On the other hand, if you are moving to an SSD with equivalent (or greater) capacity (or if you have a boot partition that’s equivalent or smaller than your new SSD), then you won’t have this consideration to worry about.
Besides migration, your other option is to perform a clean install of Windows. This means that you’ll be starting fresh… possibly even enjoying that OOBE (“out of box experience”) like you did on day 1 with your PC all over again.
Some of the advantages to a clean install are:
You’ll have a clean slate. Only software that you choose to install will be installed. Often, this single factor alone can produce enough of a speed boost that people will do it even without moving to a faster hard drive.
You can map out your new configuration as you see fit. Where will your “My Documents” folder be located? (i.e. Which drive will it live on?) Which programs do you want installed on the SSD (because you particularly need them to run faster) and which ones can stay on your legacy hard drive?
Keeping your SSD clutter-free. I personally don’t want to store data and other static files unnecessarily on the SSD. It’s intended to be lean, fast, and unencumbered. My older hard drive can shoulder the load for storage and so forth.
Disadvantages to a clean install include:
It can be a pain to do. Ever tried installing Windows 7 to a laptop without a Windows 7 installation CD/DVD? Even more fun… without a place to put the CD/DVD (since you yanked your DVD drive out to make room for your SSD)! A little extra effort (and perhaps some downright creativity) is required to pull this off.
You may be out of commission longer. Nothing will be installed on your laptop until you install it. This means you’ll start with the essentials (Windows, Chrome, and your most-used software), and then you may find yourself discovering another missing item weeks afterward.
Once you’re up and running, additional energy may be required to get everything back to where you like it.
For me, the decision between a migration and a clean install was a complete no-brainer: hands-down, I wanted a clean install. I was looking to squeeze every possible ounce of benefit (read: speed) out of this project. There’s no better way to pull that off than to start fresh with Windows. Being the extremist that I am (at times), I wanted to even be sure I avoided any of the bloatware that Gateway originally installed on my machine. So… I chose to not even bother trying to use the “recovery” partition. Instead, I went on the hunt for an official Microsoft image of Windows 7 to install.
Being a geek, I’ve performed many a clean install of Windows. Even so, it had been a while… so, I made a couple of blunders that cost me a little bit of time. Here are some notes so you can perhaps avoid running into any problems yourself.
Prepare your Windows installer ahead of time. Before you take the big plunge and render your existing setup inoperable, do yourself a favor and get everything ready. It’s a long story, but I ended up needing to use another computer to do this. Chances are, you don’t have a Windows CD or DVD to install from, since most manufacturers quit distributing them long ago. So, you’ll have to work around this dilemma, which means you’re going to need a 4GB or larger USB flash drive, and you’ll also need to…
Understand which version of Windows you have. If you bought your PC at retail, then you have the “OEM” version of Windows. That product key on the colorful COA sticker on the bottom of your laptop won’t work if you try to install the “retail” version of Windows. You also need to know if you’re using the 32-bit or 64-bit version. Once you figure out which one you have (mine worked out to be “Windows 7 64-bit Home Premium OEM”), you’ll need to download an .ISO file (DVD image) for that version. There are lots of places to look for these… some of them legitimate (read: legal) and some of them less so. To save time and energy, I located a version that included SP1 (“Service Pack 1”), which had a huge batch of the earliest Windows 7 updates rolled up into it already.
Create a bootable USB drive with your Windows installer on it. Once you’ve located and downloaded an appropriate .ISO file, you can use Microsoft’s official Windows 7 USB/DVD download tool (more info about this here) to push the Windows 7 installer to your USB flash drive. (Note: I had a little trouble with this tool… in fact, it never did completely finish without an error. But I finally realized that if the tool made it to 98% before the error occurred, then chances are it actually had finished. This turned out to be true.)
Before you get started installing, download all the drivers for your machine. Hit your laptop manufacturer’s website and locate the downloads for your model number. You’re going to need (at least): the chipset driver, video driver, audio driver, and network drivers for both LAN and wireless. You may also need to get drivers for your touchpad, webcam, card reader, bluetooth device and maybe some other peripherals in your system. That last batch can be downloaded from your new, fresh Windows install if necessary. But you’ll want the first batch in a folder on your USB stick so they’ll be handy when Windows comes up for the first time.
Block off some time and be ready to reboot quite a few times. The actual Windows 7 installation went pretty quickly for me… maybe even under an hour. Once you have your basic driver set installed, however, Windows 7 will start pulling down updates. They number into the hundreds… and that’s when you start from SP1! Some of your drivers will even require a reboot upon installation, which is a good idea.
Get your other software installation media ready to go as well. If you need to install other programs (such as Microsoft Office apps) from a CD, it’s a good idea to get those installers onto your USB stick ahead of time also. Many, many programs can be downloaded, so if you aren’t able to locate discs, it may not be the end of the world.
Once you’ve got your tools in place, then plug that USB stick in and go!
My laptop had no problem booting from the USB flash drive, and when the Windows 7 installer came up, it was pretty clear which drive I wanted to target for the installation. Be careful to select the right drive, though, as choosing the wrong option from the installer could end up wiping your existing hard drive. I plan to keep all the data on that drive (eventually I’ll delete the Windows folder, I guess), especially at first, so I made sure that Windows 7 got installed to my brand new SSD.
Once the Windows 7 installer reaches the point where it needs to reboot, you may want to take a look at your BIOS or “Boot Order” settings. My machine’s BIOS didn’t recognize the SSD as a hard drive in the boot sequence options, which led to a moment of panic. It did, however, still show the option of booting from the CD-ROM/DVD-ROM drive, which I realized pointed to the SATA channel that the SSD was connected to. So, I set the machine up to boot from that first (once I was finished with the USB flash drive portion of the process), and it worked like a charm.
As the installation process completes and a reboot is necessary, you may see an option to select from a couple of different Windows 7 installations at boot-up. The “top” option will be your new one. In my case, I can still boot to the previous Windows 7 install (from my legacy hard drive) using the 2nd option. This is nice for when you need to locate that one setting (piece of software, etc.) you forgot about. Later, you can remove the 2nd entry if you want to eliminate this step in the boot process.
The Results
I’ve now had a couple of days to enjoy using my machine since installing the SSD and getting a clean install of Windows 7 going. Wow, what a difference! I’m certainly seeing all the speed benefits I was hoping for. All the waiting from hard drive lag is gone. Reads and writes to the drive are  pretty much invisible to me now. The machine boots up in a fraction of the time that it used to take. Some of the more hard-drive heavy software tools I use regularly (Photoshop, etc.) are faster than I’ve ever seen them on my own hardware.
An unexpected benefit that I’m seeing is a reduction in both heat and noise. The machine is quieter than ever… partly because the 2nd hard drive (meaning my legacy hard drive, which is now exclusively for storage) doesn’t have the constant read/write activity that made it noisy and caused it to get hot. In turn, with less heat in the chassis, the fan is running a lot less often. Those two combine to make this the quietest laptop I’ve ever owned.
Regarding battery life, I had expected it might suffer with the two hard drives. However, the power consumption of my SSD is virtually nil when compared to the legacy hard drive. Since the SSD is my boot drive (and my Windows drive), the reads and writes to the legacy drive are cut by 90% or more. Thus, I’m expecting to see a nice bump in battery life. I haven’t done any actual measurement of this yet, so I lack the evidence to make this claim unequivocally, but it wouldn’t surprise me if this bears out after some real testing.
In short, this is the best ~$150 I’ve ever spent upgrading a laptop. There is truly no comparison between the “after” and the “before.” I highly recommend it.
Even factoring in all the time I’ve spent… whether checking prices and doing my pre-planning or actually installing the gear and/or Windows and the accompanying joys of getting everything back up and running, this is well worth the effort. My payoff in terms of speed, responsiveness, and overall usability are beyond my wildest expectations.
In short: if you’re suffering from a slow laptop, add an SSD via a caddy and get yourself a major speed boost!
AÂ recent piece in The Economist (which included the above graphic) got me thinking about just how Google pulled off such a massive global coup in the world of desktop web browsers.
After all, the choice of what web browser to use has long been a deeply personal one.
And when I say “long,” I’m going back to when we had to decide between the original Netscape (c. 1994) and AOL’s crappy browser (lovingly referred to as “Nyetscape”). Microsoft wasn’t a serious player in this fight—although they began rolling out Internet Explorer with Windows 95—until they forced it on the world with service packs and ultimately integrated it into Windows 98 (because it was necessary, of course!).
Let’s not forget that in those days Apple was in the toilet and a workable Linux operating system for home use—even geek home use—was many years away. So, for all intents and purposes, Microsoft completely controlled the operating systems of, well, all of us. Thus, they had a bit of an advantage when it came to providing the world’s default web browser.
And that’s exactly what Internet Explorer (“IE”) became… the world’s default web browser. Despite its security flaws, vulnerabilities and overall user experience, IE’s dominance was unshaken for many, many years.
We could discuss why this was true for so long, but at the end of the day, I believe it all comes down to “friction.”
Very simply, IE came bundled with Windows. Installing a new browser meant going out of your way to a different website, selecting the right download, finding the download on your computer and running it. Then… it meant changing your habits. Instead of looking for the little blue “E,” you had to find the icon for whatever new browser you installed… and then there was the matter of default websites, bookmarks/favorites, etc. For an average user, this represented a fair amount of pain (geeks did all of this a long time ago… more on that later), and was more than most would prefer to deal with.
Along Came Google
Ultimately, it was all the “friction” that Google solved. After all, they’re a default of their own… when it comes to search. By placing a simple little button on their famously stark and simple search page, they provided many with the opportunity to experience the web with a better browser.
Now don’t get me wrong… Google had to also build a great browser. And they did. Chrome was lightweight and elegant (and still is, for the most part).
But the more important factor was that it was easy.
Google built an installer that ran right inside IE and eliminated most of the steps required that might have represented some degree of pain for the average user. In fact, I would argue that a direct correlation could be drawn between the improvements made to that installation process and the spread of Google Chrome.
Global desktop web-browser market share, courtesy The Economist
And Google continues to innovate. Borrowing a page from the Mozilla playbook, they’ve created a marketplace for developers to contribute extensions that add features and functions to their browser, and they constantly look for ways to remove friction from processes—especially when they can carve a “path of least resistance” that leads to their own door.
Their latest innovation with Chrome involves streaming content from your browser to your television via WiFi. All it requires is the Google Chromecast, a simple device that connects to the HDMI port of your television and connects to your wireless network. The device is officially priced at only $35, but when it sold out in less than 2 days, it began selling for double and nearly triple that in no time.
In short, it’s the simplest and easiest way to enjoy internet-based content on your TV. Picture yourself sitting on the couch or laying in bed… you stumble across an interesting YouTube video on your smartphone, but you don’t want to be forced to watch it on that small screen… simply press a button and “Presto!” — it’s playing on your TV instead.
And the Chromecast isn’t limited to YouTube. All sorts of content can be sent to your TV. I believe it’s truly a game-changer… and it continues the tradition of eliminating friction.
 What Does Your Choice of Browser Say About You?
As a quick sidebar, most of the geeks of the world jumped off the IE train just as soon as Firefox became a real alternative (for me, that was about 10 years ago). Firefox was much safer, and Mozilla had grown a community that fostered innovation (remember when “tabbed browsing” was new?). Overall, it was much less painful.
Other browsers began to pop up… Apple gained decent market share in the desktop and laptop space, increasing the presence of its Safari browser. More and more people realized just how bad IE really was… and somewhere along the line, your choice of web browser began to really say something about you.
At one point, someone famously published a study that suggested IE users had lower IQs than users of other browsers. The study was a complete hoax, and the originators of this delicious piece of fun managed to prank a number of reputable outlets, including the BBC, much to the delight of geeks everywhere.
Where web browsing will go in the future is anybody’s guess. For now, Chrome is the browser of choice for geeks and non-geeks alike. And we appear to be one step closer to Google’s takeover of the known world. Resistance, apparently, is futile.
Update: On September 18th, a stable release of CyanogenMod 6.0 became available. Details are here. (The post below refers to my experience with the “release candidate,” which is the predecessor to the new stable release.) I updated my phone on October 23rd to the stable release and can attest it’s faster and better than ever! I was happy with the release candidate, but I’m even happier now!
HTC Hero for Sprint: Is There Any Hope?
I absolutely love my HTC Hero. I have since day 1, which for me was November, 2009.
But I’ve hesitated to recommend it to people… primarily because of the frustrations I’ve experienced with the device. It is plagued with significant lag (delays between when you expect something to happen and when it actually happens), some of the Android functions weren’t quite ready for prime time, and its battery life left something to be desired.
Nevertheless, I’ve been so thrilled with the Android operating system as a whole that I’ve personally just looked beyond those frustrations and made the best of it.
But a couple of months ago Sprint royally ticked me off. I’ll explain in a moment.
Cupcakes, Donuts & Eclairs
It may help here to provide a little background. My Hero originally shipped with Android “Donut,” which was version 1.6 of the Android Operating System.
For clarification, “Android” is the name of the open source operating system that is developed by Google (or has been since they acquired Android, Inc. about 5 years ago). There remains some confusion over terminology since Verizon licensed the term Droidâ„¢ from Lucasfilm, LTD. Verizon produces and sells several different devices under the name Droidâ„¢ as a way to brand their family of phones that run the Android operating system.
But any manufacturer is free to develop devices using the Android operating system. And many do. The devices began to take off when Android 1.5 (AKA “Cupcake”) released in early 2009. Google’s “Market” (their version of Apple’s “App Store”) began to explode with fantastic apps and the devices became more or less ready for daily use.
HTC Sense UI
So back to my Sprint HTC Hero. The Hero shipped with “Donut” (the successor to “Cupcake”), and as I said before, I loved it from day one. An important reason for it got so much love (from me and from others) was because HTC (the device’s manufacturer) developed an array of apps, widgets and modifications to the Android operating system that they labeled the “Sense UI” (UI is geek-speak for “User Interface”). Anyone who has used the Sense UI is spoiled.
I didn’t realize how spoiled I was until I picked up a friend’s Verizon Motorola Droidâ„¢ thinking I could use it. It was substantially clunkier and actually quite unfamiliar. I was surprised by the learning curve I had (considering I had owned and used my Android device regularly for months). But most surprising to me was how blazingly fast the Droidâ„¢ was in comparison to my Hero.
It was then that I began to realize just how unhappy I was with all the lag and the other frustrations I was experiencing.
This wasn’t just a case of device envy. I was syncing my Hero to an Exchange server and a Gmail account. I was regularly unable to answer calls because the lag was so long that they would go to voicemail before my phone was ready. Text messages were difficult at times. The browser was clearly powerful (especially when compared to my previous Blackberry and Windows Mobile browsers) but so painfully slow that it was rendered almost unusable.
So… imagine my delight when Sprint and HTC announced the availability of a significant upgrade from “Donut” (Android 1.6) to “Eclair” (Android 2.1) in May. Eclair boasted faster speeds — even on the same hardware (a rare occurrence in the world of hardware/software relations), and HTC had made substantial improvements to the Sense UI.
I backed up all my data (using an app that was readily available from the Android Market) and performed the upgrade. It was painful to watch the process run so slowly, but when it was over, my phone was noticeably more responsive.
But not responsive enough.
And even more painful was knowing that Eclair’s release date was October of 2009, fully 7 months before Sprint & HTC bothered to roll out the update. And also that “Froyo” (Android 2.2) was released by Google right about the time that I was downloading the Eclair update from HTC’s servers.
The Froyo Frustration
So… I said earlier that Sprint had ticked me off. Several things happened all about the same time in the world of Sprint. In June, they announced the HTC EVO… which they widely proclaimed the nation’s first 4G phone. It boasted a bigger screen, faster processor, and a big fat price tag. And even though I’m a Sprint “Premier” customer, I was still nearly 6 months away from qualifying for their “upgrade pricing.”
Another Sprint event: a leak. Word leaked out that although the EVO would be getting an upgrade to Froyo, the Hero (and a couple of other lesser phones) would not.
Whatever the reasons for their decision, here’s how it came across to the community of HTC Hero owners: a slap in the face. Some of them had just purchased the Hero, and in fact Sprint still sells it brand new today.
My wife is eligible for a Sprint upgrade and has been for probably 18 months or so since her last contract expired. No matter how easy to use, there was no way I was going to have her purchase the HTC Hero… because I knew that to a non-techie the problems I was experiencing would be absolute showstoppers.
But given Sprint’s attitude (“We’re not going to provide the software update, just buy our new $500 phone if you want something better…”), I seriously began contemplating a switch to another carrier.
I know, I know… they all screw their customers. And frankly, I’ve had almost no trouble at all with Sprint over the years… nor with Nextel prior to Sprint’s acquisition of it. Signal is good. Billing is accurate. Customer service (on the rare occasion when I’ve required it) has exceeded my (admittedly low) expectations.
So… why would I want to switch? It just felt like the decision was made purely to dangle a real expensive carrot in front of customers like me who pay significant fees every month for service.
It also happened that around July I began to face the fact that my dependence upon Microsoft was coming to an end. I’ve owned, managed or leased space on Exchange Servers for nearly 1o years. I’ve synced with a variety of mobile devices (as I mentioned before) and I am an enormous believer in “the cloud.” In fact, when I switched from my last smartphone (a Windows mobile device) to the Hero, my 1000+ contacts and an untold number of emails (even in the 3-day sync window) were synced before I left the Sprint store.
Realizing how good the sync is on the Android platform (including Facebook and Twitter integration), and that Google isn’t going anywhere, I decided to take the plunge and test out Google Apps For Your Domain (“GAFYD”). Holy cow. I wish I’d done it sooner. The Gmail platform (private-labeled for my team) is unbelievably powerful and easy to use. The extremely low cost ($50 per user per year) is an enormous cost savings over using (and supporting) the Exchange platform, and no software (Microsoft Outlook, you know who you are) is required.
So… a number of pieces were coming into place for me. I’m seeing a long term commitment to Google’s platform — including Android.
But man… the Hero was frustratingly slow.
So… last week, I bit the bullet and “rooted” my phone.
To Root or Not to Root
No… I’m not digging around in the soil. And no… I didn’t let it get acquainted with nature in an attempt to get an insurance upgrade (ever known anyone who’s tried that trick?)…
I did, however, void my warranty. At least temporarily.
The Android platform is closely related to Unix. On a Unix system, the “Administrator” (to use Microsoft’s terminology) is called the “Root” user. This user has “root” (the highest level of) access to the operating system.
For reasons that I’m sure are relatively obvious, Sprint (and every other carrier) does not provide “root” access to the operating systems on its devices. Instead, it locks down most configuration options and system areas so that the end user can’t screw things up too badly (and so that rogue apps don’t have the ability to behave too badly). Apple does the same thing with its devices.
Of course, there’s a vibrant community of hackers who will teach you how to gain root access to your Android device… and even provide software tools to avoid the most complicated, error-prone steps.
Why would you want root access? Well… for a long list of reasons, most of which involve gaining a higher level of control over the device. Want to overclock your processor? You need root access. Want to reconfigure your LED? You need root access. Want to do just about anything aside from installing the sanitized apps from the market? You need root access.
Want to install Froyo (Android 2.2)? You need root access.
Wait a minute… you can install Froyo? The same Froyo that boasts 3x-10x speed improvements (yes… on the same hardware) over Eclair? The same Froyo that allows for tethering (providing internet access via a USB cable from your phone to your laptop when not in range of wifi service… a feature blocked by Sprint in Eclair) and hotspot (turning your phone into a wifi hotspot so your laptop and other devices can utilize its internet connection… something Sprint charges an extra monthly fee for on the EVO even though it’s a built-in feature) and significantly-improved multiple Google account support?
Well… officially, no. You can’t have Froyo. You’re stuck with a slow Hero.
But unofficially… once you make the decision to take a few liberties with your device… you can do all of the above.
And let me tell you… the difference is nothing short of amazing.
On Saturday, I decided to take the plunge: root the phone and install Froyo. Of course, there’s no chance of just going to Google’s Android site and finding a download for Android 2.2 that’s going to actually work on your phone. But thanks to the community of developers/hackers I mentioned earlier, there are ready-made distributions available that are tailored to your carrier, device and desired configuration.
Let me be clear: this process is not for the faint of heart. There are portions that are highly technical in nature, and it’s best if you don’t expect someone to hold your hand. The community has produced a dizzying array of blogs, wikis and most importantly: forums, where answers can be found for all manner of technical questions.
I’m personally writing this post to inform some of the non-techies in the world that there are ways to get yourself a much better experience with your HTC Hero on Sprint (or just about any other Android device, for that matter). But I’m unable to provide technical expertise or guidance on this aside from sharing a few details that worked for me and pointing you toward the true masters of this game… the ones who have devoted untold hours to writing code, testing and supporting their work.
To these individuals — the ones who dared to say to Sprint, “Take that!” — I am truly grateful. I have today what amounts to a brand new phone. Yes, the hardware is no different. But how it performs… there’s absolutely no comparison.
So… let me provide a brief summary of the steps I took to get this amazing result.
The Process… Summarized
First and foremost, as with any operation that has the potential to affect valuable data, perform a backup. I highly recommend a phenomenal paid app from the Android Market called MyBackup Pro. Open the Market from your device, fork over a mere $4.99, and you can backup everything from your emails, contacts and calendar all the way to applications and even the layout of your homescreen. It will save to your device’s SD card and, if you choose, upload a backup to the developers’ servers where it can be retrieved later from the same device or from a replacement (if you’re switching hardware).
For me, my emails, contacts and calendar were all synced to Google accounts, so there was no need to actually store that data. But my call log, SMS (texts) and MMS (multimedia messages) and apps were valuable to me. I guess some people don’t see a need to hang on to those, but I like being able to refer back to things in the future. So I backed ’em up.
After you’re satisfied that you have a backup and can restore your phone to its current state if necessary (either because things go badly or because you need warranty service from Sprint because of hardware issues), then you can get under the hood and really start tinkering.
The short version is this:
Gain root access to your device
Download and install a recovery image (provides a boot platform as well as backup and other valuable tools)
Perform another backup using Nandroid (part of the recovery image)
Download and install a ROM that contains the distribution of Android and the configuration you’re looking for)
Install the ROM
Install the Google Apps (Market, Gmail, Maps, etc…) so that you can use the basic functions you’re expecting from Android
Install/configure Launcher software (if you choose — as I did — to go with something different than what came with the ROM you installed)
Selectively restore data from your backup (the one you performed prior to step 1). For me, this meant: call logs, SMS/MMS messages, and apps.
Locate some new apps (as desired) to replace the stuff from HTC’s Sense UI that you might miss.
Experience blazing speeds, better battery life, and overall… a fantastic phone!
I’ll provide a little more detail for you below. But here’s my caveat: this stuff changes… sometimes daily. Whatever I post here will be outdated by the time I hit publish, not to mention by the time you read it.
So… I’m going to point you in the direction of the valuable resources I have found. There are a few major players worth highlighting, but there are countless other players who may not be as visible or noticeable who have also played an enormous role in making this level of customization to your device possible. These are the real heroes, in my opinion. Obviously, Google and the original Android team deserve some major props as well.
The developers who have gone the “last mile” to us end users can be found in the forums at XDA-developers.com. This is where you’ll find heroes like Darchstar — who created the final actual ROM I’m currently using and would highly recommend — and theimpaler747, who is one of many who deserve recognition for their tireless support answering questions from people like me who are trying to wrap our heads around what it takes to get the job done.
So, by topic, here are some important links you’ll need in order to undertake the process. (Note: these links apply — in most cases exclusively — to the HTC Hero on Sprint and may be out of date — see my red ink above. If you need stuff for a different device or a different carrier, then search the forums for your specific situation. Chances are, you’ll find great results.)
Learn about (and download tools to gain) root access to your device here.
Download the ROM Manager from the Android Market (using the Market app on your phone). It will only work after you have root access. Give it “Superuser” permissions and it will install the appropriate recovery image and the other tools (such as Nandroid for backups) to your device.
Reboot to the recovery image and run a Nandroid backup to your SD card. This is a much more comprehensive, system-level backup of your entire device.
Wipe your device. In hacker parlance, this means perform a “factory reset.” This is required in order to effectively install the ROM you’ll need. Alternatively, you can download the desired ROM and install it via the ROM Manager, which will prompt you for the wipe (which you should have it perform in this case).
Here’s where to find Darchstar’s Froyo ROM RC1 for the Sprint Hero. (“Release Candidate 1” means it’s stable enough for you to use, but isn’t officially considered a full release yet as they’re still tinkering). Darchstar built upon the fantastic work of the CyanogenMod community in bringing us Froyo. This particular distribution bears the date of August 15, 2010. I’m sure I’ll be flashing (installing) a newer ROM when it becomes available — either RC2 or a formal release. There are also “nightlies” (nightly builds) available that may have newer features but may also be less stable. I’m not using the nightlies because my phone is something I absolutely depend upon on a daily basis and I can’t afford the luxury of testing at the bleeding edge for now.
Darchstar also maintains a link to the latest version of the Google Apps distribution you’ll need. It’s posted on the same forum topic as his distribution. Grab it. You’ll want it. You “flash” this ZIP file right on top of the ROM (don’t perform a wipe this time) that you just installed. I used ROM Manager to do it, which Darchstar was kind enough to include in his Froyo distribution.
Test, tinker and tweak.
I dug through the forums and decided to purchase the Launcher Pro App from the Android Market (after I synced my Google account, naturally). This brought some of the features of the Homescreen back that I would’ve missed from HTC’s Sense. I also gained some fantastic new features in the process (e.g. more rows for icons, a nifty all-new App Drawer, and some more fun stuff.)
I also decided to download the Dialer One app to regain some of the experience inside the actual phone functions that I liked from HTC Sense. It looks different, but performs very well. You can also turn it off and switch back to the standard Android dialer if it isn’t what you like.
For text messaging, I went with chompSMS. This was something I’d already switched to prior to rooting and upgrading to Froyo. It has a fantastic UI… including popups that appear when you receive an incoming text so you can answer (or not) without interrupting what you were doing. The threaded conversations are fantastic and visually appealing as well.
One of the most noticeable elements of HTC’s Sense UI is the big digital clock with the animated weather icons that typically adorned the Homescreen of most users. While Launcher Pro comes with some options, I ultimately decided to get the Beautiful Widgets app (and pay for the upgrade) from the Market. It has some obvious visual differences, but there are replacement widgets that look as good as (and are frankly more configurable than) the ones that come with Sense.
There are lots more tweaks available. And a few lingering issues are minor annoyances as well. The whole experience has opened my eyes to just how powerful the Android platform really is. At this point, I’m not sure I could ever be talked into buying an iPhone. Apple’s reputation for closing itself off to proprietary platforms is legendary… and ultimately not in the best interests of users. There are certainly those who think Google could be evil… and I’m mindful of the possibility that they could turn that direction somewhere along the line. But their commitment to open source development is clear. And there’s a clear path for getting your data off of their platforms at any point in time if you decide you want to switch.
As for the annoyances, there’s a lag that remains when you bring the phone back from sleep. Some users have overclocked their phone’s processors using “uncapped kernels” (another piece of software you can optionally flash on top of Darchstar’s Froyo ROM if you’re extra brave) and claim to have gotten rid of this. Frankly, I’m aware of it (it’s longer than the lag I had previously with Eclair/Sense), but it’s not a big deal. The blinding speed I get with every other function on the phone far outweighs any complaint I might raise about this lag. But the forums are filled with questions about it (typically the same question over and over), so some people are more annoyed by it than I am. Â Occasionally, I uncover some other “missing feature” that I realize was part of Sense. But there are replacements for almost all of these. There’s a bug that occurs when you try to open the camera from inside the gallery (something I did regularly before) that causes the phone to hang. The fix is nifty: you get to pull the battery from your phone in order to reboot it. Not cool, but as with the other issue: it’s something I’m aware of and in this case, I can avoid it!
All in all, I’m so thrilled with my experience that I wish I’d done it a lot sooner. Of course, every day that goes by produces better and better code from the crew that’s working on it. So… perhaps the timing of my switch was good.
Either way, if you own a Sprint HTC Hero, I highly recommend that you root your phone and upgrade it to Froyo. You won’t regret it… and if for some reason you do, you can go back to the configuration you have today (if you really want to) by using the ROM that Sprint/HTC made available when they rolled out Eclair back in May.
This may be the longest post I’ve ever written here. But… what can I say… I’m thrilled with my Hero! And I’m running Froyo on it.
Incidentally, there’s a fantastic thread now running on XDA-developers.com that was started by the aforementioned theimpaler747 for users of any of the CyanogenMod ROMs for the Hero (this includes the one I’m using from Darchstar). In addition to the thread containing Darchstar’s ROM download, this one is highly useful.
I hope this post helps you make the decision to move forward with upgrading your Hero. It’s worth every minute of effort you spend learning your way around and going down the road, as complex as it may be!
And now for something completely different: In a bizarre move, Microsoft does something brilliant.
At first I thought,
“Well… they grabbed a 4-letter domain name that’s easy to remember… they couldn’t possibly have intended to connect it to the Monty Python sketch…”
That was when I first started seeing the bing.com commercials about the tangential search results. The commercials are humorous, although for me they purport to solve a problem I don’t have.
But now… they started using the funny little high-pitched male voice saying, “Bing!”
And really… what Python fan in the world could forget this moment from The Meaning of Life?
Until Apple managed to emerge from the 1990s somehow still in business, I had always thought of Microsoft as a corporation that was brilliant in its marketing. In retrospect, my admiration was actually aimed at what I would now classify as business strategy. Apple is without question a brilliant marketing machine, and to say they’ve successfully trumped Microsoft in that department is like saying that Alexander the Great had some military victories.
But I must admit… the “Bing!” thing is a brilliant marketing move on many levels.
Whether the “new” search engine actually offers any unique value remains to be seen.